Fall Veggie Picks (Cauliflower) by Patty Leander

Cauliflower’s prima donna reputation is slightly overrated. Yes, it does need consistent moisture and fertile soil, it is susceptible to freezing weather and is stressed by heat but hey, we all have our comfort zones. If you plant the right variety at the right time under the right conditions it will reward you with a large, edible head with a sweet flavor that barely hints of its relation to other members of the cabbage family. White cauliflower is what most gardeners and cooks are familiar with but several varieties produce lovely heads of purple, green and orange.

A colorful cauliflower harvest includes ‘Cheddar’, ‘Snow Crown’, Graffiti’, ‘Green Harmony’ and ‘Veronica’.  Photo by Bruce Leander

A colorful cauliflower harvest includes ‘Cheddar’, ‘Snow Crown’, Graffiti’, ‘Green Harmony’ and ‘Veronica’. Photo by Bruce Leander

So how do you keep cauliflower happily growing in your garden?  Start with quality, 4-6 week old transplants. Set them in the garden 10-12 weeks before the first freeze in your area and stick with quality hybrid varieties.  Here in Texas cauliflower performs better in the fall, when it matures as the weather cools off. Be sure to mulch plants well to help moderate moisture and soil temperature.

If you don’t meet cauliflower’s demands you may end up with an ugly, discolored and distorted head.  Photo by Bruce Leander

If you don’t meet cauliflower’s demands you may end up with an ugly, discolored and distorted head. Photo by Bruce Leander

You can easily grow your own cauliflower transplants from seed.  However, it is a little late for that this year.  If you want to grow your own transplants you need to start your plants 16 to 18 weeks before the first freeze.   If you have to buy transplants, look for strong, healthy transplants at the nursery, but resist the temptation to purchase cauliflower that has already formed a miniature bud.  You may think that tiny bud is a head start, but in reality it means that the plant is probably stunted and its growth will never catch up enough to support the formation of that large head of cauliflower that you are anticipating.

Look for healthy transplants; these stunted transplants will never reach their potential.  Photo by Bruce Leander

Look for healthy transplants; these stunted transplants will never reach their potential. Photo by Bruce Leander

Like broccoli, cauliflower grows best in loose, fertile soil with a pH of 6.0 to 7.5 and responds well to regular applications of soluble fertilizer. Slow, steady growth is essential. Development will be stunted if plants are stressed by lack of water, lack of fertility, too much heat or too much cold and the end result will be puny, unimpressive heads. Plants can handle a light frost but be sure to protect them if temperatures are expected to fall below 28°F.

White cauliflower should be blanched to prevent discoloration by the sun. Use a clothespin, rubber band or twine to tie leaves around newly formed heads.  Photo by Bruce Leander

White cauliflower should be blanched to prevent discoloration by the sun. Use a clothespin, rubber band or twine to tie leaves around newly formed heads. Photo by Bruce Leander

White varieties will need to be blanched to maintain their pure white color and mild flavor. This is simple to do: when the head starts to form wrap the inner leaves around it to keep the sun from discoloring it.  Secure the leaves with twine, a rubber band or clothespins. Colored varieties do not require blanching but they are best served raw or roasted; if cooked in water they tend to lose their color.

‘Snow Crown’ is a dependable, vigorous and quick-maturing hybrid.  Photo by Bruce Leander

‘Snow Crown’ is a dependable, vigorous and quick-maturing hybrid. Photo by Bruce Leander

The following varieties are recommended for Texas gardens (number in parentheses indicates days to harvest from setting transplants in the garden):

‘Snowball Y’ (70-80 days): an open-pollinated variety that produces flavorful, 6” heads; not as early as most white hybrids

‘Snow Crown’ (50-60 days): a popular All-America Selections winner that grows well in all regions of Texas; early-maturing plants produce large, uniform heads

‘Graffiti’ (80 days): striking purple heads are worth the extra time in the garden; color fades when cooked in water so best served raw, roasted or lightly steamed

‘Vitaverde’ (76 days): this hybrid  “broccoflower” possesses characteristics of both broccoli and cauliflower; suitable for fresh-eating, roasting and stir-fries

‘Cheddar’ (58-68 days): mild-flavored, orange heads contain high levels of beta-carotene

‘Veronica’ (78 days) and ‘Tipoff’ (72 days): these lime-green Romanesco-type cauliflowers of Italian origin produce unusual spiral-shaped heads

 ‘Veronica’ is a romanesco variety that produces conical whorls of mild-tasting florets.  Photo by Bruce Leander

‘Veronica’ is a romanesco variety that produces conical whorls of mild-tasting florets. Photo by Bruce Leander


Fall Veggie Picks (Broccoli) by Patty Leander

Broccoli comes with its own bonus: sides shoots form on the plant after the main head is harvested

Broccoli comes with its own bonus: sides shoots form on the plant after the main head is harvested

Broccoli belongs to a big, health-promoting family of vegetables known as the brassicas; sometimes referred to as cole crops.  From arugula to turnips, this nutrient and phytochemical packed group includes Brussels sprouts, cabbage, cauliflower, collards, kale, mustard, radish and numerous Asian vegetables. Broccoli ranks near the top as one of America’s all-time favorite garden vegetables and for good reason. If given a good start and proper care it is easy to grow, and all parts of the plant – crunchy stalks, hearty leaves and deliciously tender flower buds – are edible. And broccoli offers a bonus of multiple side shoots that are produced after the main head is harvested.

Home-grown broccoli transplants ready to be set out into the garden

Home-grown broccoli transplants ready to be set out into the garden

Like all brassicas, broccoli is a cool season plant. It grows best in a temperature range of 50°-80° and once established can tolerate temperatures into the low 30s. Broccoli should be transplanted into the garden in early fall and if time and space allow stagger your plantings over a 2-3 week period so that all those heads of broccoli are not ready to harvest at the same time. Here in Central Texas we generally start planting in early September and continue into October. Check with your local Extension office or ask experienced gardeners for appropriate planting times in your area.

It takes a big, healthy plant to grow a big delicious head of broccoli

It takes a big, healthy plant to grow a big delicious head of broccoli

In order for broccoli to develop a big head it needs to first develop strong roots and healthy leaves.  Prepare the soil by working in a layer of compost and about ½-1 cup of complete fertilizer per 10 foot row. A 15-5-10 lawn-type fertilizer (15% nitrogen, 5% phosphorus, 10% potassium) offers an adequate amount of nitrogen to support leafy growth but if you prefer to use an organic garden fertilizer double the amount since the percentage of nitrogen will likely be lower. Give plants plenty of room to grow by spacing them at least 12-18” apart. Water transplants in with a water soluble fertilizer diluted to half strength and for the first week or two use shade cloth, an old window screen or even an umbrella to help protect young transplants from the heat and sun. Broccoli will be ready to harvest in about 8 weeks but stress caused by high heat, lack of moisture or insect damage in the early stages will slow growth and cause smaller heads. Give plants a boost by sidedressing with 2-4 tablespoons of high nitrogen fertilizer when the head begins to form and again just after harvest.  Ammonium sulfate (synthetic) and blood meal (organic) are both good choices.

A little shade will give young transplants a chance to acclimate to their new environment.  BTW, did you see that A&M is ranked Number 7!!!

A little shade will give young transplants a chance to acclimate to their new environment. BTW, did you see that A&M is ranked Number 7!!!

The main pest to watch out for is the cabbage looper which can do serious damage in a few short days. Carefully check the underside of the leaves for the small, green worms and remove them or dust them with a product that contains Bt. Considered an organic control, Bt (Bacillus thuringiensis) is a naturally occurring bacterium that lives in the soil and is toxic solely to caterpillars. Be careful to spray it only where caterpillars are doing damage and repeat applications following label instructions.

 ‘Blue Wind’ broccoli grows happily in a large pot

‘Blue Wind’ broccoli grows happily in a large pot

Hybrid varieties of broccoli include ‘Arcadia’, ‘Belstar’, ‘Green Goliath’, ‘Marathon’ and ‘Packman’. Popular open-pollinated varieties include ‘De Cicco’ and ‘Calabrese’, both heirlooms that came to America with Italian immigrants in the late 1800s. Rather than forming one large head, these sprouting broccolis produce a few smaller central heads followed by several side shoots. ‘Blue Wind’ and ‘Small Miracle’ are suitable for container cultivation. Don’t confuse sprouting broccoli with broccoli raab, which may have broccoli in its name but is more closely related to turnip and shares that typical sharp, slightly bitter flavor.

Harvesting and Curing Onions (Part 2) By Patty Leander

Onions ready for harvest.  Photo by Bruce Leander

Onions ready for harvest. Photo by Bruce Leander

Onions will let you know they are finished growing when their necks soften and topple over; this is a natural occurrence and it’s a myth that they need our help doing this. Some gardeners think that knocking the tops over prematurely will encourage larger bulbs but actually it’s the tops that manufacture the sugars and energy that cause the bulbs to enlarge and when the necks are broken prematurely that process slows to a halt.  As I learned from long-time farmer’s market gardener June Russell, of Midland, Texas, “onions have the sense to lay over on their own”. 

Wait till the tops fall over before  harvesting onions.  Photo by Bruce Leander

Wait till the tops fall over before harvesting onions. Photo by Bruce Leander

Onions also bulb in response to day length and in Central Texas where I live the short day onion varieties that we plant in the winter begin bulb formation in springtime as the day length reaches 11-12 hours. In the northern half of the state gardeners grow intermediate day onions which require 12-14 hours of daylight and in colder parts of the country where onions mature during the longer days of summer gardeners grow long day onion varieties that require at least 14 hours of daylight. If you have onions that don’t bulb properly then chances are pretty good that you are growing the wrong type of onions for your region.

Onions and garlic drying on a bench in the shade.  Photo by Bruce Leander

Onions and garlic drying on a bench in the shade. Photo by Bruce Leander

My short day onions are usually ready to harvest in late May or early June. Once the necks start to fall over it’s a good idea to cut back on water for a few days and let the soil dry out before harvesting. After the soil has dried out for a few days hold onto the stem of each onion and coax them gently from the soil then spread them out in a dry, shady spot to cure for at least 5-7 days.  Go ahead and harvest any onions that send up a flower stalk – they are perfectly edible but they will not store very well so eat them first. Prepare dry onions for storage by trimming the roots and cutting off the dried leaves then drop them, one at a time, into a mesh bag or a length of nylon pantyhose. Tie a knot or a twist tie between each onion, then when you need an onion for cooking just snip off the lowest onion just below the knot, leaving the others for later. I hang my onions on a hook inside the pantry so they are always at the ready. They can also be stored in a flat box or crate in a cool, dry place with good air circulation (in other words do not store them in a closed bin or box). An alternative method that works especially well with smaller onions is to leave the tops intact and braid them together. Short day onions do not store as long as long day varieties, but if properly cured they will last about 3 months.

After drying, onions tops and roots are trimmed in preparation for storage.  Photo by Bruce Leander

After drying, onions tops and roots are trimmed in preparation for storage. Photo by Bruce Leander

The organosulfides that give onions their pungent taste and smell also have powerful cancer-fighting properties. Since heat can destroy these compounds raw onion will have the highest concentration, but eating lots of raw onions can be hard on those with sensitive digestive systems so a quick sauté is the next best thing. It will lessen the pungency of the onions while retaining most of the organosulfide compounds.

Don't through out those old panty house.  the make great storage for your onions!  Photo by Bruce Leander

Don’t throw out those old panty hose. They make great storage for your onions! Photo by Bruce Leander

It’s Tater-Plantin’ Time! by Patty Leander

Valentine’s Day is just around the corner – a time for love, roses, wine, romance…and taters!

Plant potatoes now for potato harvest in May or June.  Photo by Bruce Leander

Plant potatoes now for harvest in May or June. Photo by Bruce Leander

The traditional time for planting potatoes in Central Texas is right around Valentine’s Day or President’s Day. Gardeners in North and West Texas should wait and plant in early March and gardeners in South Texas should plant right away. Potatoes are like people – they are most comfortable and perform their best at room temperature, so in order to keep potatoes happy, we need to plant them so they can grow in our mild spring temperatures (a pretty narrow window, I know) and mature before those hot summer days arrive.

Russian Banana fingerling potatoes.  Photo by Bruce Leander

Russian Banana fingerling potatoes. Photo by Bruce Leander

Seed potatoes can be purchased at many local nurseries and feed stores, or they can be ordered through the mail (but you’d have to hurry at this point as planting time is near). My favorite mail order source for certified seed potatoes is Potato Garden (www.potatogarden.com). Avoid the temptation to use potatoes from the grocery store – they have often been treated with a sprout inhibitor and you don’t always know what variety they are. They could also carry disease organisms that could be transferred to the soil. Seed potatoes purchased from a reputable source are certified to be disease free.

Potatoes cut and ready for planting; small potatoes, like these fingerlings, can be planted whole.  Photo by Bruce Leander

Potatoes cut and ready for planting; small potatoes, like these fingerlings, can be planted whole. Photo by Bruce Leander

A few tried and true varieties for Central Texas gardeners are Red Pontiac, Red La Soda, Kennebec and Yukon Gold. But don’t be afraid to try some new varieties, just try to avoid the late-season types that take too long to mature. I have had good success with Mountain Rose and Purple Viking as well as some of the fingerlings including Austrian Crescent, Russian Banana and Red Thumb.


A row of potatoes growing in bushel baskets.  Photo by Bruce Leander

A row of potatoes growing in bushel baskets. Photo by Bruce Leander

Cut potatoes into pieces about the size of an egg, making sure each piece has one or two “eyes”.  Allow the cut pieces to cure in a warm location for 2-4 days before planting. Some gardeners dust their seed potatoes with sulfur to help prevent soil borne disease.  Remember that potatoes belong to the nightshade family, so try not to plant them where you have grown tomatoes, eggplant or peppers in the past.

Potato foliage grows very quickly.  The potatoes are ready for harvest after 3 1/2 months.  Photo by Bruce Leander

Potato foliage grows very quickly. The potatoes are ready for harvest after 3 1/2 months. Photo by Bruce Leander

Prepare your soil a week or two before planting by mixing in a layer of well-rotted compost and 1 pound of organic fertilizer per 20 feet of row. When you are ready to plant dig a trench about 4-6” deep and plant the potato pieces in moist (not wet) soil 8-12” apart. Cover them with 2-4” of soil, pressing down firmly to ensure good soil contact over and around the potato piece. You will be amazed at how fast they grow. Before you know it, they will have grown 5-6” and it will be time to “hill” the potatoes.  Do this by piling soil or mulch around the potato stems until only the top two inches of the leaves are showing.  You’ll do this again in 3-4 weeks. The ultimate goal is to have several inches of soil above the seed piece so that the tubers will develop below the soil and will not be exposed to sunlight (which causes them to turn green).

Potatoes are usually ready to harvest in June when the tops begin to turn yellow, but I start feeling around for tender new potatoes in mid-May. When the time does come for harvesting, dig the potatoes gently to prevent damage and let them air dry 1-2 hours in a warm, shady spot. Wipe the dirt off carefully and store potatoes in a cool, dark location.

Seed potatoes planted in a bushel basket.  Photo by Bruce Leander

Seed potatoes planted in a bushel basket. Photo by Bruce Leander

Growing potatoes above ground is fun to do, especially for kids. My young niece and nephew were visiting from out of state last Thanksgiving and they were delighted to harvest potatoes growing in a bushel basket in my garden. Bushel baskets are cheap and easy to work with and they last two or three seasons, but a wire cage or any open-ended container will work. Start by cutting the bottom off each basket. Plant potato pieces 2-3 inches deep in soil that has been loosened and amended with garden fertilizer (use 2-3 tablespoons for each basket). Don’t overcrowd the basket – two or three potato pieces per basket is good. As the plants grow, gradually fill the baskets with compost, mulch or straw, leaving a little bit of the leafy tops showing. When harvest time rolls around just pull the basket up and harvest the spuds from the base of the basket. This is for you, Jack and Ava – let me know how many you harvest!

The prize – several Kennebec potatoes in the base of the basket.  Photo by Bruce Leander

The prize – several Kennebec potatoes in the base of the basket. Photo by Bruce Leander

Remembering our Veterans with Poppies

Happy Election Day!  As you watch the results of tonight’s election unfold, take a minute or two to remember all of those amongst us who have worn our nation’s uniforms.  These men and women serve (or served) honorably regardless of who was in the whitehouse.  Take time to say “Thanks” to those whose sacrifice gave you the opportunity and ability to live and vote in the land of the free.  May God bless these men and women and may he continue to bless the the United States of America!

Air Intelligence Agency Logo

***This is a slighly modified re-post of an article I did in May.

I am very proud to be a veteran of the United States Air Force (Air Intelligence Agency).  The Air Force paid for my education and taught me the skills that I still use to make a living today.  It also taught me that duty, honor and country are a whole lot more than just three words.  In short, the military is largely responsible for turning me into the man I am today.

In addition to shaping my character, the Air Force let me see the world.  I literally went around the world in my ten years of service.  I saw wonderful and amazing things and I met incredible people.  But of all the things I saw, the thing I most remember and treasure is the November I spent in London.

What we call Veteran’s Day, the British call Remembrance Day.  When it comes to appreciating and celebrating their veterans, the British beat us hands down.  Veteran’s Day is huge to them because war is so personal for them.  Not only did they sacrifice their loved ones to the cause, the world wars literally destroyed their country.  Because of this, each November, the British host a series of events that elegantly and appropriately recognize the service of those that were willing to give the last full measure to the defense of freedom.
 

Crosses with poppies on “graves” in front of Westminster Abbey. Their is a grave on the lawn for every unit that served in the defense of Britian in the two world wars. Photo from http://blog.travelpod.com/travel-photo/elyssa_and_dave/europe2006/1163362140/img_3306.jpg/tpod.html

One thing that stuck with me while attending the various Remembrance Day celebrations were the poppies.  They were everywhere.  On lapels, in wreaths and on tiny crosses that were placed on “graves” outside Westminster Abbey that represented the dead from every military unit (including foreign) that served in the defense of Britain.  The poppy was adopted as a symbol of Remembrance Day for several reasons.  However, most agree that the poppy was selected primarily because of a poem written by Lt Col John McCrae.  Colonel McCrae was a Canadian doctor that wrote “In Flanders Fields” after losing his close friend and student during the Battle of the Ypres Salient in Belgian Flanders.  His poem is a poignant reminder of the pain and sacrifice that man brings on himself each and every time he takes up arms against his brother.  In case you have never seen it before, here is his beautiful work:

Growing Poppies


This poppy is very similar to those that grow in Flander’s Fields. I took this picture in front of Texas Specialty Cut Flowers big blu barn

Even though I love growing all of my plants, none of them fill me with so much emotion as do my poppies.  Each Spring they remind me of the millions of soldiers, seaman and airmen that have died in defense of their countries.  They also take me back to a magical few weeks spent in London with my British cousins.   The poppies I grow are deep red singles with black throats and bright yellow centers.  However, if red or single is not your style, I promise there is a color and style out there for you.  Poppies are like roses; they come in every color but blue.

Here is a shot of the bright red variety I grow. Thanks to Carol Ann Sayles of Boggy Creek Farms for sharing them with me

Poppies are so easy to grow.  If you don’t have any, simply order or buy seeds from your favorite source.  They are so adaptable that even if you order from a reseller on the East coast, there is very good chance they will do well for you in Texas.  However, in my opinion, the best way to get your poppies is from a local gardener.  I got the poppies featured here from Carol Ann Sayles at Boggy Creek Farms in Austin.   I also have some red doubles from my buddy Greg Grant.  Since poppies are such great reseeders, everyone that grows them always has plenty of seeds to share. 

A lovely double pink variety grown by my friend and MOH contributor Patty Leander

Since poppies reseed so freely, once you get them established you will always have them.  For best results, plant your poppy seeds in Septmeber, October or early November.  Since poppy seeds are tiny, I put them out in a broadcast manner.  Instead of trying to plant in rows I simply scatter them in the area that I want them in.  Before I scatter them, I run a rake over the area I am going to place them.  Then, once the seeds are down, I run the rake the other way.  Then I water in and wait.  If you want poppies next spring, you need to get them in the ground soon.

My poppies start to bloom in early March and they continue blooming well into April.  By mid-April the flowers have gone and the “heads” that are filled with all of those tiny little seeds are beginning to dry.  The heads that are left after the flower fades are actually what’s left of the plant’s pistil.  As the pistil dries, little holes open up around the top where the stamen were once attached.  These little holes turn each head into a little “salt shaker” that dispenses the seeds whenever the wind blows or the plant falls over.

A great shot of dry poppy head. Notice the little holes in the top that allow the plant to “shake” its seeds all over your garden

If you want to gather and save seeds, simply cut these heads as soon as the holes open.  Shake the seeds into a bag and store for later use.  I have been doing this for several years and I have now been able to spread poppies all over my property.

 While many flowers are used as symbols for something, poppies represent the things I value most; sacrifice and service.  Poppies are easy, reliable, carefree and oh so beautiful.  Plant some now and you will be rewarded with a spring time show of beautiful flowers for years to come!

All of these seeds came from this head

Edible Landscape Tour

Currently, one of the hottest trends in landscape design is called “Edible Landscapes”.  Edible landscapes seek to incorporate vegetable, herbs, berries and fruit trees into urban and suburban landscapes. 

The backyard of one of the homes on the tour. Photo by Bruce Leander

I can attest that it is pretty easy to create an attractive outdoor space using a mix of fruiting plants and ornamentals.  Each season my little potager contains lots of vegetables mixed in with daylilies, salvias, justicias and dianthus.  The structure and color that these ornamentals add make the less showy vegetables much more attractive to look at.

I strive to make my spring and fall potager as attractive as possible.  While the aesthetics are important, there are a couple of side benefits to this combination of plants that make the garden much more efficient and productive.

Pansy, viola, carrots and shallots in my 2011 fall garden

First, since this is a vegetable garden, I mulch everything fairly well.  This mulch moderates soil temperatures and reduces water lost to evaporation.  Because of this, I am able to keep a fairly large amount of plants alive on MUCH less water than would be required to keep up a lush lawn of the same size.

Increased pollination is another side benefit of mixing vegetables and ornamentals.  Since I have a wide range of flowers that bloom throughout the year, my potager is always full of bees and other pollinators.  In addition to giving me something else to watch while I am in the garden, these pollinators make sure that I get lots tomatoes, squash and cucumbers every season.

Another yard on the edible landscape tour. Photo by Bruce Leander

If you would like to learn more about edible landscapes, you can join my wife and I at the Travis County “Edible Gardens Tour” In Austin.  My friend (and fellow MOH blogger and Texas Gardener writer) Patty Leander will be giving a presentation on the healthy aspects of vegetable gardening at the Agrilife Extension Center.  If you don’t want to start your tour at the Extension office, feel free to start at any of seven houses that are on the tour.  You can get your tickets, schedule and map to the houses online.  The tour kicks off at 9:00 and there will be short presentations at each one.  This is a great opportunity to see and learn from some very good gardeners that are doing great things by combining edibles and ornamentals in their yards and gardens.  As an added bonus, some of houses on the tour also use water wise gardening practices.  With the constant threat of water restricitions, this will be a great opportunity to pick up some of the tips and tricks you need to continue growing food when the rains don’t come.

The tour costs $15 per person in advance and you can reserve your tickets on the event website (Click Here).  The tour will start at the Travis County Agrilife Extension Center located at 1600-B Smith Road in Austin.  Hope to see you there!

P.S.  If you can’t make the tour in person be sure to watch KLRU’s “Central Texas Gardener”.   Their October 13 show will feature many of the gardens and the gardeners that are featured on the tour.  Their schedule is below.

Channel Day Date Time
KLRU    SaturdaySunday

Monday

Oct. 13Oct. 14

Oct. 15

Noon & 49 a.m.

5:30 a.m.

KLRU Q (18/3) TuesdayWednesday

Friday

Oct. 16Oct. 17

Oct. 19

6:30 p.m.7:00 a.m.

9:30 a.m.

KLRN (San Antonio) Saturday Oct. 13 11 a.m.
KNCT (Killeen & Waco) Saturday  Oct. 13  1:30 p.m.
KBDI (Denver, CO) SundayTuesday Oct. 14Oct. 16 2 p.m.2:30 p.m.
KPBT Midland (Permian Basin) Monday Oct. 15  12:30 p.m.
KAMU (College Station) Saturday Oct. 13 5:00 p.m.
KRSC (Claremore, OK) SaturdayTuesday Oct. 13Oct. 16


10:30 a.m.1:30 p.m.
KTWU (Topeka, KS) multiple days & times    

also on UNCMX Raleigh-Durham and K32EO Colorado Springs


Make Room for Cool-Season Peas by Patty Leander

Plump full pods of Mr. Big Peas. Photo by Bruce Leander

A few months ago I wrote about heat-loving Southern peas (Vigna unguiculata), but now that September is here and temperatures have begun to cool off ever so slightly, it’s time to switch gears to cool-season peas (Pisum sativum): sugar snaps, snow peas and garden peas.

Peas have been in cultivation around the world for thousands of years, but the sugar snap pea that we enjoy today is American-made, thanks to a plant breeder named Calvin Lamborn of Idaho. In the 1970’s he crossed a garden pea with a snow pea, resulting in a tender pea with a crisp, sweet, edible pod. This new pea was introduced to the public in 1979, and has been a sensation ever since. ‘Sugar Snap’ was the original introduction of edible-podded peas.  It is a vining variety that can reach 5-7 feet. ‘Super Sugar Snap’ is an improved version with resistance to powdery mildew.  Both varieties mature in 62-65 days.

Cascadia Peas ready for harvest. Photo by Bruce Leander

Most peas are compact bush types that grow 24-30” tall and begin producing slightly earlier than the vining types.  A few reliable sugar snap varieties include ‘Cascadia’ (58-60 days to maturity),

‘Sugar Ann’ (52-56 days), ‘Sugar Bon’ (56 days) and ‘Sugar Sprint’ (55-58 days). If garden or shelling peas are more to your liking try the heirloom varieties ‘Wando’ (68 days) or ‘Little Marvel’ (62 days). A more recent introduction is the 2000 All-American Selection winner called ‘Mr. Big’ (58-62 days), a vining variety which grows 5-6 feet and  produces large pods filled with 8 to 10 plump green peas.  


Wando shelling peas ready for harvest. Photo by Bruce Leander

Sugar snap peas can be eaten at any stage of development; the entire pod is edible when the peas inside are small and immature. Fresh, crunchy pods can be served with dip or sliced and added to salads. Whole pods are delicious sautéed or roasted (see accompanying recipes). Peas that are allowed to fully mature can be shelled and prepared like any garden pea, by simmering in a small pot of water just until tender.

Peas can be a challenge to grow because they are particular about the weather and must be planted during a short window of opportunity. Too hot and they will wither away, too wet and they succumb to powdery mildew, too cold and they will drop their blooms and potential pods. Plant peas at least 8 weeks before your first average freeze in fall so plants have time to grow and mature before the cold weather sets in. In my Central Texas garden I usually plant peas in early September, and again a week or two later. Then I keep my fingers crossed and hope that the peas grow fast and our first frost comes late. 

Cascadia Pea blooms. Photo by Bruce Leander

The soil will still be hot at these recommended planting times, so try shading it with row cover, shade cloth, burlap or several layers of newspaper for a week or so before planting to help moderate the temperature. Planting after a rain is ideal, but if you are not so lucky be sure to irrigate a day or two before planting so the soil will be moist and ready to receive seed.

 Because peas are legumes they have a special relationship with a beneficial soil bacteria called Rhizobia. The peas allow the bacteria to live on their roots and the bacteria extract nitrogen from the air and convert it to a form the plants can use. If you are planting peas in a new garden, a container or an area of your garden that has not hosted legumes before you can encourage this relationship by inoculating the pea seed before planting to ensure that the bacteria is present in the soil. The inoculant is often available at garden centers or it can be ordered through most seed catalogs. The process is simple and involves nothing more than coating the dampened seeds with the inoculant powder before planting.


To harvest pods: hold the vine in one hand and pull pod with the other. Photo by Bruce Leander

Plant the seed 1-1½” deep and 3-4” apart. Bush-type varieties that grow 24-30” are considered self-supporting, but I find that they are easier to tend and easier to harvest if given some kind of support. They will also get better air circulation (therefore less prone to disease) if grown upright and off the ground.  Try using string or chicken wire tied between stakes or insert pruned branches next to the plants for support.  The tall, vining varieties, like ‘Super Sugar Snap’, must have sturdy support and should be planted at the base of a tall tomato cage, a fence or a trellis.  Once your peas start producing, harvest them frequently for peak quality and to encourage more production. And be sure to use two hands when harvesting or you could easily pull up an entire vine (been there, done that).

 Your home-grown peas that travel from garden to kitchen in mere minutes will look better, taste better and cost less than any fresh sugar snap pea that you can buy at a grocery store – yet another reason to grow-your-own!


Sugar Snap Peas with Mushrooms. Photo by Bruce Leander

Sugar Snap Peas with Mushrooms

Some peas, especially heirloom varieties, have strings, so be sure to snap off the end and peel the strings off before cooking.

½ lb sugar snap peas, trimmed

1 T olive oil

½ lb mushrooms, sliced

 Sauté peas in olive oil 3-5 minutes. Add mushrooms and sauté 5 minutes. Season with salt and pepper and serve.

 Roasted Sugar Snap Peas

1 lb sugar snap pea pods, trimmed

2-3 Tbsp olive oil

½ tsp salt

¼ tsp pepper

 Toss pods with olive oil and sprinkle with salt and pepper. Roast in a 475° oven for 12-15 minutes.

Sustaining My Health, My Soul and My Sanity by Patty G. Leander

Save seeds from this year’s crop or order from seed catalogs for planting next spring

There is a lot of talk these days about sustainable gardening – gardening in a way that builds soil, is gentler on the environment and makes the most efficient use of resources. But after a crazy, busy and hot summer that involved relocation moves for my daughter, my niece, my mother and my in-laws, followed by my husband’s back surgery and topped off with an emergency room visit for my father-in-law, I barely had the time or energy to work on sustaining my vegetable garden. But I was amazed – yet again – at how my garden sustains me.

‘Calico’ crowder (also known as Polecat)

Because of some unanticipated – but completely appreciated – rain in July (almost 8” in my south Austin backyard!) my garden was producing a decent supply of okra, eggplant, crowder peas, butter beans, Malabar spinach and winter squash. By August the rain tapered off and when we left for South Carolina to help with my in-laws’ move to Texas, I figured that was the end of my summer garden. I didn’t have the heart to ask a neighbor or even my daughter to go out and tend my vegetables amid the mosquitoes and the heat, and I was prepared to let it all go in anticipation of a re-start in fall.

Southern peas (left) and butter beans (right) are allowed to dry on the vine, after shelling they are ready for cooking or storage

Not surprisingly, upon my return, the okra and eggplant had withered (they were in pots and never really had a chance) and the winter squash was overcome by squash vine borer damage, but miraculously the crowder peas and the butter beans continued to yield. The pods were not as plump and numerous as production in early summer, but still they kept coming, and I kept picking. Every few days I’d have enough for a small meal, and even after I had picked the last of the green pods, there were plenty of dried pods on the vines.

A mix of ‘Jackson Wonder’ butter beans and ‘Dixie White’ butter peas

Shelling peas takes a little time but the results are well worth the effort. And cooking field peas is a cinch – they require very little preparation and as they simmer they create a rich potlikker that is nourishing and delicious. Dried peas can be stored in glass jars, plastic bags or any other airtight container and should be consumed within a year for best quality. Believe me, a meal of crowder or black-eyed peas, home-grown and dried from your own garden, dished up with a slice of hot, buttered cornbread in the middle of winter, is really a treat and will garner all kinds of compliments. Serve with a side of simmered collard greens (from your fall garden, of course) for a down home-taste of Texas terroir.

Plain and Simple Southern Peas

My dad used to say that “everything tastes better with a little pig meat” and it certainly applies to these Southern peas. He grew up in a time when families subsisted on what they produced from the land and nothing from the farm was wasted. As a result, all kinds of vegetables prepared in southern kitchens were flavored with bacon or ham hocks, which add a hearty goodness. But if you are not a fan of bacon you can sauté the onion in olive or vegetable oil or just throw all the ingredients into a pot and let them cook together until tender. They are so good they practically cook themselves.


2 slices bacon, chopped

½ cup chopped onion

2 cups dried Southern peas (crowder, black-eyed, cream, purple hull)

4 cups water

1 tablespoon white vinegar

2-3 teaspoons sugar

1-2 teaspoons salt

1-2 teaspoons pepper


Cook bacon until crisp; remove from pan and set aside.  Sauté onion in drippings. Add remaining ingredients, adding enough liquid to cover peas by one inch. Bring to a boil, cover and simmer about 2 hours, until peas are tender and liquid has deepened in color and flavor. Add more liquid and adjust seasonings if necessary. Serve with crumbled bacon, chopped onion or chow-chow, if desired. 

Yield: 4-6 servings


No Rest for the Weary-Summer Gardening Chores by Patty Leander

Well, is it hot enough for ya?  The sweet corn ain’t so sweet anymore, the spider mites have set up camp on the underside of my green beans, the squash vine borer has mutilated my zucchini and the mockingbirds keep beating me to the tomatoes. It’s a jungle out there and usually by late June or early July I’m ready to pull out these weary spring plantings and give most of the garden (and the gardener) a well deserved rest. Take advantage of the summer ‘dormant season’ to dream, plan and prepare for the upcoming fall season.  


A planting of buckwheat makes a good summer cover crop, the blooms also attracts pollinators. Photo by Bruce Leander

If you are not the type to hibernate in air-conditioned comfort for the next few months there is still plenty to do in the vegetable garden. Summer tasks might include removing spent crops, planting a cover crop of cowpeas or buckwheat or mulching fallow beds with leaves, hay, dried grass or compost. Organic matter burns up quickly in hot weather and a layer of mulch or compost will help add and/or conserve organic matter in the soil so it will be ready to receive your plants in the fall. Red Ripper or Iron & Clay cowpeas make vigorous summer cover crops – I get mine from Heavenly Seed (www.heavenlyseed.net). Johnny’s (www.johnnyseed.com) also carries Iron & Clay, buckwheat and a wide selection of green manures.


A compost bin located in the garden row makes for easy distribution later. Photo by Bruce Leander

Be sure to keep your compost pile going through the summer, and if you don’t have one why not start now? Composting has many benefits for the soil and is an excellent way to reduce, reuse and recycle waste from your garden, yard and kitchen. Most compost guides suggest placing the compost in an inconspicuous corner of your yard, but over the years my compost piles (yes, I have more than one) seem to inch closer and closer to the garden where they will eventually be used. Sometimes they inch so close that they end up IN the garden – I place a square or round compost bin, made of chicken wire or fencing material, right in an empty garden bed or in the row. Over the summer I fill it with kitchen scraps, grass clippings and garden trimmings, keeping it moist to encourage microbial activity (if it’s in full sun cover with an umbrella, tarp or shade cloth to help hold some of that moisture). Come fall I’ll loosen the bin and remove it, freeing up the contents for incorporation into the soil or for mulching crops.


The author using bricks to secure a layer of plastic for solarization. Photo by Bruce Leander

Another task that is well-suited to our hot days and warm nights is solarizing nematode infested soil with plastic.  Use clear plastic that is 2-4 ml thick and anchor it in place with bricks, U-pins or bury the edges with soil. Before putting the plastic in place, turn or till the soil, rake it smooth and water well. The moist soil covered with clear plastic will create a greenhouse effect that will elevate the soil temperature enough to kill nematodes. Leave the plastic in place for 4-6 weeks during the hottest part of the summer. It may get too hot for soil microbes under that plastic so after solarizing be sure to amend the area with 2-3 inches of compost, turn it under and you’ll be ready to plant for fall. To discourage nematodes even further, I’ll usually follow solarization with a nematode resistant crop, such as onions, garlic or corn.


The author’s cat reminds us that sunglasses, hat, sunscreen, water and cooler with cold washcloths will help keep us cool and safe while working in the Texas heat. Photo by Bruce Leander

I know you know this, but it is worth repeating: if you do work in the garden this summer, wear sunscreen, take breaks and drink plenty of fluids.  It is easy to fall victim to heat exhaustion this time of year. If you are going to spend some time working outside, try this tip – wet some wash cloths, roll them up and put them in a cooler with ice or a couple of ice packs. Then when you take a break, you’ll have a nice, cold cloth to wipe down your face and neck or drape over your head. Ahhhh, sweet relief.

TLC for Your BLTs (Big Luscious Tomatoes!) By Patty Leander

I came in from working in the garden the other day and declared to anyone that would listen that my vegetable garden was looking AWESOME, and my dear husband hardly looked up from his work as he replied, “EVERYBODY’S vegetable garden is looking awesome this spring”. True enough, the rain and mild temperatures have been just what we needed here in Central Texas to shake off the drought doldrums, but I can still revel in the beauty and bounty of my own little piece of earth. It is my sincere hope that you are experiencing the same success.  One reason our vegetable gardens are so splendid is because tomato time is finally here, and for tomato lovers, especially those who try to eat local and in season, it has been a long and mostly tomato-less winter.

Hopefully by now your tomatoes are growing strong and you may have already savored that first juicy bite of your home-grown and sun-ripened treats.  But just when tomatoes are in the home stretch it seems a plethora of plague and pestilence begin a full assault, and that is when our plants will benefit from a steady diet of attention, inspection and TLC.

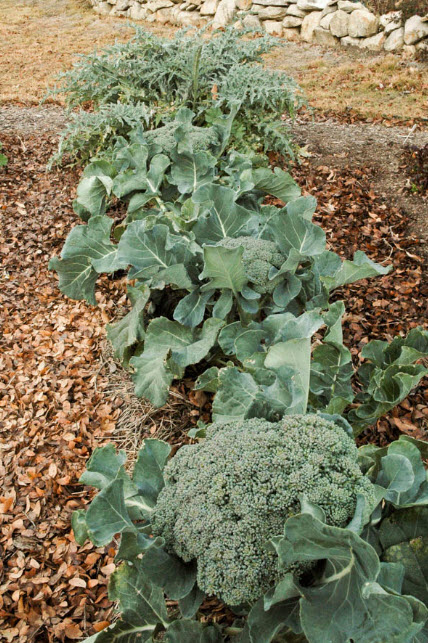
As we move toward summer make sure your plants receive at least 1½” of water each week, preferably from drip or soaker irrigation that places water at the root zone and avoids wetting the leaves. A 2-4 inch layer of mulch is essential to moderate soil temperature, to keep water from splashing soil onto the leaves (fungal spores are often lurking in the soil underneath plants), and to conserve moisture in the soil.  Dried leaves or grass, alfalfa hay, pine straw, or even partially decomposed compost are suitable mulches. Side-dress your plants with fertilizer as soon as the first fruit set, and then continue to dole out small servings of fertilizer every 4 weeks. One way to side-dress a tomato plant is to pull the mulch back and apply 2-3 tablespoons of fertilizer (feather meal, blood meal, ammonium sulfate or other packaged fertilizer) around the diameter of each tomato plant, scratch it into the soil, water lightly and then replace the mulch. Some gardeners prefer to spray their tomato foliage with a water soluble fertilizer every week (using a product like Miracle Grow or liquid fish emulsion) and that seems to work well, but remember that plants are not designed to take in nutrients from their leaves, so it’s important to also get fertilizer into the root zone. A hybrid approach may be best – side-dressing at the root zone every 4 weeks and applying a foliar spray every 7-10 days.

Tomatoes generally stop setting fruit when the daytime temperature hits 90º and nighttime temps reach the mid 70s, though cherry varieties may often produce through the heat. If your tomato plants are healthy and you can keep them that way you might be able to carry them through the summer for a fall crop. If you would rather start with fresh tomato plants for the fall garden most local nurseries will have transplants available in late summer or you can grow your own. It takes 6-8 weeks to grow a good size tomato transplant so plant those little tomato seeds in early June so you’ll have decent size transplants by late July or early August.

Inspect your tomatoes every few days for signs of insect damage or disease, and as the plants grow gently guide the stems so they stay within the cage. Eventually those stems will be laden with fruit and they will need the support that the cage provides. Below is a rundown of some of the most common problems associated with tomato cultivation:


Leaf Footed Bug. Photo By Bruce Leander

Leaf-footed Bugs: these grayish brown bugs with the flattened hind legs are a common pest of tomatoes. They have what entomologists call “piercing-sucking” mouthparts, and that is exactly what they do to tomatoes. They pierce the skin, inject an enzyme to dissolve the juices, and then suck the juice out, leaving small, hard, white spots or lesions on the surface of the tomato.

Leaf Footed nymphs and eggs. Here you can clearly see how they are laid in "a chain". Photo By Bruce Leander

Their eggs are laid in long chains along the stems or leaf midrib; after hatching the nymphs, with their orange bodies and black legs, congregate together making them easy to spot. Do not be deceived – the nymphs may not look like adult leaf-footed bugs, but they will in approximately 30 days after morphing through five instar stages.

Adult and nymph Leaf Footed Bugs on a tomato leaf. Photo By Bruce Leander

These soft-bodied orange nymphs cannot fly, they can only scatter, so this is the preferred stage to treat them with insecticide, squish them or drop them into a bucket of soapy water. Also destroy any egg cases that you find. Spinosad and insecticidal soap may be effective against the nymphs, but nothing seems to bother the adults – they just glare at you and fly away. Handpicking is the best way to get the adults, but beware – they are a type of stink bug and when you squish them it is not pleasant.


The first sign of early blight. Photo By Bruce Leander

Early Blight: Alternaria solani, a common fungal disease that attacks tomatoes, especially during rainy periods. Foliage starts to yellow at the base of the plant and then gradually moves upward. Ideally we should prevent this disease by providing adequate spacing and air circulation, mulching below the plants and avoiding overhead watering that wets the leaves.

Early Blight can decimate your tomatoes. Photo By Bruce Leander

Once the disease takes hold it can be treated with an approved fungicide; if early blight is a perennial problem it’s best to start treatment early in the season, to prevent spreading of the disease. Serenade and neem oil are organic controls and Daconil (active ingredient chlorothalonil) is a conventional fungicide that is effective in combating early blight. Using these products on an alternating schedule may give better results. Even though Daconil is not organic, it requires approximately ½ teaspoon per quart of water and the solution can be judiciously directed at foliage, not fruit.


Spider mites can cause a strippling effect on leaves. Photo By Bruce Leander

Spider Mites: a nuisance in most spring and summer gardens, this tiny pest inhabits and feeds on the underside of leaves, causing a stippled effect on the surface of the leaf. If left untreated spider mites can quickly destroy a crop. It is amazing how many teeny tiny mites can be on the back of a leaf, they are just near impossible to see without magnification. Their numbers usually increase in hot and dry conditions, but I am already seeing huge numbers of spider mites on my tomatoes even though we’ve had more rain than usual this spring and the temperatures have been mild.

Patty is blasting away her mites with the MiteyFine mister created for her by her brother. Photo By Bruce Leander

Spider mites are difficult to control, but my first line of defense is to wash the mites off using a strong spray of water directed at the underside of the leaves every 3-5 days. My favorite tool for this purpose is the Mite-Y-Fine Sprayer™ – a tool that my engineer brother built for me. It is a long-handled tool with a high pressure nozzle that allows me to wash mites off of leaves efficiently and without stooping – it’s such a useful tool I told my brother he should make more and sell them – and he is! They are made of quality materials, hand built by him, his wife and their son. I use mine almost every week during the spring and summer growing season. See www.miteyfine.com for more information.

Insecticidal soap, neem oil and wettable sulfur are labeled as miticides and can be sprayed on leaves to help control mites. Many gardeners swear by a weekly seaweed spray to keep them at bay though I prefer to use the Mite-Y-Fine because I like to eat tomatoes off the vine while standing in the garden, and I’d rather not spray them with anything.


A great shot of a serious tomato predator - the hornworm. Photo By Bruce Leander

Tomato Hornworm: prevention is the best control here. A single tomato hornworm can defoliate a tomato plant in short order if left unchecked, so it’s best to scout the plants for signs of damage (large chunks of missing leaves and moist, dark green worm poop on the soil or in the branches. These large caterpillars usually show up as an army of one, rarely do I see more than two on a plant. When there’s only one or two it’s easy to pull them off and toss them into your neighbor’s yard, or do as one lady told me – she just goes after them with a pair of scissors (ugh).


Nematodes can decimate a tomato's root system. Photo By Bruce Leander

Nematodes: if your healthy tomato plant begins to gradually decline, turning yellow, drooping, losing vigor and/or wilting without reviving by the next morning then you may have nematodes. Nematodes are microscopic worms that get into the roots and form small galls or knots in the root, blocking the uptake of water and nutrients and causing the plant to gradually decline. Once a plant has nematodes you might as well pull it up as there is no treatment and leaving it in the ground will only allow the nematodes to increase in numbers. When pulling an infected plant be careful not to fling nematode-infested soil to other parts of the garden.

Below are two of my family’s favorite recipes for utilizing the season’s tomato harvest:


Patty's salsa is made with only fresh veggies from her garden. Photo By Bruce Leander

¡salsa!
4 fresh tomatoes, chopped (peeled and seeded if desired, but I usually don’t)
2-3 jalapenos, chopped
1 onion, chopped
1-2 cloves garlic, smashed
1/4 cup cilantro
1-2  tsp salt
1/2 tsp pepper
1/2 tsp cumin
2-4 Tbsp lime juice
1/2 tsp sugar

Chop the onion, jalapenos, garlic and one tomato in a blender or food processor. Then add the seasonings and the remaining tomatoes, and blend till it seems right. This is personal taste. You can leave it chunky but I usually blend out most of the chunks. Then I taste and usually end up adding more tomatoes, lime juice and sometimes another jalapeno. I let it sit a bit and then go back and taste and adjust seasonings if necessary. It gets a little redder and a little spicier as it sits.

** You do not have to use a blender/food processor. If you prefer, finely chop the first five ingredients by hand, then stir in the seasonings and adjust to your taste.

Roasted Tomatoes

Roasted tomatos - Yum! Photo By Bruce Leander

Roasting tomatoes brings out an amazing, concentrated flavor – they can be used in sauces, pasta, sandwiches or simply as a savory snack. They don’t last long around my house, but they can be stored in the refrigerator for 2-3 weeks or frozen for up to three months without compromising the flavor. ‘Juliet’ tomatoes and small roma varieties are perfect for this recipe.

Wash, dry and slice tomatoes in half vertically. Remove seeds and juice (don’t worry about removing every single seed, you just want to scoop out most of the wet pulp). Arrange on a foil-lined pan, cut side up. Drizzle with olive oil and sprinkle with salt and pepper. Roast in a 325º oven for 1½ -2 hours. Watch carefully to be sure they don’t burn and adjust temperature or time, depending on size of tomatoes.