Tip of the Week – Week 20 in the Zone 9 Garden

When it rains it pours!  In addition to almost nonstop rain, bad luck has been falling down on me in waves!  Last week my transmission went out, a snake ate my two baby chicks, my son’s dog passed away and two of our daughters barely dodged tornadoes!  Things have to get better!  Hopefully there is some sunshine right around the corner that will lift the clouds that seem to have settled over the gardens and gardeners of this part of Texas!

chicken-snake

I am not normally a snake killer. however, this guy or gal ate my two baby barred rock chicks. I am afraid this is the beginning of a series of snake problems in the coop!

Vegetables

As Patty’s latest article reminds us (Stewart’s Zeebest Okra), now is a great time to plant okra.  Zeebest is Patty’s favorite because it was developed by her friends and garden mentors.  While not an “heirloom” yet it soon will be.  When you are planning your garden this fall why not include some heirlooms in your seed picks.  Many of these heirlooms taste better and produce better than the hybrids that are sold in the big boxes and garden centers.  Each heirloom has a story.  Someone bred it, or saved it and has grown it for years – each one has a story.  One of my favorite heirlooms is a shallot called “Gumbo Onions”.  A family from Louisiana has been growing these tasty and productive green onions for over 100 years.  It makes me feel really good to know that I am doing my part to keep this plant, which is not available in the trade, going for future generations.

Here are the artichokes I mentioned in last week's post.  Very excited about our first harvest.  Photo by Sally White.

Here are the artichokes I mentioned in last week’s post. Very excited about our first harvest. Photo by Sally White.

Ornamentals

My yard is beautiful right now.  Everything is blooming, the grass is green and there is fruit on the trees!  With all of this rain, mowing and weeding will be the things that keep me outside once the rain stops.  Before you weed I really suggest you go and pick up some mulch.  Mulch will greatly reduce the number of weeds that sprout. Weeding is not my favorite garden chore so anything that reduces weeds is a no brainer for me.

All of this rain has my yard and vegetable garden looking good.  Here you can see my heirloom elephant garlic in full bloom.

All of this rain has my yard and vegetable garden looking good. Here you can see my heirloom elephant garlic in full bloom.

Yards

With all of this rain and low temperatures, brown patch is going to become a problem in your St. Augustine.  Unless it is really bad it will correct itself once things dry out.  Help it out a little by laying off the fertilizer for a while.  Too much nitrogen acerbates the problems.

I have hundreds  of daylilies on my property.  This is a pretty one that was bred by a friend in the DFW area

I have hundreds of daylilies on my property. This is a pretty one that was bred by a friend in the DFW area

Trees

Some of my peaches are beginning to show color.  This is already bringing in the birds.  If you have problems with birds getting you fruit, this weekend will be a good time to cover them in nets.

I share my posts on the HomeAcre Hop.  Be sure to stop by the hop.  It has tons of great information from gardeners and homesteaders all over the world!

‘Stewart’s Zeebest’ Okra by Patty G. Leander


Southern-Living-Seed-Guide

The Southern Living Seed Guide

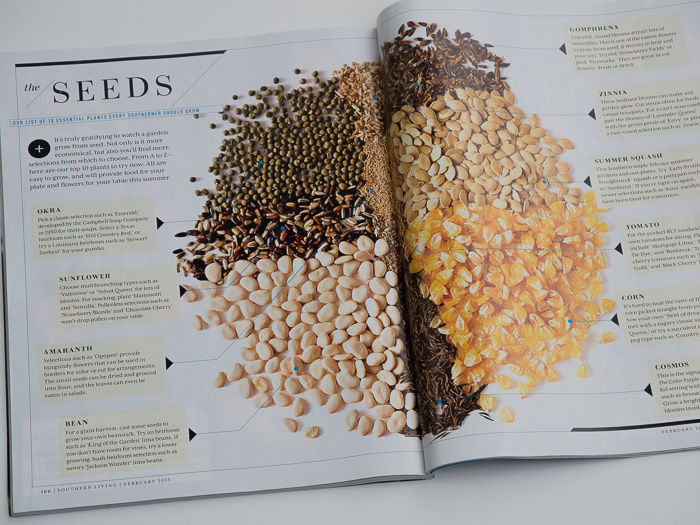
A little over a month ago I was thumbing through the February issue of Southern Living while waiting for a dental appointment. I skipped past the kitchen redo, the make-your-own-berry-wreath and the South’s new hotels to land on a piece titled The Southern Living Seed Guide. As a seed-admiring, seed-saving vegetable gardener I am drawn to stories and articles about seeds, varieties and the stories behind them.

My favorite seed story, of course, is the one I am most familiar with and one I have a personal connection to – ‘Stewart’s Zeebest’ bushy okra, developed by my all-time favorite garden mentors, teachers and encouragers, the late George and Mary Stewart. So when I saw ‘Stewart’s Zeebest’  listed as a Southern Living pick it made me smile real big, and then my smile turned to disbelief and dismay when they referred to it as a Louisiana heirloom!

Stewart’s-Zeebest-okra

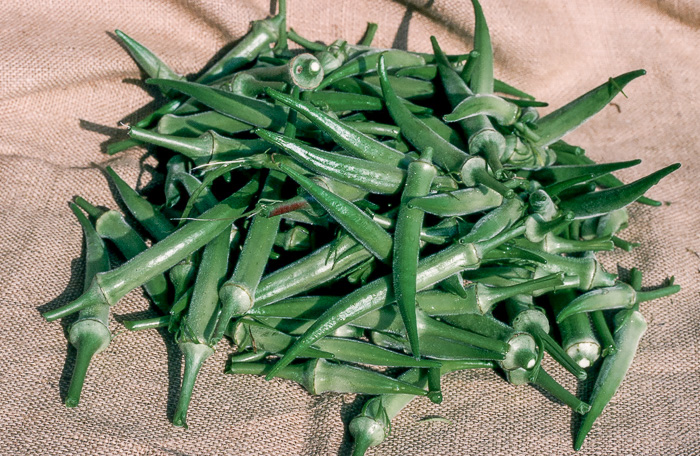
‘Stewart’s Zeebest’ okra harvest.

Uh-uh, no way. We love you, Louisiana, but the Lone Star State’s reputation is at stake here: ‘Stewart’s Zeebest’ is not a Louisiana heirloom though you certainly get some credit since George was born in Westlake, Louisiana and ‘Zeebest’ was selected from a planting of ‘Louisiana Green Velvet’ okra. But all the toil and sweat that George and Mary put into developing ‘Zeebest’ – planting, selecting, saving, replanting and ultimately sharing – occurred in the 1980s at the Stewart homeplace in Houston, right down on South Main where George and Mary spent most of their adult life, across the street from the train tracks and a few doors down from the auto repair shop. And to add a little more perspective, George and Mary had lived in Houston so long they could remember the installation of Houston’s first traffic light and gleefully shared tales of the days before air-conditioning.

houston-chronicle-stewart

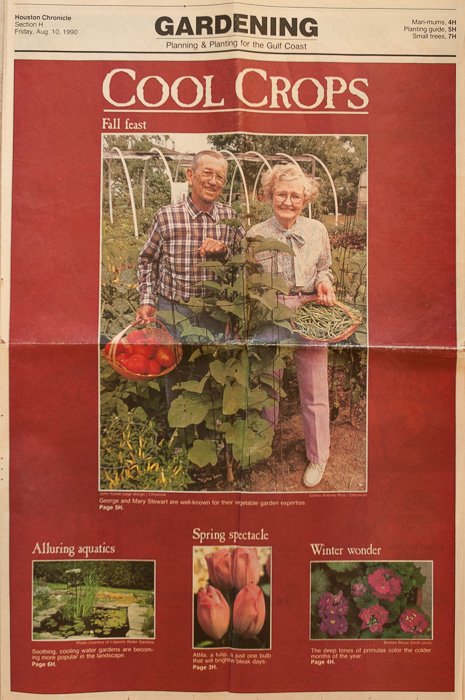
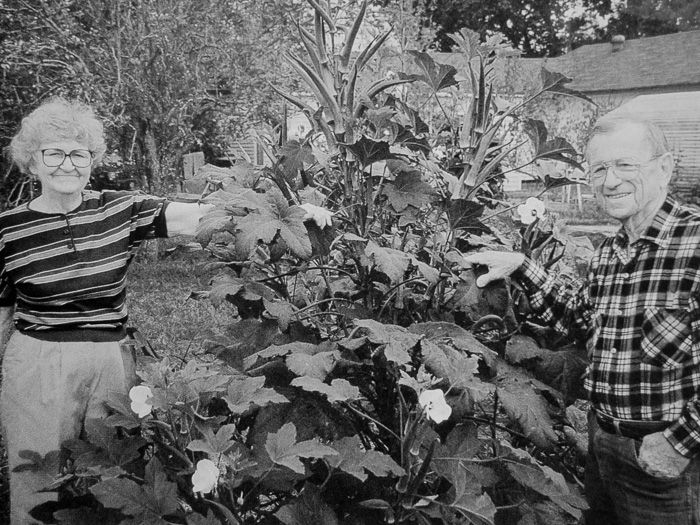
Houston’s premier garden educators, George and Mary Stewart, profiled by Kathy Huber in the Houston Chronicle, 1990

George and Mary Stewart were extraordinary gardeners, full of wit and wisdom and a special gift for entertaining while educating. They drew the audience into their horticultural adventures with stories and laughter, inspiring a can-do attitude that made you want to go home and grow-your-own. For posterity’s sake and to keep the record straight, here is a brief history of ‘Stewart’s Zeebest’:

George-Stewart

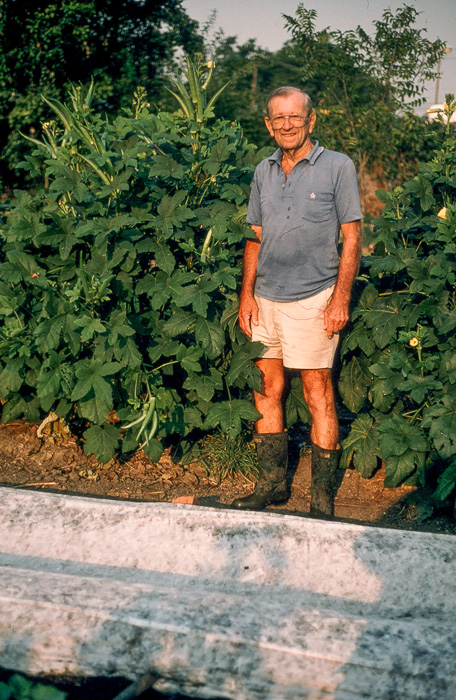
A proud George with one of his branching, productive ‘Zeebest’ okra plants. Photo by William D. Adams

In the 1980s George and Mary were given a few pods from a highly productive planting of ‘Louisiana Green Velvet’ okra from the garden of family friend Joe Ziegler. The seeds were planted in the Stewart garden and George recognized that some of the plants developed a strong branching pattern. They began carefully selecting for tender, productive and heavily branched plants which George enthusiastically referred to as ‘Stewart’s Zeebest Bushy Okra’; over time it was shortened to ‘Stewart’s Zeebest’ or simply ‘Zeebest’ and soon they were promoting their home-grown Texas variety and giving away seeds. That was almost 30 years ago so it hasn’t yet reached heirloom status. An heirloom is generally defined as an open-pollinated variety that has been grown and maintained by an individual or a community for 50 years. Well, George and Mary are gone now but they left ‘Zeebest’ in our hands and we in turn need to keep it in production for future generations. Today, thanks mostly to the efforts of Bill Adams, Retired Harris County Extension Agent and good friend of George and Mary, seeds are available from Baker Creek Heirloom Seeds (Rare Seeds) and Southern Exposure Seed Exchange (Southern Exposure).

Whether you are a native Texan or a transplant, if you live in Texas I hope you have learned to love okra. If you haven’t planted seed yet now is a good time. Okra not only survives but it thrives in our heat and looks pretty good while doing it, thanks to being a member of the mallow family which also includes hibiscus and hollyhock. Most varieties produce in 60-65 days and will continue to produce right up to the first frost. Overgrown okra can be fibrous and tough and should be picked when it is 3-5” long. It grows fast so check for pods every other day.

stewarts-zeebest-okra

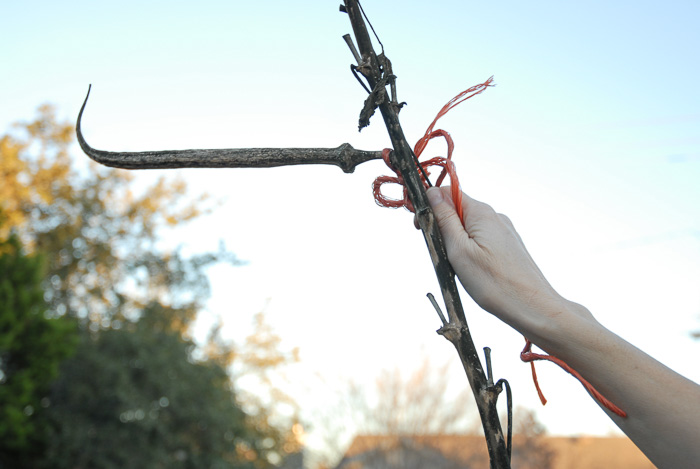
Flag the best okra pods for saving and let them dry on the plant.

Saving seed of okra is very easy to do as the seeds are big and the pods are a perfect receptacle.  To ensure the purity of the seed it is recommended that you grow and save seed from only one variety at a time. Select one or two pods (or more if you want to have plenty to share) from your healthiest specimens, flag the chosen pods with brightly colored tape, and let those pods dry on the plant.

I met George and Mary in 1989, when Mary was 79 and George was 83. I was in my early thirties and they could run circles around me in the vegetable garden. They gardened intuitively and frugally, generously sharing what they knew about growing vegetables to scores of home gardeners along the Gulf Coast.  George and Mary were proud of the vegetables that they grew and their produce needed no enhancements. But George was a born storyteller and was known to sometimes embellish the truth. Though he tried to keep his exaggerations to a minimum, it seemed to be Mary’s lot in life to keep George grounded in truth. In fact, at the age of 83, after some 60 years of marriage, Mary wrote and dedicated the following poem to George:

Tell any tale you like, m’love,

Embroidered with lies and fiction;

I’ll not interrupt to correct, m’love,

                   Your facts or figures or diction.

Embellish your stories to any degree

                   With fables and falsification;

Just don’t turn to me and expect me to give

                   My unqualified verification.


With that in mind, below is a description of ‘Zeebest’, taken right out of Mary’s garden notes:

“The parent plant of these seed had 28 branches and 243 pods on it at one time.  We started with Louisiana Green Velvet and over a period of 9 years of selection for branching tendencies, this is the result.  To save seed, let a fine pod on a good specimen plant dry on the stalk,
then shell out and let dry completely in open tray at room temperature.  Store seeds in a tightly closed container in the refrigerator.”

mary-stewart

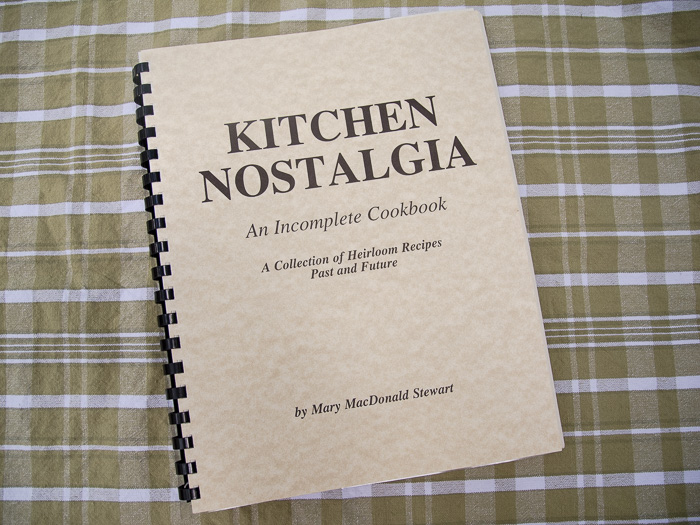
Mary’s collection of recipes and remembrances, published at the age of 80

Mary learned to use a computer when she was 80 years old and proceeded to write a cookbook which she titled, “Kitchen NostalgiaAn Incomplete Cookbook–A Collection of Heirloom Recipes, Past and Future”.  The preface of Mary’s cookbook begins “This is in memory of Mamma.” Here is a favorite recipe from the files of vegetable gardener and home-cook extraordinaire, Mary Stewart, in her own words:
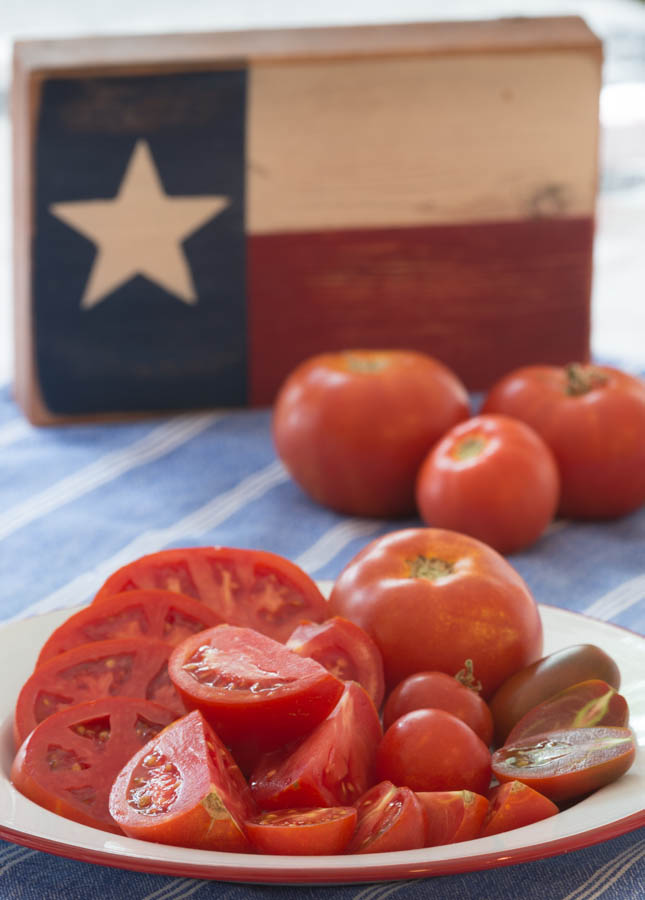
Okra and Tomatoes

“This has been a summer mainstay as long as we have had a garden, which has been forever. Some add browned beef, but I never have. It is good served over rice or just as a side vegetable. Searing the cut okra in hot fat at the start takes away some of the slickness and makes it more palatable. The amounts are really variable, so feel free to deviate.”
4 cups sliced fresh okra

¼ cup oil (or bacon fat)
1 cup chopped onion

1 cup chopped bell peppers, red, green or mixed

2 cloves garlic, minced

1 teaspoon salt

1 teaspoon chili powder

1 teaspoon cumin

2 8-ounce cans tomato sauce or 1 can tomato paste (or 2 cups peeled, chopped tomato)

1 cup water

Heat the oil in a heavy pot or skillet; add okra, stirring to sear the cut edges. Don’t let it burn. Add onions and sauté till limp, then add garlic and pepper and simmer about 5 minutes, stirring to prevent burning. Then add the tomato sauce or paste, thinning with water to have it a bit on the “soupy” side. Add the seasonings and simmer about 15 minutes, stirring now and then until the okra is tender but not falling apart. Yield: 8 servings

George and Mary Stewart in their Houston vegetable garden in the early 1990s. Photo by William D. Adams

George and Mary Stewart in their Houston vegetable garden in the early 1990s. Photo by William D. Adams

I hope that if you decide to grow ‘Stewart’s Zeebest’ bushy okra, you will share it with compliments of George and Mary, and take the time to reflect on the heritage of gardeners from your own family history, passing these stories down to a future generation of vegetable growers.

Butterbean Basics by Patty Leander


butterbeans-mixed

Whether green, white or speckled, butterbeans are down-home delicious. As mentioned in a previous post, freeze leftover liquid from cooking collard greens and use it to boost the flavor of butterbeans.

Tomatoes tend to get all the attention this time of year but there is another vegetable, so delicious, so easy to grow, so humble, so Southern, that it belongs in every Texan’s garden. I’m talking about butterbeans. Some of you may refer to them as lima beans – the terms can be used interchangeably – but poor lima beans suffer from an overcooked-and-underseasoned-school-cafeteria reputation that still haunts many adults, even though they haven’t touched a lima bean in decades. Butterbeans, on the other hand, elicit nothing but comforting memories of gardens, grannies, greens and cornbread. One of the more memorable comments I’ve heard about butterbeans came from AgriLife Extension Fruit Specialist Jim Kamas. At a fruit seminar a few years ago I had the occasion to ask if he enjoyed butterbeans as a child, and without hesitation he fondly recalled his childhood in Belleville and those luscious beans from his grandmother’s garden. She used to tell him that “if you were eating butterbeans, you were the luckiest boy in town”.  Such a sweet and memorable sentiment coming from a man who lives and breathes Texas peaches. Lucky indeed.

shelled-butterbeans

Fresh butterbeans are hard to come by unless you grow and shell them yourself.

There are several varieties of butterbeans to choose from and I’ve never grown one I didn’t like. Some are bush, some are pole, some are green, some are white, some are speckled but they all like warm weather and they all grow well in Texas.

butterbean-varities

Henderson, Jackson Wonder, Thorogreen, Dixie Speckled, King of the Garden, Christmas Pole, Fordhook 242

You can usually find small packets of butter beans at farm supply or garden centers. Online sources for seeds include Southern Exposure Seed Exchange (www.southernexposure.com), Willhite Seed (www.willhiteseed.com), Seed Savers Exchange (www.seedsavers.org) and Baker Creek Heirloom Seeds (www.rareseeds.com).

Florida-Speckled-Butterbeans

‘Florida Speckled’ butterbeans engulf a chain link fence.

Because they like warm conditions it is best to plant them a couple of weeks after you plant green beans – any time this month is good. They are not particular about soil but be sure to give them full sun and regular moisture. Pole varieties are quite vigorous and will need a sturdy structure to climb. Most bush varieties are ready for picking in 60-65 days; pole varieties take a week or two longer. Butter beans, especially pole varieties, usually produce through the summer but if it is exceptionally hot and dry (and who knows what awaits us this summer!) their blooms may shut down. Keep them watered and they’ll perk up again in the fall and produce like crazy.

Dixie-Speckled-Butterbeans

Small-seeded ‘Dixie Speckled Butterpeas’ cook up tender and delicious.

If you are new to the business of butter beans, keep in mind that they must be shelled. Not really a big deal unless you plant rows and rows that all come ready at once – then you’ll have some work to do. If you have room in the garden plant a few short rows of different varieties with varying maturity rates so you’ll be able to space out the picking, the shelling and the eating. Cooking is simple, the less you do to them the better – just flavor with a little bacon fat, salt and pepper and let their subtle flavor and creamy texture shine. The fresher they are the quicker they cook, usually less than 45 minutes.

Butterbeans used to be a common side dish served at kitchen tables across the South, but like corded phones, station wagons and cassette tapes, they are at risk of becoming yet another reminder of simpler times and days gone by. Shoved aside by an industrious society fueled by quick-to-fix processed food, their destiny lies at the mercy of local farmers and vegetable gardeners willing to continue their cultivation. I hope you will help carry on their legacy by planting, eating and saving seed. Sop up the simplicity of this humble bean and enjoy a taste that is rich, down-home and satisfying, and always remember how lucky you are to be eating fresh butter beans.

King-of-the-garden-butterbeans

‘King of the Garden’ with a side of cornbread and a piece of fruit for a good-to-the-last-bite satisfying meal.

Old-Fashioned Butterbeans

The secret to a tasty pot likker is to simmer the cooking liquid with bacon drippings or ham hocks for at least 30 minutes before you add the beans. 

1 ham hock, ham bone or 1-2 tablespoons bacon drippings**

2 quarts water or chicken broth

4-6 cups shelled butterbeans

¼ cup brown sugar (optional, but a common ingredient)

1 teaspoon salt

½ teaspoon pepper

Bring water and ham hock or bacon drippings to a boil and simmer 30-40 minutes. Add the beans and simmer until tender, about 30-40 minutes, adding more water if necessary, to keep beans covered by about 1 inch. Season with salt and pepper.

** Vegetarian-minded folks can forgo the pig meat and cook beans in water or vegetable broth. Season with salt and pepper then top off with a pat of butter.

Springing Forward in the Vegetable Garden-by Patty G. Leander

So long winter, it’s time for you to move on! You have overstayed your welcome, and not just here in Texas but the Midwest and Northeast as well, where the snow keeps growing deeper and the icicles have reached massive lengths (check out these incredible Instagram icicle photos at http://www.boston.com/news/weather/2015/02/11/the-icicles-instagram/YfkqQcjuV5xW7JIEFPVsEJ/story.html).

spring-garden

The spring season is upon us! Photo by Bruce Leander

Here in Austin we’ve had over two inches of gentle rain the last few days, we now have an extra hour of daylight, the forecast is looking good and like most gardeners I am itching to plant. We must proceed with caution though. Working wet soil can cause clumping and compaction so if you’ve had rain it’s best to wait a few days and allow the soil to dry out. One way to know if the soil is too wet is to take a handful and squeeze it in your hand; if it forms a muddy clump then it is too wet, but if it crumbles or breaks apart when dropped from above you are good to go.

over-ripe-produce

Remove over-mature crops before they become infested with unwanted pests. Photo by Bruce Leander

If you have not yet cleaned out your fall and winter crops it’s time to do so. Cool season vegetables that are left in the ground after the weather starts to warm up tend to become a breeding ground for unwanted pests, plus they quickly grow beyond their prime.

vegetable-transplants

Grow transplants of cool season greens in partial shade. Photo by Bruce Leander

As Jay mentioned in his previous post you’ll find transplants of mustard, collards and lettuce available at nurseries but think twice before you reach for that plant. Do you have room for it in your garden or will it be taking up valuable space needed for warm season vegetables like cucumbers, beans, okra or squash?  If you’d love to have some fresh greens for spring consider planting these vegetables in pots and place them close to the house in a spot that gets dappled or morning sun.

swiss-chard

Swiss chard will take the heat of summer as long as it receives shade during the hottest part of the day. Photo by Bruce Leander

Swiss chard is the most adaptable of the cool weather greens as it will grow happily into summer, especially if you plant it where it will get some shade during the hottest part of the day.

Bread smeared with butter is totally American, but top it with some fresh radishes and a sprinkle of course salt and you have a classic French hors d’oeuvre. Photo by Bruce Leander

Bread smeared with butter is totally American, but top it with some fresh radishes and a sprinkle of course salt and you have a classic French hors d’oeuvre. Photo by Bruce Leander

Enjoy this time of transition in the vegetable garden and the eating-in-season that comes with it. Radishes are great sliced in a salad but have you ever tried them sliced over buttered bread with a sprinkling of sea salt? Or sautéed with sugar snap peas? Talk about a versatile vegetable, radishes can be grated, steamed, braised or simmered, even the leaves and seed pods are edible. Take this opportunity to branch out from sliced radishes in a salad or cauliflower covered with cheese sauce (not that there’s anything wrong with that!) to bring some exciting new flavors to your kitchen. Below are a few ideas to help with your end-of-winter harvest.

radish-sugar-snap-peas

Braised radish and sugar snap peas are different and delicious. Photo by Bruce Leander

Braised Radishes and Sugar Snap Peas

Remove the strings from sugar snap peas and quarter radishes. Melt butter in a skillet and add the peas and radishes. Sauté briefly then add a few tablespoons of water or chicken broth. Cook, partially covered, until radishes and peas are tender. Top with chopped mint or chervil and a splash of vinegar.


Broccoli and Cauliflower don't have to be steamed!  Try roasting them for a healthy and tasty side.  Photo by Bruce Leander

Broccoli and Cauliflower don’t have to be steamed! Try roasting them for a healthy and tasty side. Photo by Bruce Leander

Roasted Cauliflower and Broccoli

Cut broccoli and cauliflower into equal sized pieces. Toss in olive oil, sprinkle with salt and pepper and arrange in a single layer on a large baking sheet. Roast at 425° until golden and slightly charred, about 25-30 minutes.

Cauliflower-rice

Try cooking grated cauliflower as a quick side or a flavorful substitute for rice.

Cauliflower “Rice”

Grated cauliflower is a lot like rice yet cooks faster than couscous – you’ve never made cauliflower so quick and easy. We like big, plump Medjool dates but any dates or even raisins will do.  

Grate one head of cauliflower into a bowl. Sauté in a small amount of olive oil until golden, about 10 minutes. Add ½ cup chopped dates, sprinkle with ¼- ½ teaspoon turmeric, season with salt and pepper and cook 5-7 minutes longer. Top with chopped cilantro and sliced almonds before serving.

pot-likker

A big pot of greens will yield plenty of pot likker; freeze some of that delicious liquid as a base for flavoring summer vegetables.

Greens

Flavored with some bacon or ham, leaves of collards, kale, kohlrabi, broccoli, beets and cauliflower are all edible and can be cooked together into a nutritious pot of greens with plenty of pot likker. Even though we love to slurp that Southern elixir I always set aside a few jars for freezing and use it to flavor the butter beans and cowpeas that are coming my way this summer.

This post has been shared on the HomeAcre Hop!  Please drop by and see what gardeners and homesteaders across the country are doing.

Brassicas Rule, Cannas Drool by Patty G. Leander

Cannas may be beautiful in the summer time, but they sure aren’t very pretty after a freeze. Mine bit the dust right around Christmas, when Old Man Winter showed up and decided to stick around for awhile. Of course my small bed of canna lilies dies back every year yet every year I am amazed at the contrast of the gloomy canna skeletons against the vibrant greens, purples and reds of the brassicas that shrug off the cold weather and keep on growing, proving once again that they deserve a prime spot in the winter garden.

cannas-freeze-damage

Canna lilies would prefer to spend their winter on a tropical island (me too!) but they’ll be back this summer. Photo by Bruce Leander

Seasoned gardeners are well aware of these gems of the winter garden, but for novice gardeners and those who have been on the fence about a winter garden, I’d like to share a few easy-to-grow vegetables to consider planting next fall.

Chinese-Cabbage

Mustards, kale and Chinese cabbages love the cold weather. Photo by Bruce Leander

I usually plant sugar snap peas twice a year, mid-September and late January. This year I planted a vining variety from Seed Savers Exchange, called ‘Amish Snap’, on September 17. I started picking on November 11 and plants were still producing in December even after several light freezes. On January 8th we experienced a freeze with temperatures that fell into the low 20s; the plants survived but the peas took a hit (Note: a more diligent gardener would have harvested the pods before the arrival of a predicted hard freeze!). The outer pods were damaged but many of the peas inside were perfectly edible, with a flavor slightly reminiscent of, well, frozen peas. Since the vines are healthy and the weather is mild, I’ll leave the vines for now to see if I’ll get a another flush of blooms and pods, but in the meantime I’ll seed another round of peas for a spring harvest.

Amish-Snap-Peas

‘Amish Snap’ peas: planting seeds in September, ready to harvest in November, freeze damage in January. Photo by Bruce Leander

Swiss chard, beets and spinach do not belong to the brassica family but they are ideal specimens for a winter garden.

beets-in-hand

Beets that were seeded in September have provided roots and lovely greens all winter long. Photo by Bruce Leander

Other stalwarts for the winter garden include onions, spinach, carrots and almost every herb you can imagine, except basil. We still have cold winter days ahead and any of these vegetable or herbs could be planted this month to bridge the gap between winter and spring.

multiplying-onions

Multiplying onions look grow so well in the winter garden, and they look great too! Photo by Bruce Leander

winter-mint

Brighten up your winter meals with the fresh flavor of multiplier onions, mint, dill and oregano.

Tomato Tips and Tricks by Patty Leander

home-grown-tomatoes

Nothing beats home grown Texas tomatoes. Photo by Bruce Leander

There are tomato lovers and tomato haters. Tomato haters are the ones who pick chunks of tomatoes out of their pasta or leave a neat pile of tomatoes on the side of their salad plate (you know who you are, BWL). Tomato lovers tend to reside in one of two groups: those who love tomatoes so much that they don’t care if they get their fix from a can, a bottle of ketchup or a supermarket tomato, and the other camp who eschews bland winter tomatoes and commercial tomato products and opts to eat the juicy fruit in season, fresh from the garden and whenever possible while standing IN the garden! Like most vegetable gardeners I prefer my tomatoes in season and hyper-local – direct from my garden to my table. My penchant for home-grown tomatoes means that I gobble up my last fresh tomato sometime in December and I don’t have a new crop until mid-May, and that’s if I’m lucky, so when spring planting season rolls around I am giddy with anticipation.

jaune_flamme_tomato

‘Tomatoberry’ and ‘Jaune Flamme’ are some of Patty’s favorite varieties for the Austin area. Photo by Bruce Leander

March brings the promise of mild days and warm weather but seasoned Texas gardeners have no delusions about our ideal tomato-growing conditions. We have but a small window of opportunity between our average last frost (mid-March here in Central Texas) and that first string of 90 degree days (June if not earlier) when plants slowly succumb to the heat and pests of a typical Texas summer. We want to plant as early as we can yet we must be prepared to protect our charges if unpredictable spring weather brings a late cold snap. Be sure to have a supply of floating row cover, boxes, milk jugs, buckets or other means of protection on hand to cover tender transplants if frost threatens. Even without the threat of cold weather I like to wrap the outside of my tomato cages with row cover or plastic to protect plants from strong winds.

sideways_tomato

A tomato laid on its side will quickly turn up and grow towards the sun. Picture by Bruce Leander

Row cover can sometimes be found at local garden centers or it can be ordered from a variety of online sources, including Texas Gardener (www.texasgardener.com), Southern Exposure Seed Exchange (www.southernexposure.com) and Johnny’s Seed (www.johnnyseeds.com).

Before planting transplants in the ground it’s important to harden them off by gradually acclimating them to the outdoors. Start by setting them out in a protected spot on a patio or under a tree for an hour or two, gradually increasing their exposure to sun and outdoor temperatures. For best growth and production space plants 3-4 feet apart in the garden. Resist the urge to plant your tomatoes deep. Instead, remove the lower leaves and plant your transplants sideways in a shallow trench. This will keep the roots in the uppermost layer of soil where it is warmer and new feeder roots will sprout all along the stem, adding to the plant’s vigor. The stem will turn towards the sun and straighten out within a day or two.  Water new transplants with a half-strength fertilizer solution and as they grow gently direct their stems to keep them corralled inside their cage – this is much easier to do when they are young. Spray every 2-3 weeks with a liquid fertilizer and sidedress each plant with 1-2 tablespoons of granular garden fertilizer when the first fruit starts to form. Provide 1-1½ inches of water per week, and if possible use drip irrigation or soaker hoses to keep soil from splashing up on the leaves as this is sometimes how soil borne diseases get their start.

Nothing beats the complex taste of hierlooms like "Black Cherry".  Photo by Bruce Leander

Nothing beats the complex taste of hierlooms like “Black Cherry”. Photo by Bruce Leander

Most of the heirlooms that we love to eat take 80-90 days before that first juicy tomato is ripe for picking.  The intense heat of summer is not far behind so be sure to include some quick-maturing hybrid varieties that start producing in 65-75 days as insurance for a successful tomato crop.  ‘New Girl’ (62 days from transplanting), ‘Early Girl’ (57 days) and ‘Juliet’ (62 days) are all good bets. Most heirlooms don’t produce as reliably or prolifically as the hybrid varieties, but their beautiful colors, juiciness and complex flavors are hard to resist.  ‘Cherokee Purple’ (74 days), ‘Green Zebra’ (75 days) and ‘Black Krim’ (80 days) are popular varieties, and some years are better than others. Cherries are always a favorite – ‘Black Cherry’ (65 days), ‘Black Plum’ (82 days), ‘Sun Gold’ (57 days) and ‘Tomatoberry’ (60 days) bring interesting color, flavor and shape to the tomato harvest. If you have the space try experimenting with different varieties.  You just never know when you are going to find that perfect plant that fulfills all of your tomato expectations. When you do I hope you’ll share it with us here at the Masters of Horticulture!

black_plum_tomato

“Black Plun” is another great heirloom for the Austin area. Photo by Bruce Leander

Gumbo Onions

There are two things that really get my gardening juices flowing–pass along plants and discovering a new, exceptionally good variety of something.  This year I received a true gift – a pass along onion that has turned out to be the best green onion I have ever grown.  The “Gumbo Onion” is everything you look for in a green onion.  The white bulbs are firm and spicy and the green leaves taste great and are firm enough to be easily chopped. 

gumbo-onion-1

These “gumbo onions” have been grown in the same family for over 100 years

I got my “Gumbo Onions” from fellow Texas Gardener writer Patty Leander.  Patty got her starts from Chris Corby who is the editor of Texas Gardener.  Chris got these amazing onions in the mail from L. E. Andrews of Houston. L. E. sent Chris several of these amazing onion bulbs.  L.E. told Chris that the onions came from a family of Cajuns from south Louisiana who migrated to Texas.  They have been growing these onions in the same family for well over 100 years.

Shallots are grown just like regular onions.  Only they have no day length limitations.

Shallots are grown just like regular onions. Only they have no day length limitations.

Mr. Andrews’ “gumbo onions” are technically shallots.  Shallots (A. cepa var. aggregatum) are a variety of the onion family (Allium cepa) that reproduces primarily by division.  Plant a single shallot bulb and that bulb will create several “off sets” from the main bulb.  Because of this growth habit some people call them “garlic onions”

Each shallot bulb will reproduce by creating several "offsets" around the main bulb.

Each shallot bulb will reproduce by creating several “offsets” around the main bulb.

Shallots are not grown in large numbers in the U.S. I am beginning to see them in a few feed stores and nurseries in my area.  However, most of the varieties that I am aware of are still passed from gardener to gardener. Shallots are grown just like regular onions (except you don’t have to worry about any day length issues).  Plant them in the fall for an early spring harvest or in the early spring for a summer harvest.  Do not plant them in soil that has been recently manured.  Shallots should be planted with the root scar down and the pointy end up.  Stick them in the ground deep enough to just cover the top of the offset.  Now all you have to do is water and weed.    

L.E. Andrews' "gumbo onions" are the best green onions I have ever grown.

L.E. Andrews’ “gumbo onions” are the best green onions I have ever grown.

I am thankful for people like L.E. Andrews.  He, and others like him, are preserving our horticultural past by growing these old timey varieties that have slowly fallen out of favor with the nursery trade.  I am so glad that he decided to share his heirloom onions and their story with those of us that will appreciate them and hopefully keep them growing for another 100 years. 

BTW, if you live north of I10, it is time to get your onions and shallots in the ground!

Resolve to Grow More Veggies in 2014 by Patty Leander

In a nod to the ubiquitous cell phone and the trend of sharing one’s life in pictures, The Oxford Dictionaries Word of the Year for 2013 was ‘selfie’. But there’s another word that has crept into our vocabulary that may have more relevance to gardeners: Blandscaping. What image does that one word bring to mind? A cookie cutter landscape? A rectangle of grass? Uniformly trimmed hedges lined up in a single row? I bet it doesn’t make you think of a vegetable garden! A vegetable garden is vibrant, dynamic and engaging. It is full of sights, sounds and creatures and best of all an edible harvest.


home-vegetable-garden

This resourceful garden was built using materials available on site – native rock and unused concrete blocks with discarded fencing laid down in the paths to deter weeds. Photo by Bruce Leander.

If your landscaping has become a little too bland try incorporating a few edibles or a small vegetable garden this year.  Be sure to include crops that grow well in your region and start with vegetables your family likes to eat. Mid-January through February is the perfect time for planting broccoli, sugar snap peas, radishes, turnips, beets, Swiss chard, lettuce and spinach here in Central Texas. Check with the local AgriLife Extension office or Master Gardener organization in your county for the best planting dates in your area. 

 Get some exercise while tending your edible landscape, savor the nutritious results and you have the start to a healthy new year!  If you are new to the diverse vegetable kingdom or if the thought of eating turnips, Swiss chard or radishes leaves you feeling underwhelmed, check back here for some tasty ideas for bringing these health-promoting veggies to the table. I’ll be posting some occasional suggestions for preparing the bounty from your garden – you may be surprised how delicious it can be!   


vegetable-bed

This vegetable “bed” causes visitors to pause and admire the gardener’s sense of humor. Photo by Bruce Leander

There are numerous ways to include vegetables in a landscape, as you’ll see from the accompanying photographs, but there are also universal pitfalls to avoid in the process. It’s easy to get caught up in the garden frenzy of a new season but do try to start with a manageable plan. Believe me when I tell you that vegetables will respond much better when you don’t torture them with the following approach:

 STARTING TOO BIG

Vegetables are living things; they may not need as much time as a pet but they do require regular attention. A garden that is too big means plants will not receive the care that is required to bring them to fruition. 


beautiful-vegetable-garden

Vegetable gardens can be as varied as the gardeners that tend them. Some gardeners prefer the contemplative solitude of a morning tending tidy rows of plants. Photo by Bruce Leander

PLANTING IN SHADE

Vegetables growing in the Texas heat may appreciate a little dappled shade at the height of summer but vegetables growing in the cool season need lots of sunlight to counter the cloudy and chilly days in early spring. Farms don’t grow in the shade.


broccoli

A double row of broccoli grows in a narrow bed bordered by 16x8x8 inch cinder blocks. Lettuce fills the small space within the concrete blocks. Photo by Bruce Leander.

PLANTING AT THE WRONG TIME

Consult a planting calendar for your area or ask an experienced gardener about planting dates. When planting in the cool season months use a soil thermometer to monitor temperature before planting. Different vegetables thrive at different temperatures and most cool season plants will do best when the soil temperature is in the 40-50° degree range.

PLANTING TOO CLOSE

Give your plants plenty of growing room so they don’t have to compete for nutrients and water. Follow spacing recommendations for transplants and if sowing from seed be sure to thin to the proper spacing after seed has germinated. 


Childrens-garden

Some gardens exude energy, enthusiasm and learning, like the vibrant Children’s Garden at the San Antonio Botanical Gardens. Photo by Bruce Leander

IGNORING PLANTS

Create a checklist or purchase a gardening to-do guide and stick to it. Allow time for weeding, watering, fertilizing, inspecting and grooming plants. Remove diseased leaves and keep an eye out for harmful insects and hand-pick or spray to keep populations in check.

Remember, for most gardeners growing vegetables is an enjoyable and productive hobby…but when all else fails visit your local farmers market for a healthy dose of locally grown produce.  Here’s to a happy and successful gardening year!


childrens-garden-2

Vegetable gardens naturally attract children and other living creatures!. Photo by Bruce Leander.

Harlequin Bug – A Real Sucker By Patty Leander

Brassica plants love our fall weather. So do harlequin bugs. And unfortunately harlequin bugs love brassicas.  These colorful bugs are attracted to the large, succulent leaves of various members of the brassica family, including broccoli, cauliflower, kale, collards and mustard. A cousin to stink bugs, the adults are easy to spot because of their orange and black exoskeleton, and if you find one there are usually many more in the vicinity.

Adult Harlequin Bug in curly kale.  All photos in the post by Bruce Leander

Adult Harlequin Bug in curly kale. All photos in the post by Bruce Leander

One of the best methods for controlling this pest is to perform a regular “search and destroy” operation to keep them in check; otherwise they will continue to proliferate in your garden. Monitor your plants for clusters of the distinctive, black and white barrel-shaped eggs which are usually laid in clusters of 10-12 on the plant stems or the underside of leaves. Each female egg has the potential to hatch and grow and lay another dozen eggs in only four to nine weeks, so if you can eliminate just one egg mass you will be way ahead in this game we call vegetable gardening.

This dime shows the relative size – the intricate eggs are tiny and easy to overlook

This dime shows the relative size – the intricate eggs are tiny and easy to overlook

Harlequin Bugs have distinctive egg cases, usually 10-12 barrel shaped eggs laid side by side

Harlequin Bugs have distinctive egg cases, usually 10-12 barrel shaped eggs laid side by side

Harlequin instars – recently hatched; every female has the potential to lay another dozen eggs in less than two months

Organic products, such as spinosad or insecticidal soap, only offer fair control and are most effective in the nymphal stages. Adults become more resistant and harder to control so find those eggs and destroy them! If any eggs should escape your eagle eye, hand pick the resulting pests and drop them into a bucket of soapy water. Row cover can be used to protect plants, just make sure there are no adults or eggs present before covering plants. Another control option is to plant a sacrificial trap crop of mustard or turnips to attract the bugs away from your desirable plants, then pick off the adults or spray the trap crop with insecticide rather than spraying all of the brassicas you plan to eat. Keep an eye out for this pest in both fall and early spring as they can easily decimate a plant if not kept under control.

The colorful adults are plentiful and easy to find; handpick and dispose of them in a bucket of soapy water

The colorful adults are plentiful and easy to find; handpick and dispose of them in a bucket of soapy water

Fall Veggie Picks (Cabbage) by Patty Leander

The cole crops that we grow today evolved from wild plants native to the coastal regions of Northwestern Europe and the Mediterranean. Cabbage might well be considered the granddaddy of them all, being the first member of the diverse brassica family to be cultivated.

‘Farao’ and ‘Ruby Perfection’

Growing requirements for cabbage are similar to broccoli and cauliflower – cool weather, moist, fertile soil and at least 6 hours of sun. Plants are fairly tolerant of heat in the early stages of growth but must have cool weather as they mature in order to form a tight head, thus an ideal choice for fall cultivation. Transplants should go into the ground 10-12 weeks before the first freeze date in your area; here in Central Texas brave souls plant in August while the rest of us wait to plant in September, hoping for rain, an overcast day and/or a break in the heat. Once established most cabbages can handle temperatures into the mid-twenties and chilly weather will even sweeten its flavor.
‘Cheers’ cabbage is a blue-green hybrid with excellent disease resistance .  All Photos by Bruce Leander

‘Cheers’ cabbage is a blue-green hybrid with excellent disease resistance . All Photos by Bruce Leander

Cabbage varieties can be distinguished by shape (round, flat or pointed), color (green, blue-green, purple or red) and leaf type (smooth or crinkled) and what you choose to grow depends on your personal taste. ‘Golden Acre’, ‘Dynamo’ and ‘Farao’ are early-maturing green varieties that form solid round heads with excellent eating quality. ‘Early Jersey Wakefield’ and ‘Charleston Wakefield’ are heirlooms that have been grown in the U.S. since the 1800s but their conical shaped heads still surprise uninitiated gardeners.

‘Alcosa’ savoy cabbage

‘Alcosa’ savoy cabbage

Purple and red varieties add interest to our gardens, vibrant color and flavor to our food and healthy nutrition to our diets. They contain phytochemicals called anthocyanins which have been associated with improved memory function and reduced cancer risk. Availability of red and purple varieties tends to come and go as breeding improvements are made but current selections to look for include ‘Ruby Perfection’, ‘Red Acre’ and ‘Red Express’. Blue-green hybrids like ‘Blue Vantage’ or ‘Blue Dynasty’ have been bred with better disease resistance than most of the paler green types so look for those if your cabbage has been less than vigorous in the past. Savoy cabbage has lovely crinkled leaves and a sweet, tender heart. Recommended varieties include ‘Famosa’, ‘Alcosa’ and ‘Savoy Ace’.

Chinese cabbage, also known as Napa cabbage, is a different species from heading cabbage but it is easy to grow and has become very popular for grow-your-own gardeners. It is a vigorous grower with a delicate flavor and is often used for stir-fry and kimchi. Depending on variety it will produce a tight, barrel-shaped head or a loose head of crisp, frilly leaves. ‘Blues’, ‘Tenderheart’ and ‘Bilko’ are reliable producers.  If you have trouble finding decent transplants this fall then try growing your own seedlings for planting in late winter or early spring.

Be on the lookout for aphids, especially on the underside of leaves

Be on the lookout for aphids, especially on the underside of leaves

Be on the lookout for aphids, cabbage loopers and cabbageworms; these common pests can decimate a crop if not controlled. Aphids can be dislodged with a strong spray of water or can be smothered with insecticidal soap. Caterpillars can be controlled with any insecticide that contains the active ingredient Bt (Bacillus thuringiensis). Another option is to exclude the moth that lays the eggs by covering the plants loosely with lightweight row cover when they are very young. Plants can remain covered throughout the growing season but should be uncovered for fertilizing and periodic inspection.

Exclude the moths that lay caterpillar eggs by covering plants with floating row cover; alternatively handpick the worms if you don’t have many plants or try regular application of  Bt insecticide.

Exclude the moths that lay caterpillar eggs by covering plants with floating row cover; alternatively handpick the worms if you don’t have many plants or try regular application of Bt insecticide.

Once you harvest your cabbage it can be braised, stuffed, stir-fried, fermented, pickled, shredded for coleslaw, chopped for salad or added to soups. It is fun to try several different types – who knew that common cabbage could be such a diverse and interesting vegetable!