Combating Chlorosis

Chlorosis abnormal reduction or loss of the normal green coloration of leaves of plants, typically caused by iron deficiency in lime-rich soils, or by disease or lack of light

I love black eyed peas.  Each year I dedicate more space in my garden to black eyed peas than any other vegetable.  This year is no exception.  I currently have two 33 foot long rows of pink eyed purple hulls growing.  Of those 66 feet of peas about 55 feet of them are doing fine.  The vines are big, dark green and producing lots of purple hulled peas.  However, a group of plants right in the middle of one of the rows is not doing very well.  They are bright chartreuse in color and they are not producing peas.

chlorosis-black-eyed-peas-1

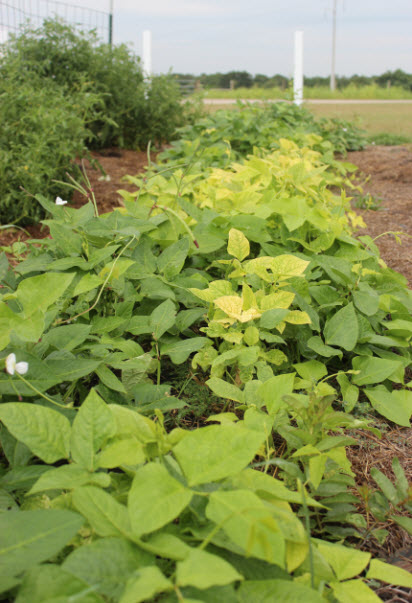
Notice the chartreuse pea plants mixed in with the healthy plants. This coloration is good indicator of chlorosis

My chartreuse peas are suffering from a condition called chlorosis.   Chlorosis is a condition where plants do not produce enough chlorophyll to properly support their growth. Because of this lack of chlorophyll, chloratic plants produce foliage that is yellow to yellow green (or even white in extreme cases).   Chlorosis happens when something in the soil prevents the plant from taking up enough iron (or magnesium).  Both iron and magnesium are necessary for proper chlorophyll production

chlorosis-black-eyed-pea-leaves-2

The deep green veins and the light green foliage of chloratic purple hull peas

I have grown peas for years and I have had absolutely no problems.  However, I grew them in raised beds that I had amended with lots of river sand and compost.  These peas are growing in ground in a “new” garden that I started last fall.  The fall garden did fine– no problems with chlorosis.  Because of the early success in the new garden, the unmistakable signs of chlorosis on my peas really surprised me.

chlorosis-black-eyed-pea-leaves

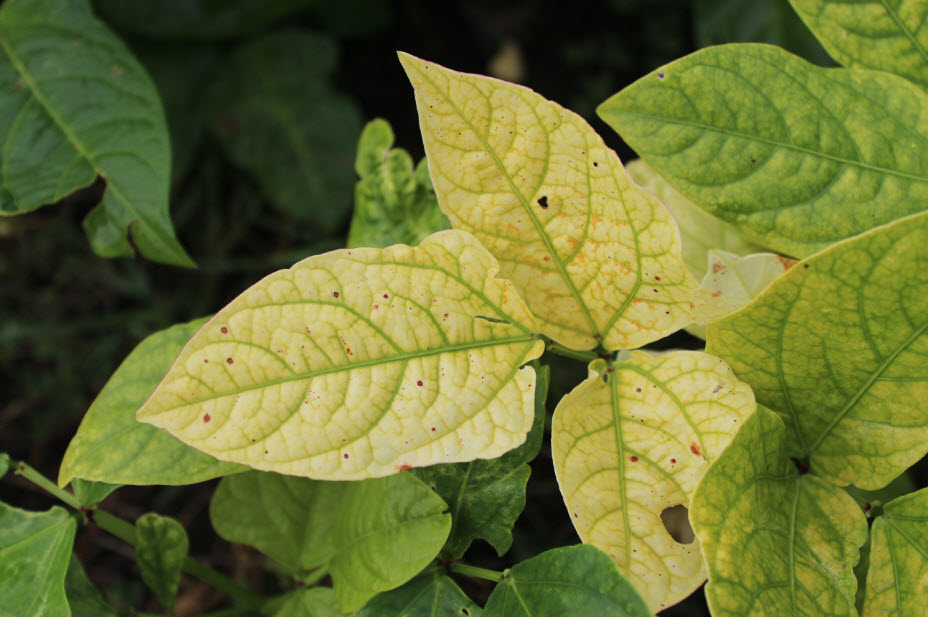
These leaves are so chloratic they are beginning to die.

Cause – Even though I knew what was wrong with my peas, I did not know what to do for them.  So, I did the only thing I knew to do; I contacted my friends in extension horticulture.  I am very lucky to be friends with some truly talented horticulturists.  Whenever I have a problem I send them pictures and a description of the problem.  You can do the same thing.  Most extension offices have people that can answer your plant questions.  Do not be afraid to contact them.  It is their job to answer your questions and they love to hear from.

My first response came from Cynthia Mueller.   Cynthia is a volunteer with extension and one of the most knowledgeable plant people I have ever known.  Like me, she was interested in the fact that the problem was isolated to a certain part of the garden.  Our discussion reminded me that I once had a burn pile in the exact same place that was now experiencing the problem.  Next, I heard from Greg Grant.  Greg is definitely one of the top horticulturists in Texas and also the most successful plant breeder around.  When I told him what Cynthia and I were discussing he became convinced the burn pile was exactly what had caused the problem.  I grow in the alkaline black clay that is common in the central part of Texas.  Greg reminded me that since black eyed peas prefer a soil pH of 6.0 to 6.5 my alkaline black clay (high pH binds up iron) was not the best environment for this variety.  In addition, the burn pile added a lot of phosphorous and lime (both of these also bind up iron) to a soil that type that is already known to tie up iron. So, I am trying to grow these acid loving peas in an environment that is just not suited to them.

pink-eye-purple-hull

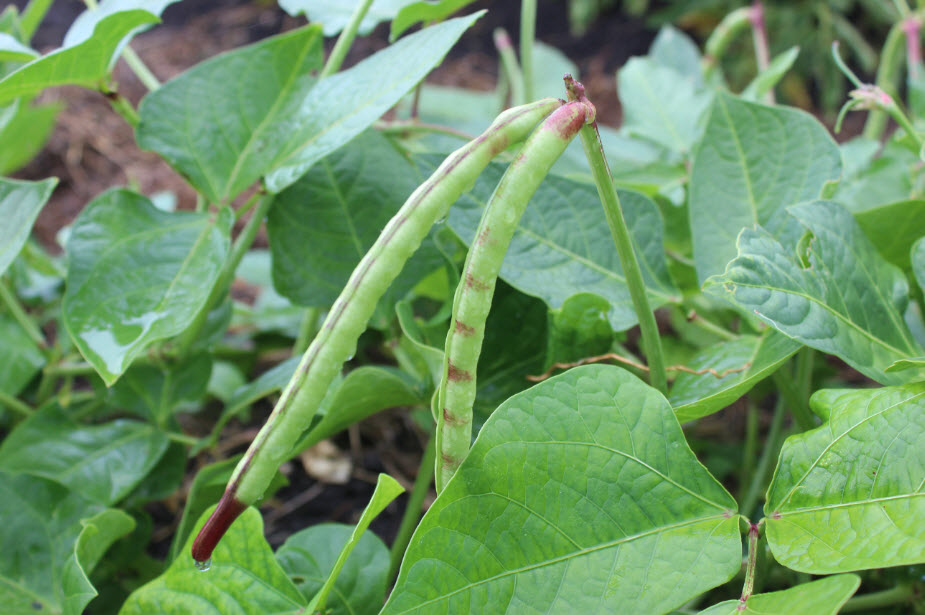
Note the deep green foliage. this what healthy purple hulls look like

Treatment – There are two ways for me to correct the chlorosis in my peas.  One is a quick fix and the other involves making changes to the soil.  My buddy Tim Hartman (who is an extension agent) sent me some very detailed instruction on how to do both.  Here is Tim’s response:

“Different cultivars can vary some in their efficiency at extracting iron from the soil. Iron availability can also vary a lot from one part of the row to the other depending on factors like watering (water with high calcium would raise the pH) or whether you’ve applied a lot of phosphorous fertilizer (organic or inorganic) to that soil (ties up the iron). You could apply chelated iron as a foliar or drench if you have some, or try to lower the pH with some sulfur. Of these, the foliar iron chelate would give you the quickest response and the sulfur the slowest. “

pink-eye-purple-hull-flower

A lovely, and healthy, pink eyed purple hull pea flower.

So there you have it.  I have chloratic peas because I am attempting to grow them in an area that is just not suited for them.  I will be taking advantage of both of Tim’s suggestions.  I am going to use a watering can to do an iron chelate drench.  This should get the chloratic plants producing.  However, that will not solve my problem long term.  When I re-till for the fall garden, I will begin to add sulphur.  I realize this is critical.  Since most vegetables prefer a pH that is in the range of 6.0 to 7.0, I will always have problems with chlorosis if I don’t fix my alkaline, lime enriched soil.

P.S. This post has been shared on the Homestead Barn Hop.  Barn Hops are a great place to go to get more information like this from a great group of bloggers.  Be sure to check it out!

Purple Bindweed – The Thorn in My Side

In II Corinthians, Paul talks about enduring a “thorn in his side”.  While no one knows exactly what the thorn was, most agree that God gave it to Paul so that, despite his many blessings, he would not become too prideful in his faith.  That story comforts me because each year the Lord “blesses” me with some new gardening “thorn” that keeps me humble about my garden and my gardening abilities.  This year, my thorn came in the form of a beautiful (but noxious) vining plant called purple bindweed!  While the flowers of this noxious weed are truly beautiful, that beauty does not make up for the overall nastiness of this weed.

purple-bindweed-flower-2

The flowers of purple bindweed are definitely beautiful

Purple bindweed is a native Texas morning glory.  It is also an aggressive vining plant that will literally grow over anything in its path.  One plant can send out trailing, twisting vines that stretch out over 15 feet.  While I have to admit, when those vines cover a fence and explode with flowers, the effect is very beautiful.  However, when they creep up your sugar cane or get twisted in with cucumbers and cantaloupes, the effect is not so nice.

purple-bindweed-flower-3

Purple bindweed is a native Texas morning glory.

Even though this plant is literally driving me crazy, I have to admire its shear survivability.  Each plant can produce 500 or more seeds.  The seeds have a very thick seed coat that can lay dormant in the soil for 20 years (some say 50 years or more).  The plant develops an extensive root system that can grow 10 feet or more into the soil.  Because of this, you can pull it, dig it or plow it and it will still come back.  In fact, research shows that a 2” piece of root can produce a new plant.  In addition, all of those deep roots make this plant very drought resistant.

bindweed-blooms

The twisting vines of purple bindweed will be covered in its lovely, lavender blooms.

All of the survival traits that the plant has developed make it very hard to control organically.  The only real option you have is frequent pulling or smothering.  If you decide to pull, realize that you will need to pull every shoot that pops up every three weeks or so for the next three years!  If you want to try and smother it you are going to need to use something like a large sheet of plywood or hardi-plank and you are going to have to leave it in place for years.  However, since the seeds can remain dormant for years, smothering and pulling is really only going to slow down the spread of this weed.

bindweed-vines-1

The vines of bindweed will wrap around anything-even its own vines!

The only way to effectively kill bindweed is with an herbicide.  Even though I do not personally like chemicals, the reality is that some weeds will never be fully contained with organic methods.  If you don’t mind spraying chemicals try Glyphosate (Round Up) or Tripcloyr (Remedy).  Both work well against bindweed.  For the best effect, many recommend mixing up a combination of both Glyphosate (2-3%) and Remedy / Triclopyr (0.25%).   These chemicals will definitely kill the bindweed if you spray it while the plant is actively growing.  For bindweed, the absolute best time to spray is when it is blooming.  NOTE:  These chemicals will definitely kill the bindweed.  Unfortunately they will also kill just about everything else that is actively growing.  Be careful to avoid overspray when applying this (or any) herbicide.  Also, apply just enough herbicide to wet the leaves.  There is no need to soak the plant. There is also no benefit to mixing them in higher concentrations than are listed on the label.

bindweed-flower-5

Even though this plant is driving me crazy, it does attract hummingbirds and other pollinators

The purple bindweed is beginning to bloom at my house.  This means that despite my best organic control efforts, it has beaten me.  This “thorn in my side” is one of just a few plants that have made me question my commitment to organic control methods.  Thank goodness I have St. Paul for inspiration.  Although his “thorn” tormented him his whole life he persevered; and so will I.  However, I have to admit, when I am out there pulling this weed in the Texas heat the thought of spraying it with an herbicide is very tempting!

My Best Peaches Ever (and how they got that way)

I am finishing up the last of the best peaches I have ever grown.  While this year’s harvest was not the largest I have ever grown numerically, the individual peaches were the biggest and sweetest that have ever come off of my tree.

peach-white-delight

Pinching half of the buds from your peach tree will yield bigger peaches next summer. Photo courtsey of Dr. David Byrne -Texas A&M

I wish I could say that I did something to produce these wonderful peaches.  My unusually large peaches were the result of a bit of bad luck that that kind of turned out to be a blessing in disguise.   On March 3 we got a very bad late season freeze.  When it hit, the redbuds, plums and peaches were in full bloom.  When the ice thawed, my beautiful redbuds looked horrible and all of the flowers were gone from my fruit trees.  I was sure this freeze would ensure that I would harvest exactly zero peaches and plums this summer.

peach-1

Two of my favorite things–fresh, home grown peaches and Texas Ware bowls!

While my prediction turned out to be correct for the plums, the peaches surprised me.  A couple of weeks after the freeze I noticed little peaches beginning to form.  Over the next few weeks, the peaches that survived the freeze turned into HUGE peaches.  Now I don’t mean that my peaches were super huge, but they were much larger than they had ever been in the past.

peach-2

I love peeling the skins off of peaches after they have been blanched. So fun to squeeze the peach and see it literally jump out of its skin!

Turns out, the freeze actually did me a favor.  While researching my next Texas Gardener article about new white peaches from Texas A&M, I discovered that commercial producers routinely remove (pinch) up to half the buds on each of their trees.  This bud removal allows their trees to produce BIGGER PEACHES!

peach-4

Diced peaches in another Texas Ware bowl ready for canning.

When I read this, I understood why my peaches were so big and so good.  The freeze “pinched” my buds for me.  Until now I did not know that this was something that you needed to do.  However, after seeing the results first hand, it is a garden chore that I will now be sure to do every year!

Right now I only have one producing peach tree.  It was literally the first thing I planted when Sally and I bought our little place in Brenham.  Since Sally and I are empty nesters, this one tree produces enough for us to enjoy fresh and also make lots of preserves.  This year, once we ate all we could, she made 24 jars of peach preserves.  If you would like to make your own peach preserves here is a great post with video from the Georgia Peach Council.  Enjoy!


peach-sally-white

I am lucky to be married to one of the cutest “canners” in the world!