Doing Rye Grass Right

The drought has really done a number on my yard.  In order to have something more than mud and dry weeds in the yard this fall and winter, I have decided to seed rye grass.  Now I have never put out rye grass before.  So, I decided to consult an expert before I went out and spent a whole lot of money and then wasted it by doing the job wrong.  My buddy, Morgan McBride, has worked in the green industry his entire life.  For over twenty years, he has designed, installed and maintained landscapes all over the DFW Metroplex.  Since he is an expert in turf management (and he would talk to me for free) I decided to ask him the proper way to seed rye grass.

Lovely rye grass sod. Photo from the website of lazyjfarms.com.

The Basics- Rye grass (genus Lolium), is a cool season annual grass commonly used for lawns, livestock food, green cropping and erosion.  There are also perennial species out there but the term “perennial” is a little misleading.  In Texas, the perennial species will only come back in areas of medium to heavy shade.

rye-grass-seed

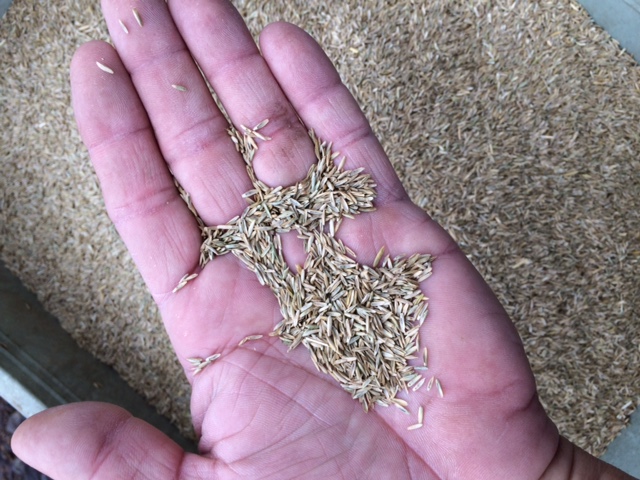
Morgan recommends using a perennial rye blend. It costs a little more but it will generally give you a more even coverage.  Photo by Morgan McBride

When seeding your lawn you need to be aware of which type of rye you are going to use.  The cheapest rye grass seed are the single variety annual types.  This type of seed is sold in your nursery or big box for around $20 per 50 lb bag.  The annual type works fine but it does not germinate as well as the perennial types.  Because of this you will need to seed at a higher rate.  Also, the varieties most commonly sold in our part of the world are VERY fast growers.  So, if you don’t mind mowing every three or four days, then the single variety annual type will be fine.

Rye-grass-seed-2

Rye grass (genus Lolium), is a cool season annual grass commonly used for lawns, livestock food, green cropping and erosion control. Photo by Morgan McBride

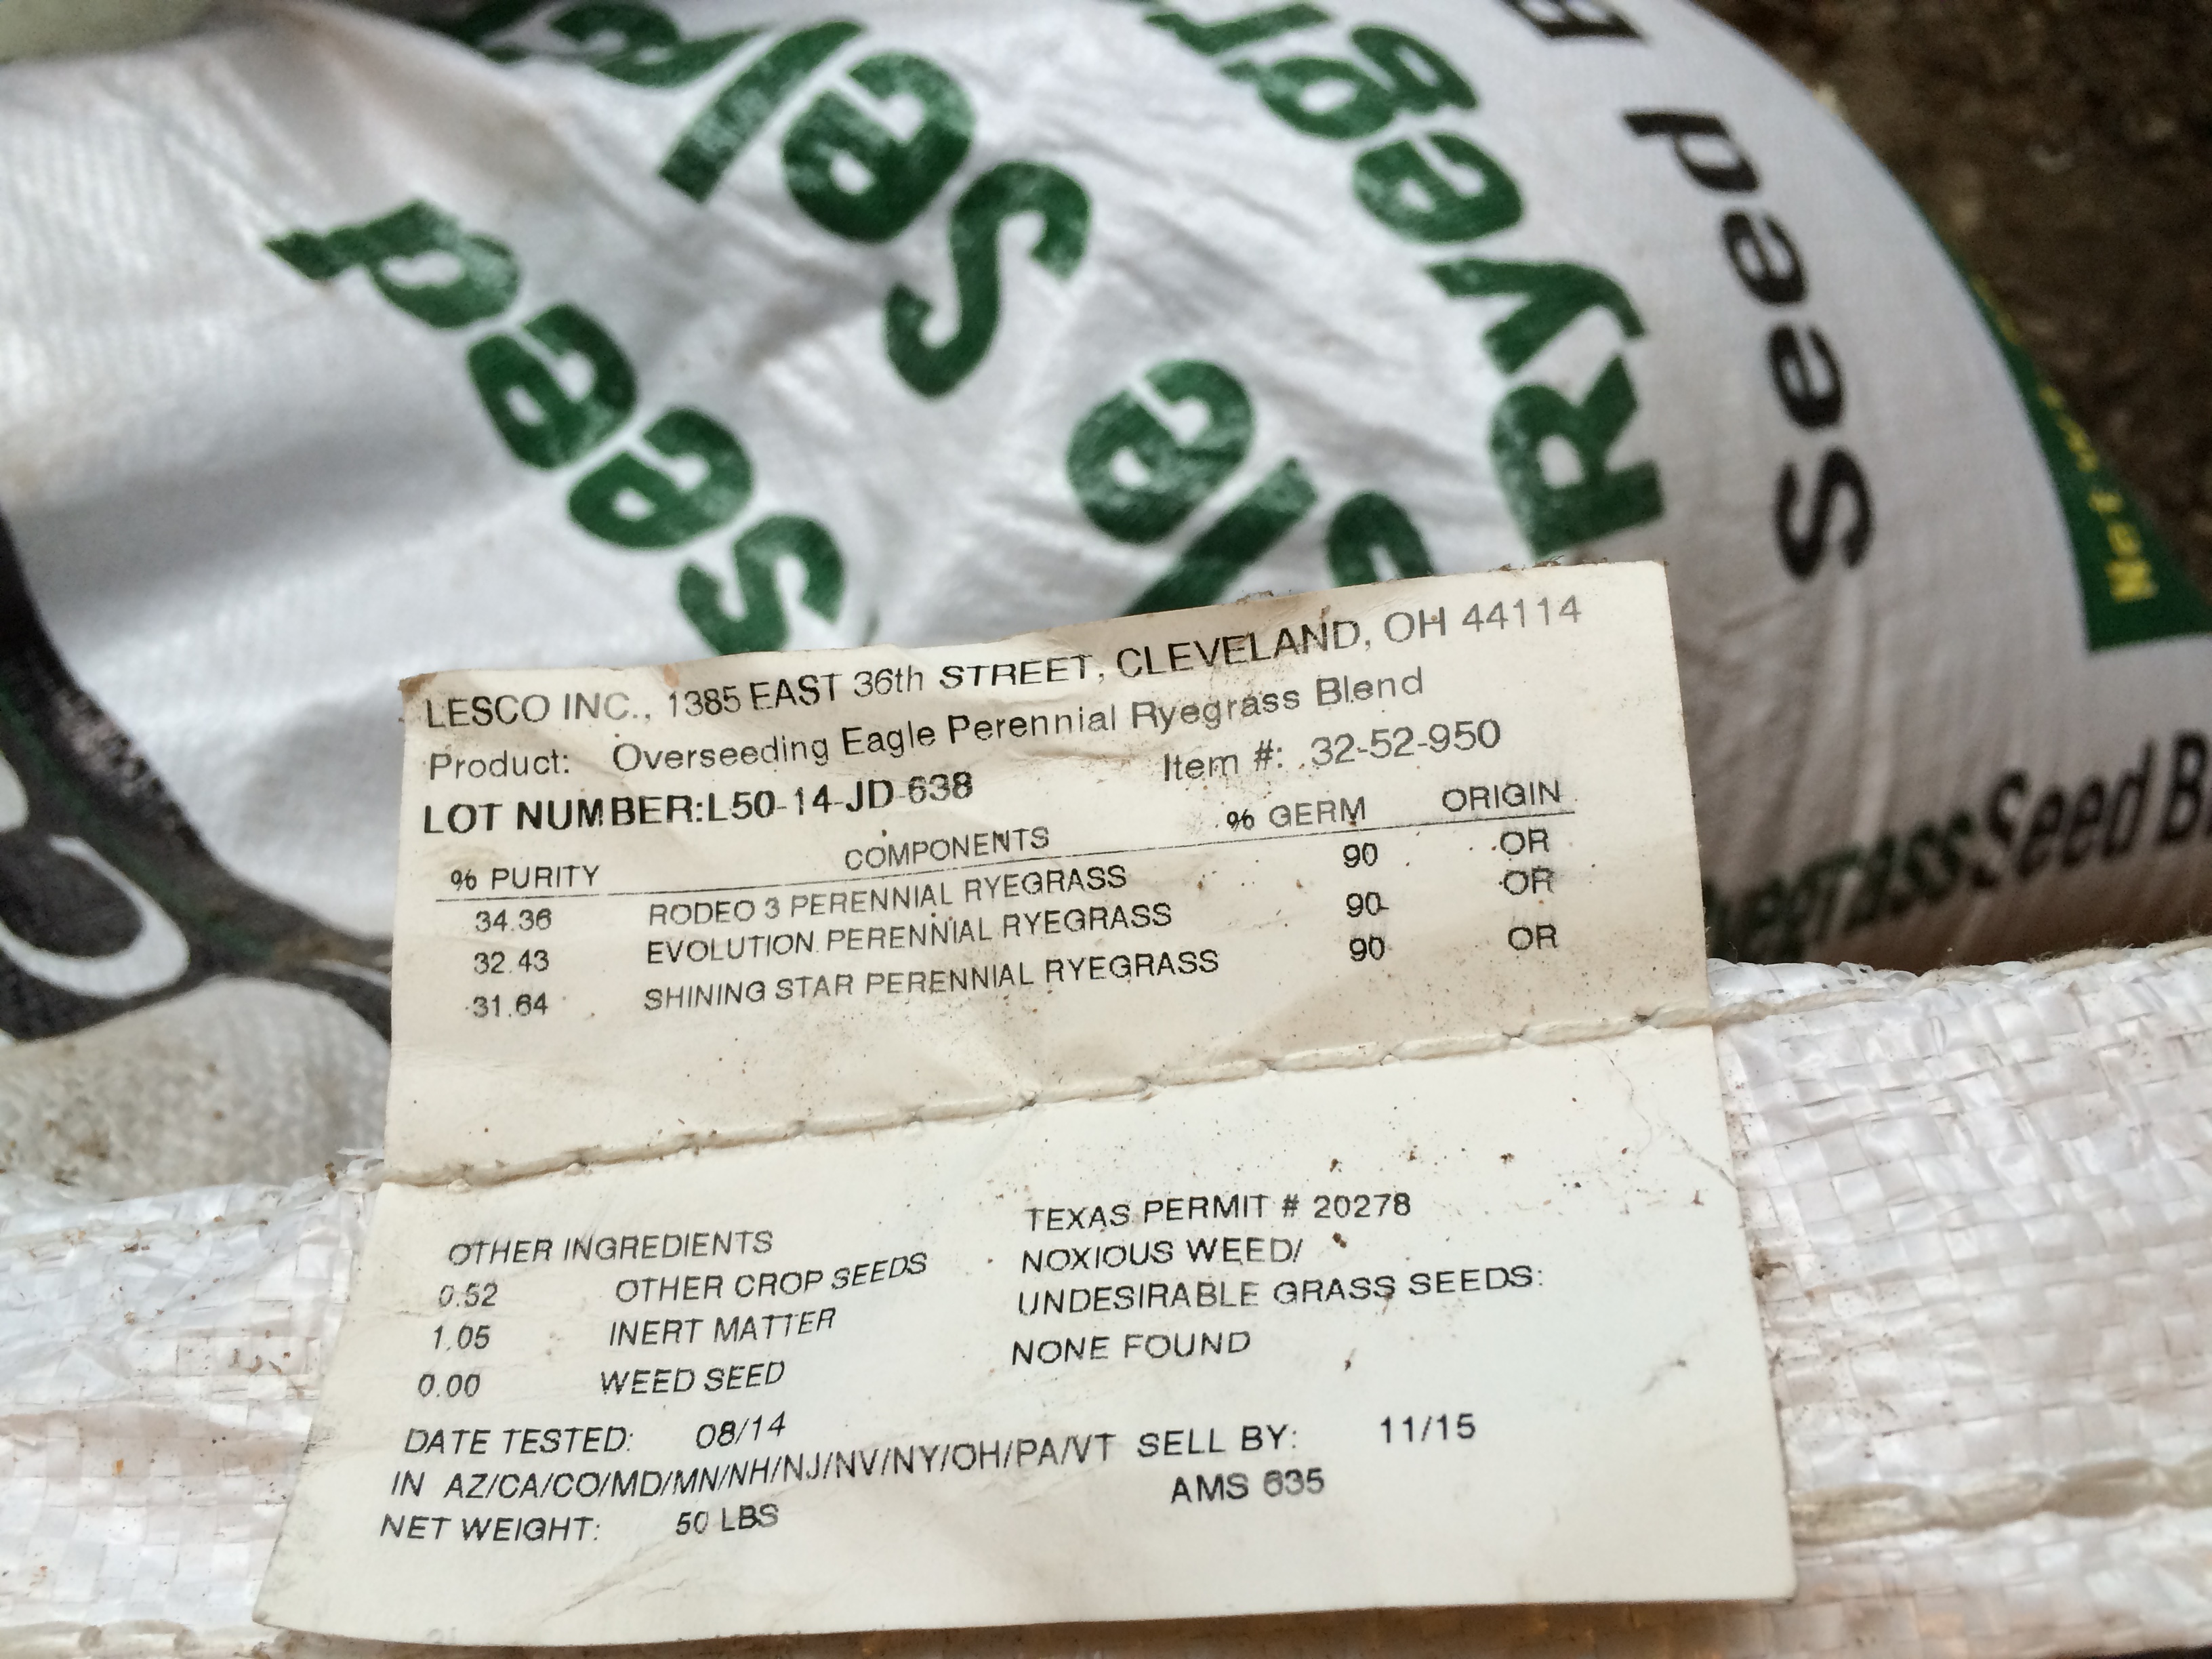
If you want to get the best coverage possible, you will probably be better served by purchasing a perennial blend.  These blends typically contain three varieties of perennial rye.  While the price is usually around $60 per 50 lb bag, you can seed at a lower rate.  Also, with three varieties, you greatly increase your chances of getting an even germination over the entire lawn.  With three verities you will get one that will do well in sun and one that will do well in the shade.

When to apply – When Morgan was doing turf management he always had September 15 circled as the date to start spreading rye.  However, climate change has taken away the certainty of that Sept. 15 date.  For your rye grass to prosper, it needs the days and nights to be at least 20 degrees different in temperature.  This year, it is now almost the middle of October and we are still barely getting that 20 degree spread.  Also, while the rye will germinate when the day/night temperature spread is 20 degrees, it will not really “take off” until that temperature spread is 30 degrees.  Using this knowledge you can select a date that is best in your area to spread your seeds.

spreading-rye-grass

For your rye grass to prosper, it needs the days and nights to be at least 20 degrees different in temperature. Photos by Morgan McBride

Preparation – Before spreading your rye grass you need to do two things.  First, rye needs to come in contact with the soil.  To increase your seeds’ chances of survival you will need to mow your grass very close to the ground.  If you have a thick St Augustine lawn you will need to scalp it.  Also, germinating rye grass cannot tolerate drought of any kind.  To increase your germination rate your soil needs to be thoroughly moist.  Since the drought has been so bad this year, Morgan recommends watering deeply for one to two weeks before spreading your seed.

Application – Once you have purchased your seed, get out your spreader.  If you buy the perennial blend you are going to want to set it to apply about 10 lbs per 1000 sq ‘.  So, your 50 lb bag will cover about 5000 sq’.  For best coverage, Morgan recommends setting the spreader to put out about half the recommended rate and seeding twice in different directions.  The Heritage Ranch Turf News Blog has a great post about this including pictures.  Please check it out as well.

When using the single variety you will need to seed at a higher rate.  Set your spreader to put out about 15 to 20 lbs per 1000 sq’.  This higher rate is used to offset the generally lower germination rates of the single variety types.

rye-grass-coverage

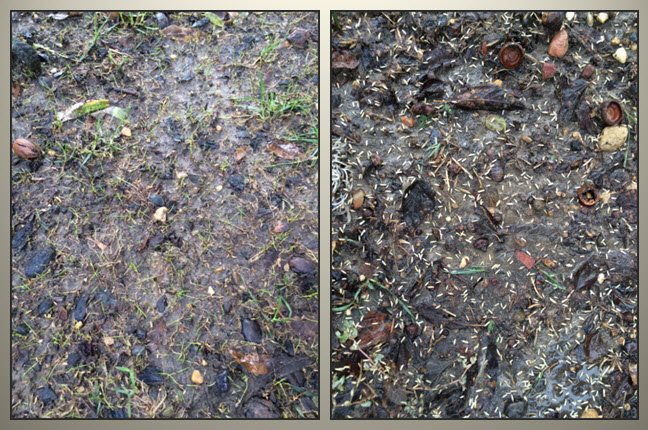
Morgan spread rye grass on this bare spot in his backyard. Two weeks later the rye grass has covered the spot. Photo by Morgan McBride

Getting it established – Once you have spread your seed you will need to be very diligent in your watering routine for a couple of weeks.  Rye grass needs an even moisture level for the most successful germination rates.  If you have a sprinkler system this should be much easier for you.  Set your sprinkler to do a short cycle in the morning, noon and afternoon.  If you do not have a sprinkler system, and you cannot be home during the day, go to your local nursery or big box and buy a battery operated hose timer.  This will be the best $20 you can spend for your rye.

When rye germinates it sends out a small, curved single root spike.  This spike is called a hook.  The hook must remain moist and in contact with the soil if it is going to have any chance of turning into grass.  That is why frequent watering is required for the first two or three weeks.

Fertilization – Rye grass is often used as a cover crop for vegetable gardens because it is so high in nitrogen.  Since rye is such a good sink for nitrogen it is a very good idea to feed your rye regularly with a high nitrogen fertilizer.  While not as easy to find as it used to be, something like a 12-0-0 is a good choice.  If you cannot find a pure nitrogen fertilizer, buy the one that has the highest N value you can find.  Broadcast your fertilizer at the same rate as you applied the seed at least once a month; the more the better.  The more nitrogen you put out the more attractive your grass will be.  Highly fertilized rye will turn a deep blue green that is just as lovely as Kentucky Bluegrass.

rye-grass-two-weeks

Two weeks after planting the rye grass is firmly established. Over the next few the grass will begin to form clumps that will form a soft and solid green carpet. Photo by Morgan McBride

Mowing – If there is drawback to rye, it is the fact that you will have to mow your lawn all winter.  However, if you don’t mind doing this there is a good chance that your winter lawn will look better than your summer lawn.  Set your mower high and mow frequently.  This will turn your lawn into a deep, soft carpet that is joy to both look at and run barefoot through.

Most of Central Texas got some much needed rain this past weekend.  The temperatures are also expected to start dropping.  So, according to Morgan, this week is the perfect time to spread your rye grass in central Texas.  If you want a lush, green lawn this winter (and you are not under watering restrictions) head out to your favorite lawn supplier and get that rye now.

Great Deal on Daylilies

As I mentioned in an earlier post, my friend Chris Von Kohn is a daylily breeder extrodinaire.  This past weekend he sold several of his creations at the Ft. Worth Botanic Gardens Fall Sale.  Chris is selling these beautiful and reliable flowers to finance his Masters of Horticulture degree at Texas A&M.  He has several plants left and he is selling them for the ridiculously low price of $7 per double fan.  If you are planning on adding some daylilies to your beds, why not contact him (his info is below). 

After the weekend rains, this is the perfect time to plant daylilies.  Please give Chris a call.  You will get some unique and beautiful plants that no one else has and he will get to go to grad school.  Everyone wins!

If you are in Arlington you can go by and pick them up.  If you are not in that area, he will be happy to ship them to you.  Chris’s cell is 817-269-7474 and his email address is Cvk007@earthlink.net.

Here are few pictures of some of the daylilies he has breed:

Tree Town USA

Have you ever wondered what $100K worth of trees looked like? These trees are in 670 gallon containers and have been container grown their entire life.

Last week, I got to spend two very enjoyable days at a 1200 acre tree farm south of Houston.  This farm is owned and operated by Tree Town USA.  Tree Town USA is the largest tree farm in the US.  They have several farms and sales offices all over the country.  This one is located just south of Wharton in beautiful Glen Flora, Texas (Click on the link and you can see the farm from the air, pretty amazing).

A shipment of high quality oak trees leaving Tree Town USA

I was the guest of one of their salesmen named Morgan McBride.  Morgan and I have been friends for most of our lives.  He and I share a great sense of humor and a deep love of all things horticultural.  Morgan has worked in the green industry his entire life.  He is a Texas Certified Nursery Professional and a true master of horticulture.  Since I had never visited a tree farm of this magnitude, he thought I might enjoy getting up close and personal with the inner workings.  He was right.

To say I was amazed is an understatement.  Until you see a working 1200 acre tree farm you just cannot grasp the amount and the scale of the work that it encompasses.  To support this much intensive agricultural production, Tree Town USA employs a huge amount of infrastructure.  The watering system was truly an engineering marvel.

The water for all of the trees comes from a 1600' well. The well is that deep so that the water contains no salts or other minerals. The water is pumped into retaining tanks where it settles and then leaves through a 10" main. That main is then tapped by 4" irrigation tubes. Drip systems are then attached to the 4" lines.

Morgan and the other sales people regularly visit the farm to pick the best inventory for their top customers.  On this trip, He needed to pull several small quantities of oaks and then 120 30 gallon yaupons.  Helping him was going to be a very pleasant way to spend a Friday away from the office.  I arrived late Thursday afternoon.  He had just finished a lot of his work so he took me on a tour of the place.  I thoroughly enjoyed learning the ins and outs of the tree business.  This farm employs between 200 and 250 workers.  It takes all of their efforts, seven days a week, to keep an operation of this size moving.

Since it takes so long to grow a tree, tree farms are much different than a traditional nursery.  Their quickest crops typically take three years to develop.  Some of their larger trees have been grown for 3, 5 and even ten years before it is ready for sale.  I cannot even begin to imagine the management required to keep a plant alive for 3 to 10 years in a pot in the wildly variable Texas climate.

45 gallon Nellie R. Stevens hollies before the storm

This past month, Morgan was the top salesman in the company.  While I was happy for him I was a little confused.  I asked how he could sell so many trees in the middle of the worst drought in history.  Many of his biggest customers are landscape architects.  In order to get paid for a large commercial project, everything has to be complete.  That includes the landscape.  So, even though this has been the hottest AND driest year on record, these firms still have to install trees, shrubs, ground cover and turf.  Since there is a lot of building going on in the DFW metroplex, Morgan has been selling a lot of trees and shrubs.  He did tell me that the cities of Austin and San Antonio have been making some concessions to the builders because of the drought.  Trees and shrubs still have to be planted, but they are amending the contracts to allow the firms to come back later and plant the water sucking ground cover and turf.

These crepe myrtles are typical of how the winds affected much of the stock

Another very interesting thing happened on my trip.  Around 6:30 pm on Thursday night, a MASSIVE thunderstorm blew in.  This storm brought some much needed rain.  However, it was accompanied by 60 mph winds.  High winds are not the friend of a tree farm.  These high winds blew over an INCREDIBLE amount of stock.  Even though they were all well anchored, the wind pulled the anchors up.  Friday morning was a very sad day on the tree farm.  All 200 employees had to stop what they were doing and walk the property and stand up and re-anchor the stock.  The blow down was so massive that at the end of the day, 200 people did not finish standing everything back up.

The blow down caused problems for Morgan and I as well.  We still had 120 30 gallon yaupons to find and tag.  What was supposed to be a very enjoyable learning experience for me turned into an awful lot of work.  These yaupons were all six to eight feet tall and had a spread of six to eight feet as well.  Before we could find the best ones, we had to stand up a whole bunch of very heavy shrubs.  I do not know how many 30 gallon yaupons are on a two acre pad, but it is a bunch!

My friend Morgan tagging yaupons for his customer

Despite the hard work, this was truly the most enjoyable “field trip” that I have ever been on.  Thanks a ton to my buddy Morgan and to Tree Town USA for allowing me to visit.  Tree Town USA only sells to the trade.  So, while I wish I could make a product placement plug for them, you can’t buy from them directly.  However, you can request Tree Town USA trees from your local Home Depot or your independently owned nursery.  Since I have had this experience, I can tell you that if you buy Tree Town trees you will be getting a very high quality product that was grown with the best science possible by a whole lot of people who truly love trees!

Very interesting berry arrangement on one the yaupons we tagged

Square Foot Gardening Second Graders


The organic gardens from Mrs. White's second grade class at St. Paul's Christian Day School in Brenham, Texas

This past Wednesday, I got to participate in two of my favorite activities at the same time; gardening and talking about gardening.  As I mentioned in an earlier post, my wife is a second grade teacher at St. Paul’s Christian Day School in Brenham.  Each year she uses the garden as a way to introduce a plant based biology curiculum to her class.  This year, she asked me to come and talk to her class about plants in general and the seasonality of plants in particular.  It was our goal to help these second graders learn that certain plants grow in different seasons and then plant the proper plants to help bring home the message.

I love talking to young children.  They pay very close attention to what you are telling them and they love to participate in the discussion.  My wife’s second graders did not disappoint.  They were such a good audience.  They answered questions, asked questions, and they always put their hands up first.  They were so good!  I truly love giving presentations to young people.  They always reaffirm my strong belief that, no matter what the news media tells us, America is still producing a whole lot of awful good kids.

Showing the kids the proper way to remove the plants from their cells

So, after our very exciting disscussion of which plants do best in Texas in the fall, we went to the garden to put my lecture into practice.  As I mentioned in my earlier post (Going Green For God), my wife gardens in an 8′ X 3′ garden with a trellis on the back.  Her garden is based on the the best selling book “Square Foot Gardening” by Mel Bartholomew.  Since she doesn’t have a lot of space or time, the square foot gardening method is the perfect tool to allow her kids to grow a variety of crops in a small space with out too much effort.  My wife’s garden allows for 24 seperate squares to be planted.  This is good because her classes usually range in size from 20 to 24 kids.

Excellent weeding!

Before we planted, we cleaned out the weeds and left over plants from the spring garden.  Sometimes when I weed, I fail to take notice of the truly amazing things that happen in the soil.  Not these second graders!  While weeding, the kids found a freshly germinated Texas Montain Laurel seed, young pecans trees beginning to sprout (so evidently squirrels are aware of my wife’s garden), crepe myrtle seeds, grubs, worms and milipedes.  Each new find opened up another round of questions.  However, the thing that generated the most interest was the smallest little snake skin shed that I had ever seen.  The kids were VERY interested in that! 

Before planting, we recharged the beds by adding three bags of composted humate.  The kids really loved this part (and I did too).  We sprinkled the compost over the top of the garden and then used our hands to mix it in.  I cannot really describe the method used by these second graders to mix in the new compost, but it resulted in all of us having dirt and compost all over us.  It really was a lot of fun. 

Mixing in the compost

Once the beds were ready for planting, we laid out the strings that divided the garden into it’s 24 squares.  Each child got to plant either a broccoli, cauliflower, cabbage or mustard green plant.  We had twenty plants, so in the four squares that were left over, we planted 64 carrot seeds (16 per square). 

Planting carrots

Over the next few months, these young gardeners will water, weed and OBSERVE.  I hope that my wife’s efforts will instill a life long love of growing things in some of them.  Even though they don’t yet realize it, my wife is teaching a whole lot more than biology in her little garden.  Her garden shows that you can do a whole lot of good things in life if you work together.  It also let’s them watch the miracle of life unfold right before their eyes.  By watchinging that little seed turn into the carrot, she is showing them that the garden is a special place that can feed alot more than just their stomachs.

Great technique

P.S.  Do you remember the first time you watched a seed germinate?  There is a very good chance that your first exposure to gardening was in a second grade classroom.  Teachers work very hard to find ways to get kids excited about learning.  Take time out of your busy day to thank all of the teachers that are doing everything they can to make sure that the kids of tommorrow are as awesome as the kids of yesterday!

Hyacinth Bean (Lablab purpureus)

The lovely foliage of the Hyacinth Bean on my trellis

This past spring I was at a garage sale at the home of a truly extraordinary horticulturist named Lorraine.  She and her daughter hold this sale every spring.  In addition to clothes and knick knacks, Lorraine sells plants.  You never know what she is going to have.  Many folks in town know that she can grow anything, so they bring her pots, seeds and cuttings.  She always turns them into beautiful plants that she then sells at ridiculously low prices.  She grows in compost that she makes herself.  She has a green house, the cutest potting shed in town, and a dang fine vegetable garden that she has been tending in the same spot for over 60 years.  She is truly incredible and I hope to someday be just like her.  I really admire her and I never miss her sale.  This year, she had three pots of hyacinth beans that I snatched up and took home.  Those three little four inch pots of hyacinth beans have turned out to be the best $3 I have spent all year!

This year, the first flowers on my hyacinth bean appeared in late July

I planted Lorraine’s starts in May at the base of the trellis that leads to my side yard.  This trellis is over 12’ at the top.  I planted two plants on one side and one on the other.  Since May, those three plants have grown and grown until they almost completely cover this huge trellis.  The foliage is striking and the pinky-purple flower spikes are extraordinary.  The bees, butterflies and wife love them. 

Planting –Plant your seeds outdoors after all danger of frost has passed.  You can also start them inside three or four weeks before the last frost.  Some folks recommend pre-sprouting the seeds in damp paper towels before planting.  However you get them to sprout, be sure and plant them in full sun. Hyacinth bean likes rich, well drained soil.  Water regularly to get them established.  Germination from seed can take about two weeks.  Once the plant starts to grow, provide regular water but do not over water.  They are relatively fast growing and should start producing flowers 45-60 days after germination.

My hyacinth bean bloomed for over a month before it set seeds.  Maybe that was because it was just so hot.  I saw my first flowers in July but I did not see my first seed pods until the first week of September.  The plant is still blooming and it is beginning to get covered in the deep purple, iridescent seeds pods that it is famous for.

The first of the deep purple seed pods appeared last week

Hyacinth beans send out long runners that are perfect for quickly covering a fence, building or trellis. If growing on a fence, they need no support.  To get mine to go up the trellis I tied the tendrils and shoots to the posts of my trellis using a jute-like twine.  Once I had the vines trained over the structure I let them go.  They soon sent out their long inflorescence of magenta flowers that make them so attractive.  The posts of my trellis are 4 ½ feet apart.  The inflorescences of these plants are now so long that you have to push your way through the flowers.

Flower petals from the plant falling onto my yarrow

Harvesting – You can eat hyacinth beans if you harvest them when they are very young.  Many cultures around the world use them extensively in their cooking.  However, if you want to eat them you need to know that are slightly toxic when mature.  So only eat them if you know when to pick them.  In fact, once fully mature, they should not be cooked or ingested at all.

Hyacinth beans are fairly good re-seeders.  Leave them alone and they will come back year after year.  If you want to harvest the seed, wait until the plant has died and then pick the dry, brown seed pods.  Once fully dry, open the seed pod and save the unique black seeds in a cool dry place until next spring.

The 143rd Washington County Fair

This weekend, I am going to be spending a lot of time at the Washington County Fair.  I absolutely love the fair.  Where else can you see a greased pig contest, eat a deep fried Snickers, watch a rodeo, get your picture made with a queen, sit on about a hundred antique tractors, milk a cow, see tons and tons of livestock, watch people pay tons and tons of money for that livestock, hear great country music, dance to that music and still be home before midnight?   There simply is no other place in all of America that offers this much good, wholesome family fun in a single place as a county fair.

Picture from http://leejsackett.com/projects.html

There are two kinds of fair people in the world; those that go and those that PARTICIPATE.  This last group is the one I throw my hat in with.  I did a lot of my growing up at the McLennan County fair.  Each year in high school, I proudly showed my polled Hereford heifers at the fair grounds in Waco.  The Heart of Texas (HOT) fair was the start of the show season for me.  It was also the culmination of a year’s worth of work that involved animal selection, halter training, fitting and grooming.  By the time the fair arrived, I could not wait to walk around that arena with my calf!  I was also lucky enough to have an outstanding Ag teacher who also loved to participate in the fair.  Each year our Ag (FFA) classes made individual and group projects to enter in the various competitions.  Through the years I got to help build countless pic nic tables, round bale feeders and even a complete cattle trailer completely from scratch.  Thanks to his efforts, I won a blue ribbon for my show box (if you are not familiar with livestock shows this is the box that contains all of grooming articles for your animal) in 1977.  That is the only blue ribbon I have ever won.  My Ag teacher was Donald Jones and I truly loved him (and I still do, he is the only teacher that I ever had that I still keep in contact with).  Mr. Jones taught me to weld, how to use a table saw and how to castrate just about any animal that might need castration.  He also taught me a lot about respect, teamwork, and pride in a job well done. 

Tatum Westerfield is the 2011 Washington County Fair Queen. This young lady sold over $68000 worth of fair tickets to earn this year's title. Photo from KWHI.com

I have visited many county fairs all across the country and in my humble opinion, this one is the best.  I can’t really put my finger on why, it just is. The Washington County Fair was the first county fair in Texas and still is the oldest running county fair in Texas.  The first one was held in 1868 and it has been held every year since.  After 143 years the people of Washington County have really learned how to throw a party. 

If you are not from a rural area you may not be aware of the significance that county fairs play in rural America.  County fairs are THE social event of the year in rural communities.  They are the culmination of a year’s worth of by parents, children, Ag teachers, county agents and countless other volunteers.  They are a time for friends to gather, and a time celebrate the traditions that make rural America what it is.  And it has been that way for at least 143 years.  I love knowing that my grandfather, my great-grandfather and my great-great grandfather looked forward to going to the fair as much as I do now.  So I guess that is really what makes the fair special: Tradition.  America is a place that honors hard work, self reliance, competition and community.  The fair allows us the opportunity to practice those values and celebrate those that cling to them.   Not too long ago, America was mostly rural and American agriculture and agriculturists gave our nation the resources that we needed to grow into what we are today.  The fair is an annual reminder of this.

Tonight, the weather is going to be great!  The temperature should be in the 70s after the sun goes down.  Perfect fair weather!  So, grab your sweetie, put on your boots, gas up the truck and meet me at the fair!

Shallots in the Potager

I love my little potager.  It is truly the best gardening gift that I have ever given to myself.  Not only does it provide my wife and I with all of the veggies, herbs and flowers that we need, it allows me to constantly experiment with plant selection and design concepts.  Even though I want to produce as much food as possible in my small space, it is just as important to me that the beds of my potager are as attractive as they are functional.

Shallots and cauliflower in my triangular beds

Every August and February, I get out my graph paper and sketch out where I want to plant the several varieties of plants that I am going to grow.  I pick plants that are tall and plants that are small.  I will find plants that have interesting textures or colors that will break up all of the “green” in the beds.  Even though I try several different varieties in each design, the one plant that I use in each and every one of my garden designs are shallots.

Shallots are the perfect plant for the potager.  They are highly productive, easy to care for, have very few issues with disease or pests and their upright foliage is the perfect border.  I use shallots in my designs much like most folks use mondo or lariope in their flower beds.  Last year, I used them to line the fronts of my exterior beds.  This year, I am using them as a middle planting in my triangular beds.  The design for my triangular beds is based on the “Thriller, Filler and Spiller” design model.  The beds will be made up of three different types of plants.  I have selected cauliflower for the “thriller” component of the bed.  I love the large scale and course texture of cauliflower and it will contrast nicely with the upright form of the shallots that I am using as my “Filler”.  The outside border will have different varieties of leaf lettuce and spinach acting as the “Spiller”.

A handful of shallot "offsets". Some folks call the offsets bulbs. Whatever you call them, stick them in the ground just deep enough to cover the neck.

Background – Shallots (Allium cepa var. aggregatum) are often called dividing onions.  They grow in clusters of offsets that make them look somewhat like garlic when harvested.  Technically a perennial, they will continue to “divide” as long as they are left in the ground.  Because of this, I never harvest all of my shallots.  I always leave a few in the ground until I am ready to replant in the fall.  This year I pulled up a single clump that had 43 offsets.  Additionally, shallots are extremely cold hardy.  Last winter was brutally cold by Texas standards.  It got down to 18 at my house and we had several days below 24 degrees.  Still, my shallots thrived.

I got my original shallots from Plants and Things nursery in Brenham.  They are the only folks in the area that carry shallots.  In fact, they grow them in their own garden on the back of the nursery property.  This year, I needed a few more shallots to finish my bed design so I stopped in and visited with Mary Stolz.  She told me that the shallots they sell came from a start she got several years ago at a Master Gardener’s event.  Through the years, those few starts have yielded enough for them to be able to eat all they want and still offer plenty to their customers.  In spite of this year’s drought, they have harvested three wash tubs full of these tangy little onions.  That should tell you a lot about how prolific and reliable these small, bulbing onions are. 

The yupneck's youngest daughter planting shallots in the potager. The round thing in the background is a fully ripe tatume' squash that I am drying for seed.

Planting – Shallots are grown just like regular onions (except you don’t have to worry about any day length issues).  Plant them in the fall for an early summer harvest.  Do not plant them in soil that has been recently manured.  Shallots should be planted with the root scar down and the pointy end up.  Stick them in the ground deep enough to just cover the top of the offset.  Now all you have to do is water and weed.   Some folks suggest pulling the soil back from their base once the roots set, but I have not found this to be necessary.

Harvesting/Curing/Preserving – Just like “regular” onions, the tops of the shallots will “fall over” when they are ready to harvest.  However, you do not have to wait until they are fully mature to enjoy them.  My wife and I use young shallots just like we use “green onions”.  The tops are excellent chopped into a salad and the young offsets have a very strong flavor that I enjoy raw. 

Since shallots are actually onions, they can be “cured” for later use.  Cure your shallots just like you would cure any other onion (click the link to read the details of how to do this).  The only difference in curing them, as opposed to regular onions, is that you need to divide your clumps into individual offsets before you cure them.  Cured shallots can last up to six months if kept in a cool, dark place.

Another advantage that shallots have over regular onions is their ability to withstand your freezer.  My wife and I chop up several small Ziploc baggies full of shallots and then stick them in the freezer.  This makes it very easy for us to use them later in eggs, soups and casseroles.  They do lose a little of their texture when frozen but they maintain that spicy flavor very well.

Store bought shallots are very expensive.  If you eat a lot of shallots, then they are one of the few vegetables that you can grow and truly save money in the process.  Because they are so productive, carefree, tasty and ornamental, shallots have earned the title of the only vegetable that has a guaranteed spot in my fall garden.  Why don’t you stop by Plants and Things today and give them a try in your own garden?

Tree Gators, Aggies and Wildfires

Well, Mother Nature finally sent a little relief to all of us that have been suffering under the heat of the HOTTEST AUGUST ON RECORD.  This cool front was much appreciated by all of the fall gardeners who really needed to get their seeds and seedlings in the ground.  The milder weather encouraged me to tear up and haul off an old brick side walk.  I was also able to get the beds of the potager ready for a slightly late Fall planting.

I also got to install my latest “garden gadget”.  Because of the drought, all of our neighbors are watering much more than normal.  This leaves us almost 0 water pressure at our house.  Due to the low water pressure, our sprinklers are just not covering the same amount of area that they used to.  It has made it somewhat difficult to get enough water on our trees.  So, to help ensure that my trees make it, I bought five “Tree Gators” If you are not familiar with Tree Gators, they are basically a big ziplock baggie that wraps around the base of your tree.  You fill it with 20 gallons of water and then tiny holes in the bottom of the bags drain the 20 gallons over a five hour period.  I was very impressed with this little invention.  It has an incredibly simple design, is ridiculously easy to use, and entirely effective.  What more could you ask of a gadget?  You can check out the entire line of Tree Gator products at http://www.gardenhomedirect.com/Treegator-Original-Slow-Release-Watering-Bag-by-Spectrum-Products_p_3.html.

Over 80,000 Aggies showed up for Sunday’s game. It was the fourth largest crowd ever at Kyle Field.

Despite getting to watch A&M beat up on SMU, the weekend was not perfect.  The tropical depression that brought a ton of much needed rain to Louisiana, brought us extremely high winds for most of Saturday and Sunday.  These winds caused a small personal tragedy for me.  I lost my greenhouse to the winds.  I know that this is in no way comparable to losing one’s home.  However, to me it was pretty heart breaking.  I just bought my little greenhouse a month ago.  It was very disappointing to drive up my road on Sunday morning and see all of those dreams of fall and winter propagation wrapped around a barbed wire fence.

My little greenhouse fell victim to the high winds on Saturday

The Texas Wildfires

I would also like to take a minute and talk a little about the fires that seem to be consuming most of Texas.  Right now, there are 64 wildfires burning in Texas.  Things are so bad that on Saturday, I heard something I have never heard in all of my 49 years.  The Brenham radio stations were making public appeals for all volunteer firemen, regardless of where they lived, to grab their gear and head to Bastrop.  The fire in Bastrop is awful.  I heard this morning that Bastrop State Park is gone!  How can that be?  Bastrop State Park was a huge stand of ancient pines covering acres and acres of beautiful rolling hills.  I have spent many painful hours pedaling up and down those hills on my bicycle.  While my thighs hated the hills, the place was so beautiful that I gladly accepted the burning in my thighs as the small sacrifice that my body paid so my mind and soul could be invigorated by the scenery.  I will miss this place dearly.

While Brenham is still fairly safe, all of the counties around us are burning.  Two of my nephews that live close to Bastrop were forced to evacuate on Sunday.  I cannot imagine leaving your home and all of your possessions knowing there is a very good chance they will not be there when you return.  According to the news wires, between 600 and 1000 Texans have lost their homes to wildfires this summer.  Please keep these people in your thoughts and in your prayers.  Also pray for the men and women that are battling these fires.

If you would like to see where these wildfires are currently burning, the Texas A&M  Agrilife Extension site hosts a Google map with data provided by the Texas Forest Service.  Here is the link: http://ticc.tamu.edu/Response/FireActivity/.

Oxblood Lilies (Rhodophiala bifida)

Each fall in Central Texas, bright red trumpets herald the approach of autumn.  These trumpets are the deep red flowers of the Oxblood lily. 

Oxbloods in my front bed

Oxblood lilies seem to be a bit of a regional secret.  I grew up in Waco and I was not familiar with them until I moved to Brenham.  The house that we bought was on an almost bald hill.  The previous owner was not much of a gardener.  However, he apparently liked bulbs.  The first fall that we were there, we discovered that he had left us red spider lilies (Lycoris radiate), yellow spider lilies (lycoris aurea) and oxbloods.  I instantly fell in love with these extraordinary plants.

This close up of oxbloods is from "The Southern Bulb Company"

Oxbloods are often called Schoolhouse Lilies because the bulbs send up their stalks right around the start of the school year.  Like rain lilies, their bloom is in response to the first fall rains. However, since there have been no fall rains this year, they will apparently also bloom in response to a good fall watering.  Another of their common names is Hurricane Lily.  Since most of the rain that falls in the Gulf South in August is the result of a late season hurricane, this is also a very appropriate name.

Oxbloods are native to South America.  An early German-Texan horticulturist named Peter Oberwetter is believed to be the first to import the oxbloods from Argentina.  Due to his efforts, the oxblood has been very popular in the areas of Texas originally settled by German settlers.  While they are gaining acceptance around the South and Central US, they have flourished in places like Brenham, La Grange, Independence, Round Top and Austin for the last 150 years.

Here the initial foliage of the oxblood is clearly visible.

Oxbloods naturalize and reproduce readily.  In fact, they are so hardy and so prolific that Scott Ogden says “No other bulb can match the fierce vigor, and adaptability of the oxblood lily”.    Because of their “tenacity and adaptability”, oxbloods have become one of the most common “pass along plants” in Texas.  Most of the people that have them got them as a division from someone else.  Finding a friend with a well established bed is still the best way to get them for your own garden as they are somewhat difficult to find in the nursery trade.  However, some specialty bulb growers like The Southern Bulb Company(http://www.southernbulbs.com/OxbloodLily/) now offer them for sale on line.

Black, long necked oxblood bulbs harvested with Grand Primo Narcissus this past spring

Oxbloods are very easy to grow and they are very reliable.  Their growth habit is just like that of other fall blooming bulbs.  The flowers appear on a single “bald” stalk in the fall.  The stalk is often accompanied by two long leaves.  After the flowers die, the rest of the foliage begins to appear.  The foliage grows into a clump of long, thin, deep green leaves that resemble mondo or lariope that lasts until June.  After that, the foliage dies back and the bulbs become dormant.  So, if you are going to divide them, June is the optimal time.  However, unlike many other bulbs, they can be dug and divided just about any time.

Oxblood bulbs have a dark black skin that makes them fairly easy to identify.  The bulbs prefer full sun but can tolerate light shade.  In fact, most of the ones I see are massed around the trunks of old live oaks.  Oxbloods do best in rich, well drained soil but they will grow in just about anything.  Plant your mature bulbs about three inches deep with the neck slightly exposed.   Medium and smaller bulbs can be planted at little more shallow.  Once planted, water regularly for the first year.  Once established, they will survive (and even thrive) on normal rainfall.

REALLY Bad News for Texas

This courtesy of the National Weather Service

I am an optimistic person.  I always believe everything will work itself out in time.  However, I just read “The SciGuy” column by Eric Berger in the “Houston Chronicle”.  OMG!  According to this article, if you think things are bad now, wait.  There is a 50/50 chance the drought is going to get worse.  My optimism is beginning to fade.

Chart courtesy of the Texas Water Development Board

Please click the link above and read this article.  It is truly frightening.  Even though it says we are not going to get a break on the current heat wave and there is a 50/50 chance the drought will continue, the really scary part of the article has to do with our reservoirs.  In January, our water reservoirs were at 91% capacity.  Today they are at 64%.  So, if my math is right, Texas has used about 1/3 of its surface water in the past eight months.  That is truly frightening to me.

This drought has taken a huge toll on my yard, beds and gardens.  I really don’t know how we will survive another year of it.  If it is all I can do to keep a few beds alive right now, I cannot imagine what it will be like if we don’t get a ton of rain this fall and winter.  This is truly going to be devastating to those of us whose hobby relies on water.  And the poor farmers and ranchers!  I cannot even imagine the financial impact this is going to have on them.  At this point, all I can do is reiterate what Rick Perry said last month; “Pray for rain!”