The Fall and Winter Potager

Lately, several people have been visiting my site from Pininterest.com and “pinning” shots of my garden on their pinboards.  I am very flattered when this happens.  If you are not yet familiar with Pintrest you should check it out.  It is a collaborative site where you create “pin boards” of your favorite topics and then post images that you find on the web in them.  Then, everyone on the internet can come to your site and see the things that you have found.  It is really cool and you can quickly burn several hours if you are not careful. 

Right now, my little garden has never been prettier.  The folks from the Central Texas Gardener television program came to film it back in December.  It was pretty then, but it is a lot prettier now.  The veggies are doing great, but the flowers have really matured and look beautiful.  Eventhough the potager is mostly about the vegetables, it is the flowers that make it interesting.  So, for all of you Pinterest users that are fans of small, raised bed kitchen gardens, and my regular readers, here are a few pics of what is currently blooming in my little potager.

Panseys are always a great choice for Texans in the fall.  I planted these around the first of Decemeber.  If you look closely you will notice carrot foliage in the back.  I do companion plantings in all of my beds.  I have a mix of pink and purple panseys that share the center bed with a mix of carrots and vilolas (Johnny Jump Ups).  They are all thriving and look very good mixed together.

My purple panseys.

Violas are one of my favorite winter flowers.  The work great in pots where their pretty little flowers grow rapidly and spill over the side.

Calendula is often called pot marigolds.  Not only is it pretty and a prolific bloomer, the petals are edible.

I love dianthus.  They bloom well into the summer.  Their common name is “pinks”.  People think this is because they are mostly pink, but it is really because their petals look like they were cut with pinking shears.  They come in all colors and all sizes now but I still prefer this old fashioned variety.

This year’s winner in the vegetable department is Comet Broccoli.  This variety is incredible at putting on side shoots.  I have two dozen of these scattered throughout the potager.  Last Sunday, my wife and I harvested 8 produce bags full of side shoots.

Here is a picture of me with a lettuce harvest.  Our lettuce has been outstanding this year. 

One of my favorite things in the potager is not a plant at all.  It is our bottle tree.  While not technically in the potager (it is in the outside border), I still think of it as one of the main things that adds interest and charm to my little garden.

In addition to the flowers pictured above,  I have byzantine gladiolous, crinums, daylilies, two varities of roses, lots of salvia, red poppies, holley hocks, crysanthimums, zinnias and larkspur.  This ever changing pallette of colors and textures is what keeps me excited and watchful throughout the year.

RAIN!!!

Something I haven't seen in a long time; 3.5" of rain in the gauge!

Well, it finally happened.  After previous rain storms passed us by, we finally got one of our own.  In the past 24 hours it has rained about 3 1/2 inches at my house.  That is very exciting on its own.  However, this rain came in with a storm that spun confirmed tornadoes in Brenham and the Lake Sommerville area.  This storm was also accompanied by lots of thunder and lightening.  If you believe old wives tales, thunder in January means a freeze in March.  We will see.  This year has been so strange I would not be surprised at all if a late freeze comes as soon as the spring plantings are up.

Something else that I haven't see in a long time; a puddle of standing water in my yard.

Speaking of weird things that have happened this year, here are a few that I have noticed on my own little piece of heaven.  First, my peach trees are in bloom!  And the funny thing is, this is the second time they have bloomed.  Not sure what this will mean for our summer peaches but I can’t imagine it is good.  Also, my Cherokee rose has bloomed twice.  This rose doesn’t usually bloom until March.  I also have a “found” crinum that is about to bloom.  This variety usually blooms in May.

The "found" crinum that is blooming about four months too early

In spite of the bad storms that that brought it, I am so thankful for the rain.  The tornadoes were a little scarey but at least no one was hurt.  This rain was substantial enough that most people’s stock tanks caught water.  This is very good news for all of the people that are trying to keep their livestock.  Plus, with just a couple of more rains in the next few weeks, they should be assured of a pretty good early hay crop.

Mushrooms that have popped up in all of my freshly mulched beds

Yes, this is a very strange year so far.  Everyone seems to have a theory as to why; climate change, La Ninya, the Mayans.  I am not sure what is going on, but I am certain I will be able to find some things that will grow for me in spite of it all.

Ellen Bosanquet and the CobraHead Hoe

Yesterday, while returning from lunch, I found what I believe to be an Ellen Bosanquet crinum bulb laying on top of the ground.  Now I am not certain it is an Ellen Bosanquet but it was laying in a place where a large clump of them had once stood. 

Ellen Bosanquet from SouthernBulb.com

I found this bulb while walking through a garden that I go through quite regularly.  While strolling through it, I discovered that a large bed had been dug up and all of the plant material had been removed.  While surveying this, I noticed the bulb.  It was laying on top of the soil and had just a few roots still in the ground.  I decided that it had been left there to die so I rescued it.

I love crinums and I have several varieties in my beds.  Since Ellen Bosanquet is one I do not have, I was very glad to find this bulb.  In my opinion, Ellen Bosanquet is one of the prettiest.  It rosey pink flowers and slightly rippled foliage makes it an attractive plant whether it is blooming or not.

What I hope is a healthy Ellen Bosanquet bulb

Since I didn’t know how long the bulb had been out of the soil, I planted it as quickly as possible.  This gave me the opportunity to try out a new garden gadget that my wife gave me for Christmas.  The CobraHead Hand Hoe is a marvelous little garden tool that is produced right here in the USA by a small family owned business.  My wife ordered it for me from another family owned business that we often shop with; Baker Creek Heirloom Seeds.

  I am not a big buyer of garden gadgets.  However, when I saw the CobraHead in the Baker Creek magazine I knew it was something worth having.  The CobraHead is a 13″ long, curved weeder, cultivator, planter, etc.  It has a thin, curved, football shaped head that allows it to work in even the heaviest clays.  In my own garden, the tools I most often use are an old 12′ long Craftsman screwdriver and the claws of an old 20 ounce framing hammer.  The thin and gracefully curving shape of this tool, combined with the overall length and large handle made me realize that I could finally put my hammer and screwdriver back in the tool box.

After using it to plant my new crinum in a fairly heavy clay, I give the tool two big green thumbs up!  The tool performed just as advertised.  I was able to quickly dig a hole with out wearing myself out.  I was very pleased.  (I make this next statement in a very light hearted manner)  Thanks to my new CobraHead, I am actually looking forward to all of those weeds that will soon be popping up in my beds!

Grand Primo Narcissus- Harbingers of Spring

I like to think of my Grand Primo narcissus (Narcissus tazette ‘Grand Primo’) as  “harbingers of spring”.  They are always one of the first thing to bloom in the new year .  Their white, star shaped petals topped with the bright yellow center cup, always reminds me that spring is on its way.  I have hundreds of these lovely and reliable harbingers scattered across my property.  Some were left for me by the last home owner but the bulk of my collection was passed to me by a very generous friend.

The first Grand Primo of the year is beginning to open

There are many varieties of narcissus that do very well in all parts of Texas.  However, Grand Primo is the most hardy and prolific in our part of Central Texas.  Grand Primo readily naturalize here.  Not only do they come back year after year, they divide.  And because of this, you can turn a few bulbs into a whole bunch in just a few years.

Grand Primo beginning to open

Narcissus are incredibly easy plants to grow.  Their bulbs love a nice, loamy soil but they will grow in most Texas soil types.  Many of mine are in unimproved black gumbo and they do just fine.  However, the ones that bloom first and divide most readily are the ones in my well worked flower beds.

The first bud of January is fully open

Since Narcissus bloom in January, it is best to plant them in the late summer or early fall.  Realistically, you can plant them just about any time.  However, if they are planted to late in the fall they may not bloom the first season after planting.  Don’t worry about this, it is normal and they will do fine in the second season.

Since these bulbs divide so well, you can easily divide them to get more plants.  All bulb plants have a similar growth cycle.  They flower and then put out additional foliage.  This foliage does the photosynthesis for the plant.  All of those green leaves are capturing the sunlight that the plant then converts to food that it stores in the bulb.  This foliage is usually present for about six months after the bloom.  Once the foliage fades the bulb goes dormant until the conditions are right for it to sprout.  Because Grand Primos bloom in January, you should divide them late June or July (For more information on harvesting bulbs, check out my “Bulb Hunting” post from last February).

A bunch of Grand Primos that I harvested last year.

Whether you buy your bulbs or harvest them, you should plant them around early September.  To plant your Grand Primo bulbs, dig a hole about two to three bulb lengths deep.  Place the bulb in the hole with the wide end down.  If you are not sure which end to put down, simply lay the bulb on its side.  Cover the bulb with soil, water in and wait.  That is all there is to it.  These bulbs have an almost 100% success rate when planted in this manner.

As you drive around town on these cold, gray January days, look for the bright white and yellow Grand Primos.  They are everywhere!  These beautiful “harbingers” will brighten your day and remind you that spring really is just around the corner again.

Succession Planting of Fava (Broad Beans) in the Potager

The only way to get your small garden to continuosly produce is to practice succession planting.  Succession planting is nothing more than putting something in the ground as soon as something else comes out.  Since my potager is so small, and I love a steady supply of fresh veggies, I have to be fairly deligent in the way I manage my plantings. 

This past weekend, I harvested all but one of my cauliflower plants.  This freed up the middle of my four triangular beds for something else.  I decided to replace the cauliflower with fava beans (or Broad Beans for my English readers).  I also took this opportunity to plant a few more radishes, some round Paris Market carrots and Green Arrow English Peas.

I have never eaten or grown fava beans before.  However, the seeds were a gift from my dear friend and gardening mentor, Cythia Mueller.  So, in honor of my friend, and in keeping with my tradition of trying new things, I decided to plant them where my cauliflower had been. 

Fava beans (Vicia Fava) are a cool season crop that have been grown for millenia.    While native to North Africa and Southwest Asia, they are widely cultivated around the world.  It is believed that along with lentils, peas and chickpeas, fava has been in production for over 6000 years.  It is also interesting to note that they are not true beans.  Fava beens are legumes; but they are more closely related to vetch than they are to green or lima beans.

Fava beans are a great choice for the fall Texas garden.  They love a nice loamy soil, but will grow well in less perfect soils.  They will also tolerate soils with high salinity so that makes them a great choice for the Bryan-College Station area.  Fava are a true cold weather crop and they can take just about anything our winter can throw at them.  They will survive freezes into the the twenties.  Even though I planted mine on December 31, most people in our area plant them around Thanksgiving.  They grow best at temperatures between 40 and 70 degrees F and they will not set beans once the night time temps go above 75 degrees.

Here you can see how I use the end of my hand rake to make holes for large sized seeds

Fava beans produce a thick, square stalk and can grow to heights of three feet or more.  The leaves of these tall plants can be harvested and used like spinach.  Their white flowers are streaked with black.  Since black is a very unusual color in the plant world I can’t wiat for these plants to bloom so I can see it for myself.   Also, those lovely white and black flowers are edible.

Here you can see me placing the beans in their holes. And yes, that is a Baylor hat on my head. I did my undergraduate in Waco so I can wear that hat with as much pride as I have when I wear my maroon hats. BTW, did you see the Alamo Bowl? Awesome! Sic 'em Bears!

Fava beans should be planted about an inch deep.  You can plant them every four inches or so but they need to be thinned to about 8″ apart.  I used the end of a hand rake to make holes in my soil about 1″ deep and about 9″ apart.  Next, I placed the beans in the hole, covered them with soil and watered them in.   Now, if eveything goes right, I should be picking my favas by mid-March.  What do you think the odds are that the temps will stay below 75 until then?


The Fall Potager

Even though it is the middle of December, my little potager has never looked better.  This is one of the reasons I love living in Texas.  Because of the mild winters, I can literally garden year round.  Everyone loves to complain about our hot summers.  However, in my opinion, our winters more than make up for it.  I heard last night that Houston averages 16 days per year below freezing.  We are about 90 miles north of Houston but I am willing to bet we only have 20 to 24 days that are that cold.  Due to this, with proper crop selection, some rotational planting and the willingness to occasionally cover things up, your fall garden can last right up to the spring planting.  Below are several pics of the things that are currently growing in my potager:

I have three different varieties of broccoli growing in my garden.

I have 12 cauliflower growing.  I planted the cauliflower in blocks of three two weeks apart.  This way I don’t have to worry about eating 12 cauliflower in one week!

My wife and I love spinach.  Because of this, two of our triangular beds are lined with it.  In classic gardening form, one bed had a bout a 100% germination rate.  In the other bed, the germination was very spotty.  These little set backs are the things that keep me interested.  I will spend hours trying to figure out why one bed performed perfectly and the other, identical bed, was somewhat of a disappointment.

I always grow lettuce in the fall.  We eat a ton of it and it is so easy.  I only grow leaf lettuce.  Nothing against head lettuce, but once you harvest a head you have to replant and wait.  With leaf lettuce you can continuously clip the leaves through out the season.

I love shallots.  Their form is lovely in many applications in the potager.  I grow these things year round.  I never harvest them all.  Many people call them dividing onions and there is a good reason.  I recently left a clump in the ground for a year and there were almost 50 off shots on it.  I have about a dozen heads of cabbage scattered around the potager.  We are going to try our hand at homemade sauerkraut when the harvest comes in.

I don’t just have veggies growing in the potager.  I have tons of flowers.  These are baby larkspur.  I also have lots of Victoria Salvia, poppies, calendula, mums, two different roses and hollyhocks.  There are also a few byzantine glads and dianthus scattered around as well.

Pansey’s, vi0las (Johhny Jump Ups), carrots and shallots in the center bed.

A very dedicated little bee is gathering nectar on a 40 degree day.

Calendula are often called pot marigolds.  Their petals are edible and they will bloom until it gets about 90 degrees.

MOH on Central Texas Gardener

Yesterday was a banner day for MOH.  About 10:00 a.m. yesterday morning, Linda Lehmusvirta and a film crew from Central Texas Gardener showed up to film my little potager.  This was very exciting for me and I enjoyed it thoroughly.  The only downside is it will take a while before my little garden makes its television debut.  Turns out television programs take an awful lot of prep and it will take a bit of work to get the final product edited and ready to view.

Linda and I doing the interview

 Over the past three months I have worked tirelessly growing the plants and improving the potager so that it will look awesome on TV.  Because of this, things have never looked better at my house.  There really is nothing like a big dead line to motivate you to get all of those honey do’s finished that have been put off for too long. 

My wife and I with Linda Lehmusvirta from Central Texas Gardener

The focus of the interview was growing the Texas fall garden.  I was asked to describe what I most commonly grew and how I grew it.  Since I grow organically in raised beds we spent quite a bit of time talking about soil and bed prep.  We also discussed the benefits of the paved walk paths.  I am not sure how long the interview lasted but I think I babbled on for about 30 minutes.  The interview will mostly likely be edited to about 3 or 4 minutes of dialog so it will be interesting to see what I actually said!

A pic of the lettuce, shallots and cauliflower that is growing in the triangular beds of the potager.

 I would like to say a special thanks to Linda Lehmusvirta of CTG for taking time to do this.  She was great and the film crew was awesome!  The whole experience was so much fun and Sally and I greatly enjoyed making new friends.

Growing Broccoli (Brassica oleracea) and Other Cole Crops

Broccoli flower head beginning to form. These heads are actually hundreds of little flowers. Harvest the head as soon as you see any yellow tint begining to form.

Right now, I am eating so much broccoli that my skin has a greenish tint! Back in September I planted 36 plants of three different varieties and now I am being rewarded with tons of big, full heads of broccoli every night. Now there is absolutely no way that my wife and I can eat this much broccoli. However, that is never really a problem. To me, one of the greatest joys that I receive from my garden is the ability to share my harvests. People are always so happy to receive fresh, all organic produce directly from the garden.

The first four heads that I harvested this year. the large head in the back was 8" in diameter.

You might wonder why on earth I planted so many broccoli plants. I normally grow broccoli in the fall, just not this much. However, this year I was offered an opportunity that I just could not pass up. The largest gardening program in Texas, Central Texas Gardener, offered to come and film my little potager. I was thrilled. However, there was a catch; they wanted to film in December! So, I had a challenge. What could I grow that would make the potager look great in the middle of the incredibly unpredictable Texas winter?  So, that’s how I wound up with so much broccoli. I needed something fool proof to make sure my garden looked good for the cameras of CTG and broccoli fit the bill.

Now my garden does not have just broccoli in it. It also has a lot of cauliflower and cabbage (plus flowers and lots of other root crops). They made the cut for the same reason as the broccoli, they are fool proof.

Notice the slight yellow starting to show. this head is ready for harvest.

Broccoli belongs to the plant family Brassicaceae. The genus is brassica and plants that belong to it are often called simply brassicas or cole crops. Cole comes from the Latin word caulis which means stem or cabbage. The genus Brassicas contains some of the most important agricultural crops in the world. This family has been a favorite food of humans for so long that there are species that have been improved to allow us to eat literally every part of the plant. Rutabagas and turnips are brassicas that are grown for their roots. Kholrabi is grown for its stems. Cabbage, kale, brussel sprouts and mustard are grown for their leaves. Broccoli and cabbage are grown for their large, edible flower heads. All brassicas are very good for you. They contain vitamin C, lots of soluble fiber and various cancer fighting compounds as well.

Growing Cole Crops – Almost all cole crops are great choices for the garden. In fact, because of the mild winters that we have in Zones 7 thru 9, we can usually grow them in both the spring and the fall garden. Brassicas like cooler weather and they can easily survive temperatures in the middle twenties. It grows best when the daily temperature is in the mid seventies and nights are 20 degrees cooler. Because of this, it is best to plant your brassicas in early spring (February) or late fall (September). Most varieties in this genus mature in 90 to 120 days so plant according to when temperatures will be best suited for them. Do not plant too late in the season as they strongly dislike high heat.

I love the large foliage of broccoli.

Brassicas need full sun exposure and respond best to soil that drains well and has been deeply worked with compost. All brassicas are fairly pest free but they can get aphids.  They are also often plagued by cabbage worms and cabbage loppers.  Both of these pests are the larva of moths and they can defoliate a plant if the infestation is severe (more likely to happen in the spring).  You can control these with floating row cover or BT.

The brassica’s biggest enemy in the fall is the grasshopper. Young plants are very susceptible to grasshopper feeding. To help the plant beat the grasshoppers, place one gallon tin cans with the top and bottom cut out over the plants until they are about a foot tall. I am not really sure why this works, but it does. My theory is that either the grasshopper can’t see the plant or they cannot fly in way that allows them land inside of the can.

As far as I know, I have grown every type of brassica and I love them all. However, broccoli has a trait that makes it my favorite of all the cole crops. With most cole crops, you harvest the vegetable and then the plant is done. Not broccoli. Cut the green head and in a few days, additional little florets will start to form around the site of the cut. While these florets will not reach the size of the original flower head, they are just as tasty and each plant will produce several of them.

Little broccoli florets forming around the site of an earlier harvest.

In my mind, cole crops are the absolute best plant family to grow in the fall Texas garden. Give them good soil, plenty of sun and regular water and they will reward you with some of the most flavorful and nutritious things you can take from your garden.

Hyacinth Bean (Lablab purpureus)

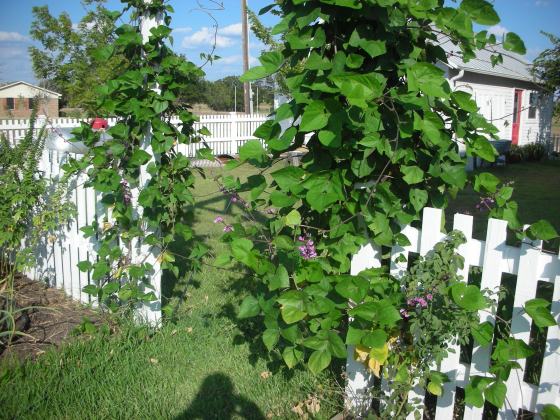
The lovely foliage of the Hyacinth Bean on my trellis

This past spring I was at a garage sale at the home of a truly extraordinary horticulturist named Lorraine.  She and her daughter hold this sale every spring.  In addition to clothes and knick knacks, Lorraine sells plants.  You never know what she is going to have.  Many folks in town know that she can grow anything, so they bring her pots, seeds and cuttings.  She always turns them into beautiful plants that she then sells at ridiculously low prices.  She grows in compost that she makes herself.  She has a green house, the cutest potting shed in town, and a dang fine vegetable garden that she has been tending in the same spot for over 60 years.  She is truly incredible and I hope to someday be just like her.  I really admire her and I never miss her sale.  This year, she had three pots of hyacinth beans that I snatched up and took home.  Those three little four inch pots of hyacinth beans have turned out to be the best $3 I have spent all year!

This year, the first flowers on my hyacinth bean appeared in late July

I planted Lorraine’s starts in May at the base of the trellis that leads to my side yard.  This trellis is over 12’ at the top.  I planted two plants on one side and one on the other.  Since May, those three plants have grown and grown until they almost completely cover this huge trellis.  The foliage is striking and the pinky-purple flower spikes are extraordinary.  The bees, butterflies and wife love them. 

Planting –Plant your seeds outdoors after all danger of frost has passed.  You can also start them inside three or four weeks before the last frost.  Some folks recommend pre-sprouting the seeds in damp paper towels before planting.  However you get them to sprout, be sure and plant them in full sun. Hyacinth bean likes rich, well drained soil.  Water regularly to get them established.  Germination from seed can take about two weeks.  Once the plant starts to grow, provide regular water but do not over water.  They are relatively fast growing and should start producing flowers 45-60 days after germination.

My hyacinth bean bloomed for over a month before it set seeds.  Maybe that was because it was just so hot.  I saw my first flowers in July but I did not see my first seed pods until the first week of September.  The plant is still blooming and it is beginning to get covered in the deep purple, iridescent seeds pods that it is famous for.

The first of the deep purple seed pods appeared last week

Hyacinth beans send out long runners that are perfect for quickly covering a fence, building or trellis. If growing on a fence, they need no support.  To get mine to go up the trellis I tied the tendrils and shoots to the posts of my trellis using a jute-like twine.  Once I had the vines trained over the structure I let them go.  They soon sent out their long inflorescence of magenta flowers that make them so attractive.  The posts of my trellis are 4 ½ feet apart.  The inflorescences of these plants are now so long that you have to push your way through the flowers.

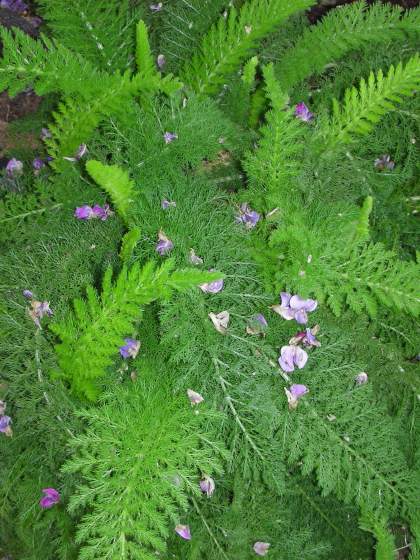
Flower petals from the plant falling onto my yarrow

Harvesting – You can eat hyacinth beans if you harvest them when they are very young.  Many cultures around the world use them extensively in their cooking.  However, if you want to eat them you need to know that are slightly toxic when mature.  So only eat them if you know when to pick them.  In fact, once fully mature, they should not be cooked or ingested at all.

Hyacinth beans are fairly good re-seeders.  Leave them alone and they will come back year after year.  If you want to harvest the seed, wait until the plant has died and then pick the dry, brown seed pods.  Once fully dry, open the seed pod and save the unique black seeds in a cool dry place until next spring.

Shallots in the Potager

I love my little potager.  It is truly the best gardening gift that I have ever given to myself.  Not only does it provide my wife and I with all of the veggies, herbs and flowers that we need, it allows me to constantly experiment with plant selection and design concepts.  Even though I want to produce as much food as possible in my small space, it is just as important to me that the beds of my potager are as attractive as they are functional.

Shallots and cauliflower in my triangular beds

Every August and February, I get out my graph paper and sketch out where I want to plant the several varieties of plants that I am going to grow.  I pick plants that are tall and plants that are small.  I will find plants that have interesting textures or colors that will break up all of the “green” in the beds.  Even though I try several different varieties in each design, the one plant that I use in each and every one of my garden designs are shallots.

Shallots are the perfect plant for the potager.  They are highly productive, easy to care for, have very few issues with disease or pests and their upright foliage is the perfect border.  I use shallots in my designs much like most folks use mondo or lariope in their flower beds.  Last year, I used them to line the fronts of my exterior beds.  This year, I am using them as a middle planting in my triangular beds.  The design for my triangular beds is based on the “Thriller, Filler and Spiller” design model.  The beds will be made up of three different types of plants.  I have selected cauliflower for the “thriller” component of the bed.  I love the large scale and course texture of cauliflower and it will contrast nicely with the upright form of the shallots that I am using as my “Filler”.  The outside border will have different varieties of leaf lettuce and spinach acting as the “Spiller”.

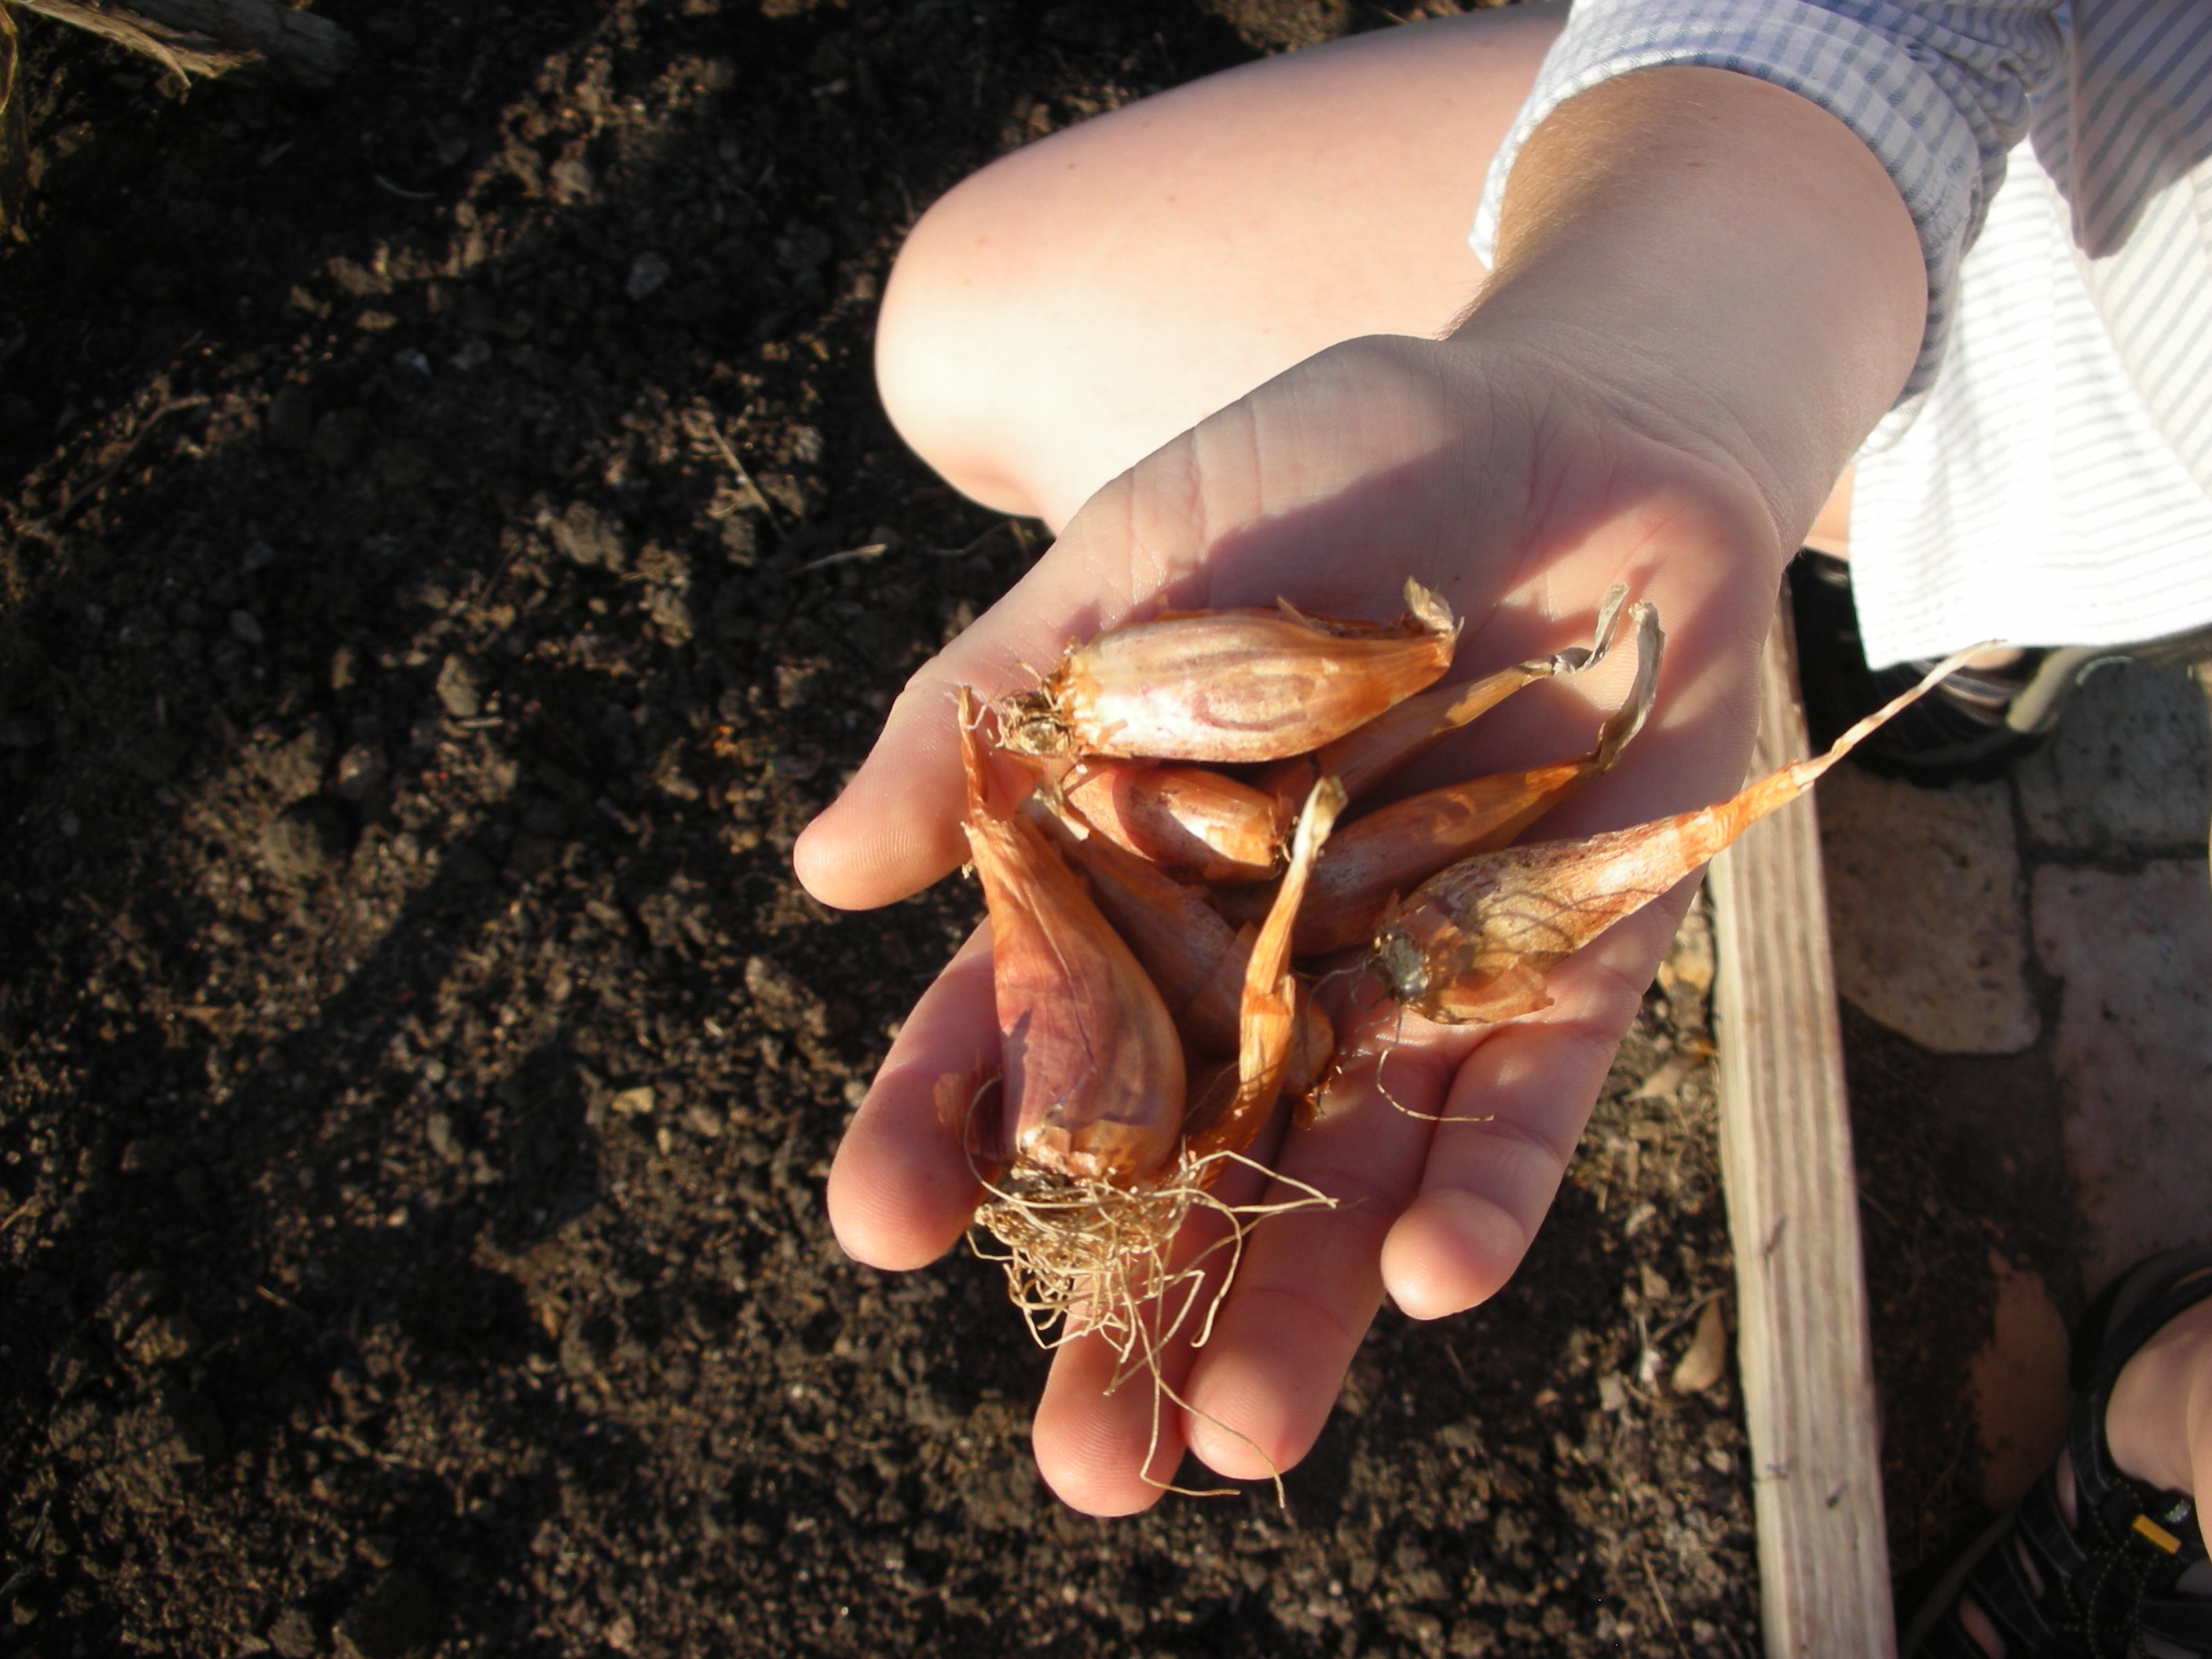
A handful of shallot "offsets". Some folks call the offsets bulbs. Whatever you call them, stick them in the ground just deep enough to cover the neck.

Background – Shallots (Allium cepa var. aggregatum) are often called dividing onions.  They grow in clusters of offsets that make them look somewhat like garlic when harvested.  Technically a perennial, they will continue to “divide” as long as they are left in the ground.  Because of this, I never harvest all of my shallots.  I always leave a few in the ground until I am ready to replant in the fall.  This year I pulled up a single clump that had 43 offsets.  Additionally, shallots are extremely cold hardy.  Last winter was brutally cold by Texas standards.  It got down to 18 at my house and we had several days below 24 degrees.  Still, my shallots thrived.

I got my original shallots from Plants and Things nursery in Brenham.  They are the only folks in the area that carry shallots.  In fact, they grow them in their own garden on the back of the nursery property.  This year, I needed a few more shallots to finish my bed design so I stopped in and visited with Mary Stolz.  She told me that the shallots they sell came from a start she got several years ago at a Master Gardener’s event.  Through the years, those few starts have yielded enough for them to be able to eat all they want and still offer plenty to their customers.  In spite of this year’s drought, they have harvested three wash tubs full of these tangy little onions.  That should tell you a lot about how prolific and reliable these small, bulbing onions are. 

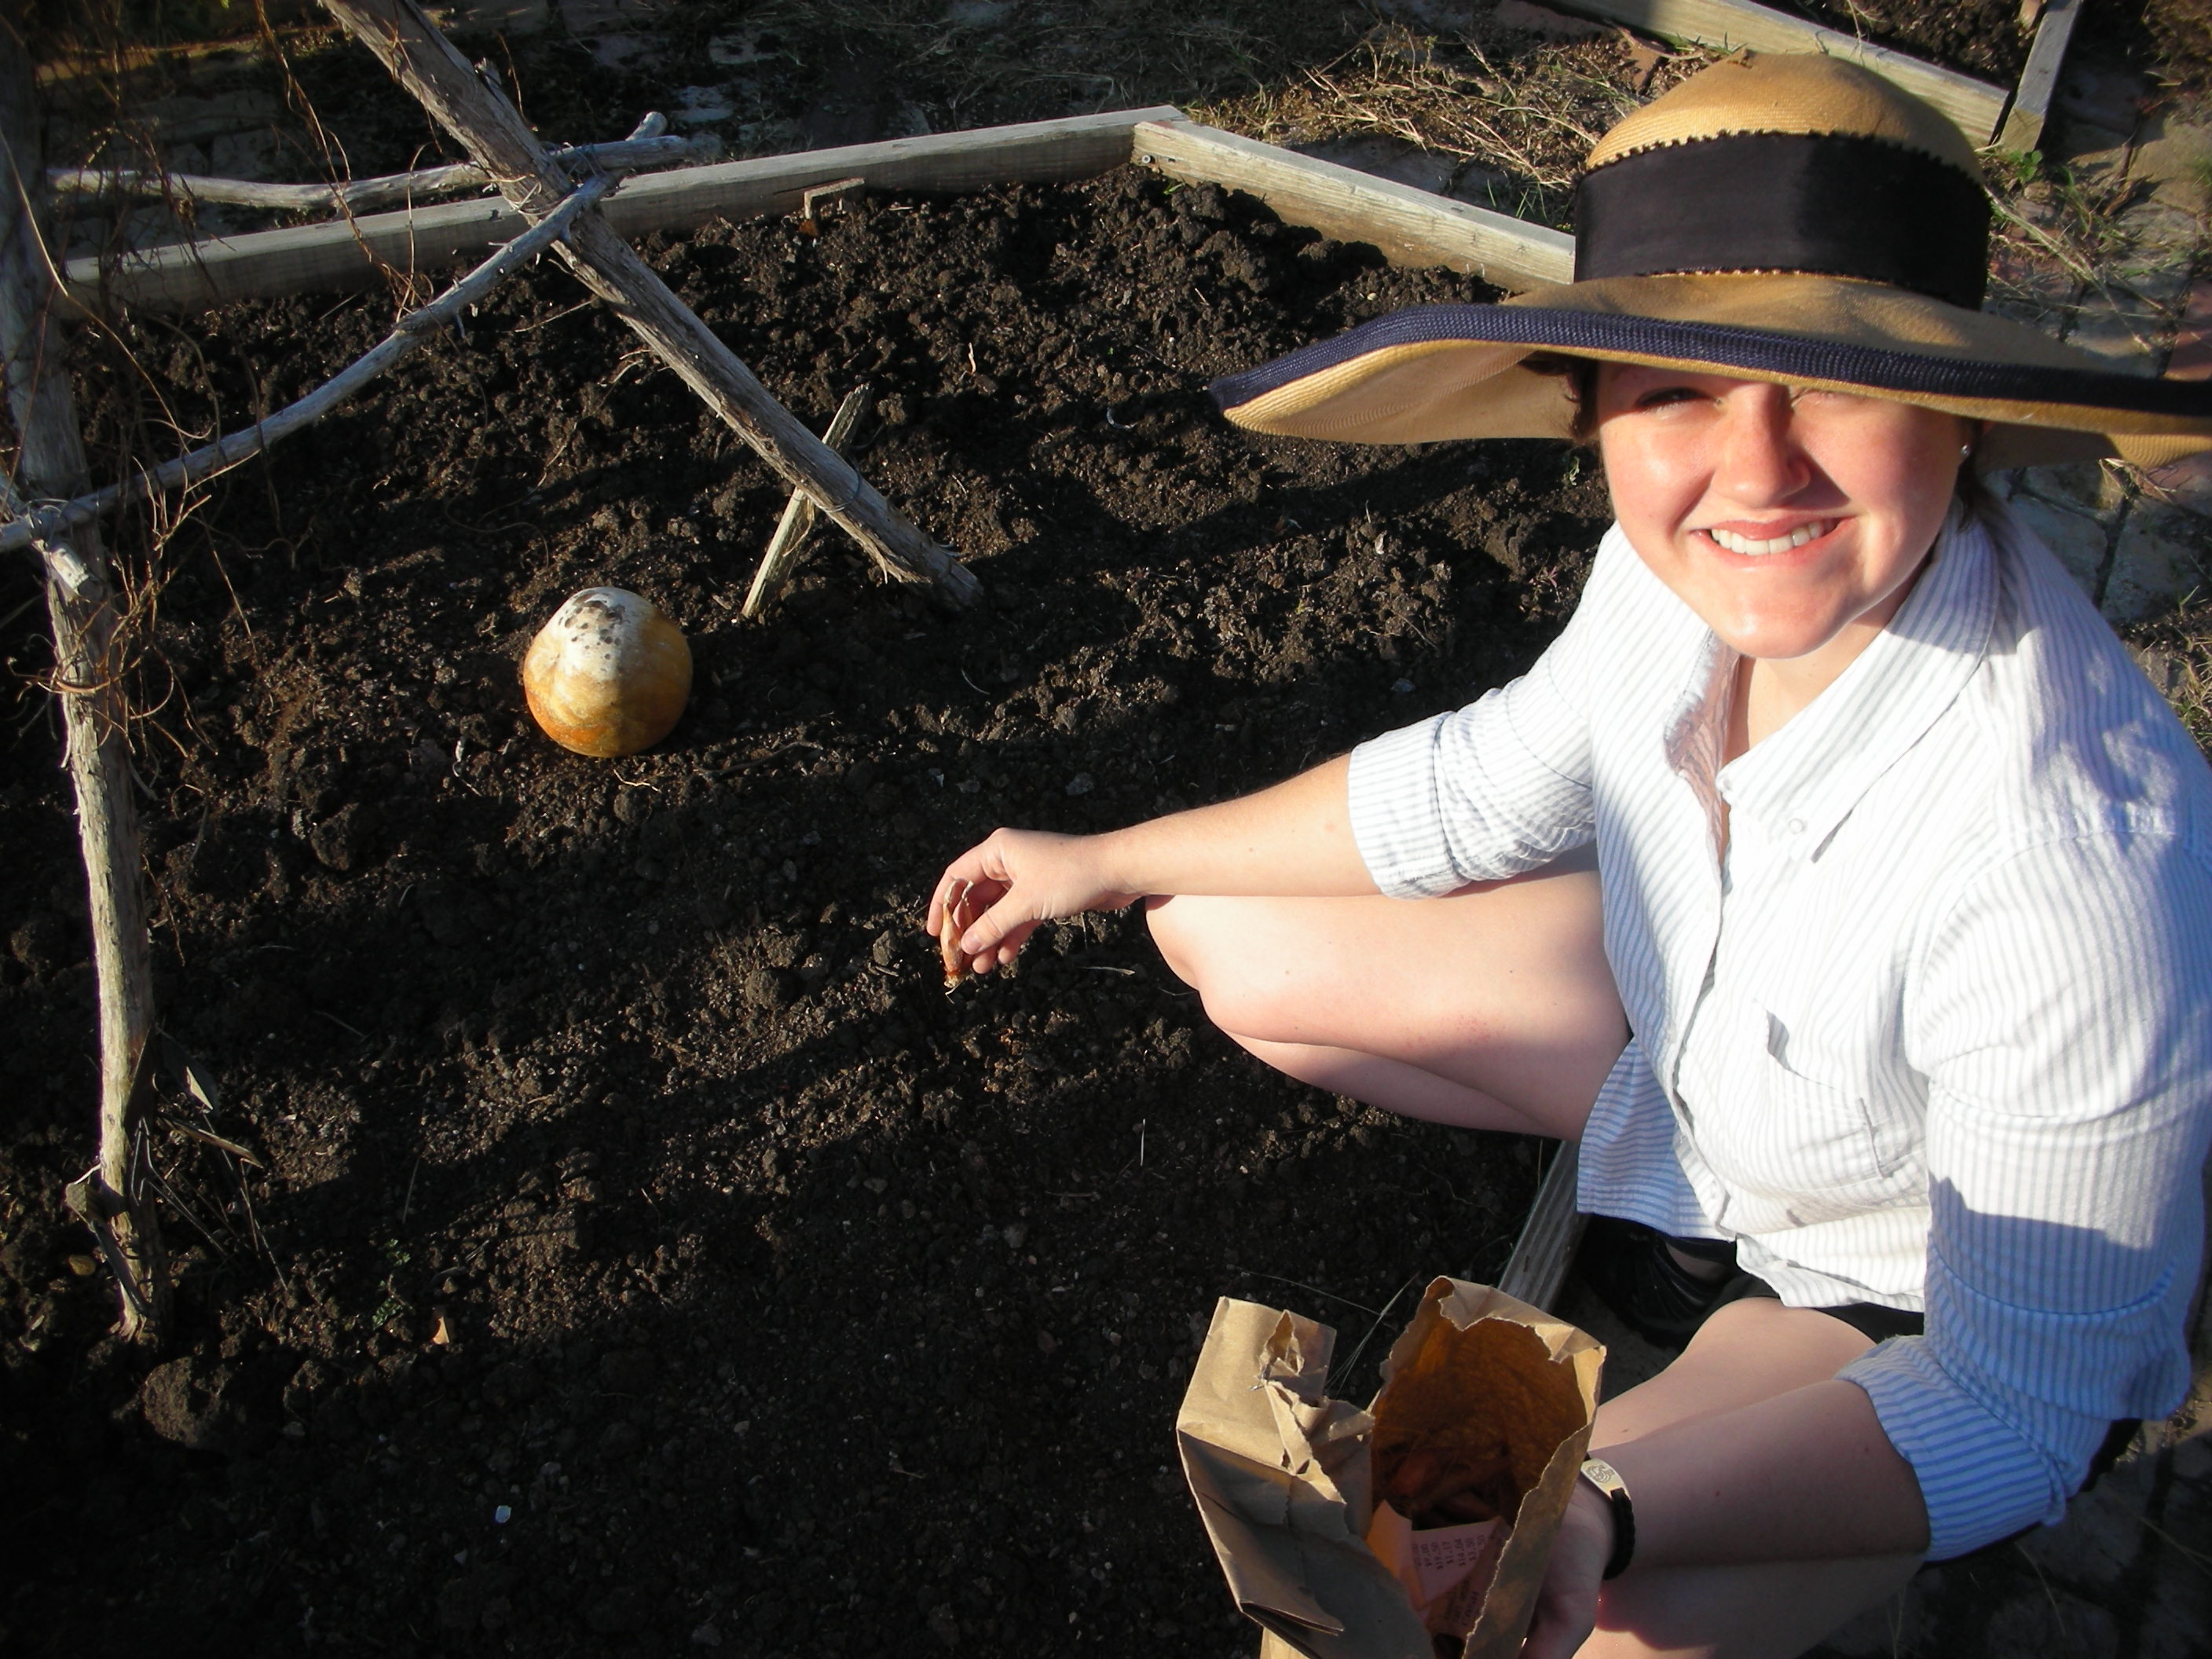
The yupneck's youngest daughter planting shallots in the potager. The round thing in the background is a fully ripe tatume' squash that I am drying for seed.

Planting – Shallots are grown just like regular onions (except you don’t have to worry about any day length issues).  Plant them in the fall for an early summer harvest.  Do not plant them in soil that has been recently manured.  Shallots should be planted with the root scar down and the pointy end up.  Stick them in the ground deep enough to just cover the top of the offset.  Now all you have to do is water and weed.   Some folks suggest pulling the soil back from their base once the roots set, but I have not found this to be necessary.

Harvesting/Curing/Preserving – Just like “regular” onions, the tops of the shallots will “fall over” when they are ready to harvest.  However, you do not have to wait until they are fully mature to enjoy them.  My wife and I use young shallots just like we use “green onions”.  The tops are excellent chopped into a salad and the young offsets have a very strong flavor that I enjoy raw. 

Since shallots are actually onions, they can be “cured” for later use.  Cure your shallots just like you would cure any other onion (click the link to read the details of how to do this).  The only difference in curing them, as opposed to regular onions, is that you need to divide your clumps into individual offsets before you cure them.  Cured shallots can last up to six months if kept in a cool, dark place.

Another advantage that shallots have over regular onions is their ability to withstand your freezer.  My wife and I chop up several small Ziploc baggies full of shallots and then stick them in the freezer.  This makes it very easy for us to use them later in eggs, soups and casseroles.  They do lose a little of their texture when frozen but they maintain that spicy flavor very well.

Store bought shallots are very expensive.  If you eat a lot of shallots, then they are one of the few vegetables that you can grow and truly save money in the process.  Because they are so productive, carefree, tasty and ornamental, shallots have earned the title of the only vegetable that has a guaranteed spot in my fall garden.  Why don’t you stop by Plants and Things today and give them a try in your own garden?