Growing Asparagus (Asparagus officinalis )

Asparagus is an extremely long lived perennial.  A friend of a friend has a bed that has been producing for 36 years!  Now that is an extremely long time but it is not uncommon to find beds that have been in production for over 20 years.  Asparagus is tough, reliable, attractive and a joy to eat. So, if I am going to grow it, I am going to have to make a long term commitment to it.

I have never grown asparagus before.  But since my wife and I love it so, we have decided now is the time to get started.  Like most of you, if I don’t know how to grow something I do research.  I have been reading about how to grow asparagus for over year.  However, all of the research in the world is no substitute for having an actual expert to talk with.  I am lucky enough to be very close friends with an outstanding asparagus expert and grower.

(WARNING!  The next three paragraphs contain EXTREME nostalgia. If you are not interested in tales of high school romance and rebellion, feel free to skip to the growing section )

Bobby Mitchell and I have been friends for more years than either of us thought we would live.  We became friends in Junior High and have stayed in touch ever since.  In high school, I had a 1955 Chevy Pick Up.  Every time Bobby got in that truck, something broke.  When we were 15, Bobby convinced the head varsity cheerleader (she was a senior and he was a sophomore) to go “parking” with him.   The problem was, he had neither car nor license.  Somehow he talked me into driving them out in the country and then sitting on the tail gate while he and the cheerleader “made out” in the cab.  For some reason, this sounded like really big fun so I agreed.

The quarterback and the cheerleader did a great job of steaming up the windows of my 55.  I enjoyed my first “dip” of Copenhagen snuff (which turned out to be a really bad thing in hindsight) while they enjoyed each other.  Since my dad worked the 3 to 11 shift I knew that if we got home before 11:30 no one would be the wiser.  So at about 11:00 I broke them up. Once we defogged the windows we headed home.  Everything was going great.  We had won the football game, Bobby had “scored” and I picked up a really bad habit.  The night could not have been better.

When you are 15 you don’t yet have the maturity to understand that when things are going this good, something has to go wrong.  After dropping the cheerleader off we headed home.  It was about 11:15 and we were only five minutes from home when the drive shaft literally fell out of the bottom of my truck!  Needless to say the rest of the night was almost as memorable as the first part of the evening had been.  My dad was not the least bit impressed with our performance that evening.  In fact, he was so unimpressed that I didn’t get to drive my truck for a month.  However, it was worth it.  This was the first of many, many memorable experiences that Bobby and I shared in that old pick up.


Growing Asparagus – I visited Bobby last summer and was very impressed with his 70’ row of asparagus.  When I told him I wanted to grow my own he was happy to share his experience with me.

Bobby recommends planting year old crowns.  Since it takes three years to get asparagus from seed, these older roots allow you to enjoy asparagus in year two.  To plant them, dig an 8″ to 12″ round hole (or trench) that is about 8” to 10” deep in full sun.  Place your plants about a foot apart.  Put two or three inches of high grade compost in the bottom of the hole.  The compost should be slightly mounded in the center.  Spread the roots of the crown out over the mound like an octopus.  Once the roots are in place, cover lightly with compost and gently water in.  Research has shown that if you plant asparagus too deep, your yields will be reduced so try and keep the crowns no more than 6″ below the soil level.

Keep the roots damp and in a few days the first little shoot will appear.  As that sprout grows, slowly add soil and compost to the hole.  Be careful not to completely cover it up.  In the first year you can expect each crown to produce 2 to 5 sprouts.  These early sprouts are small and delicate.  Bobby recommends letting 3 sprouts grow above soil level before completely filling in around them. You may also want to stake these young shoots to make sure the wind doesn’t break them off.  Once these three sprouts are a few inches above the soil line you can finish back filling the hole with a soil/compost mixture.  Asparagus is a heavy feeder so do not scrimp on the compost.  Tamp the soil in firmly to support your young sprouts.


A great picture that clearly shows how I prepared my beds and planted the crowns.

The first year the stalks will be pretty puny looking.  Continuously weed your beds and apply about an inch of water per week.  By the second year you will get a 3′ to 4′ tall plant with very attractive fern like foliage.  Asparagus foliage is so thick that it shades out most of the weeds in the second year.  In the first year, you can expect your roots to produce two to five shoots.  In the second year that number will double.  This is when you can begin to do a light harvest.  By year three you can expect to have 25 to 30 sprouts per root system.  After year two  let the first couple of sprouts of the season grow up and grow foliage.  You can start picking shoots after that. Once the mature plants start producing, the spears come pretty quickly.  If you wait too long to cut don’t worry.  Just let the stalk produce foliage.  There will still be plenty of stalks to pick

The first spears of the year in Bobby’s garden. Photo by Bobby Mitchell

Asparagus start producing in early spring and can be harvested for four to six weeks.  Do not over harvest.  Make sure and leave enough canes to make a large, healthy plant.  The foliage will feed the roots, which will in turn, store the food to put into shoot development next year.  Once you stop harvesting, “mulch” or top dress your plants with three to six inches of compost.  Top dress again in the fall.  The foliage will last until first frost.  You can prune throughout the year to control height.  Once a frost hits them, cut the foliage off at the ground and apply more compost.

A mature asparagus plant produces about ½ pound of asparagus per year.  If you like it as much as we do, four to five plants per person should be adequate.  There are several varieties of asparagus that do very well for us here.  I am planting some New Jersey sterile (all male hybrids) and Mary Washington (a popular heirloom variety).  The Jersey hybrids produce large, flavorful spears and will not spread.  Mary Washington produces yellow flowers and red berries.  The spears are very tasty.  However, it spreads so you will have to do more “weeding” with this variety than you will with the all male hybrids.

The $70 Vegetable Garden

I recently read the 2009 survey results of the gardening world by the National Gardening Association (http://www.garden.org/).  One of the stats that I found very interesting was the amount of money the average person reportedly spends on their food garden.  According to the NGA survey, the average vegetable gardener only spends $70 per year on their garden.  Now I realize that I am not the average gardener, but $70?  Really?  I spend an average of $30 per month on just compost.  So this got me thinking.  Could I create a vegetable garden (on paper) with just $70 worth of supplies?

There really is nothing better than home grown tomatoes

To do this, I had to make some assumptions.  Using the NGA data, I decided to be average.  According to their report the average vegetable garden in the US is 600 square feet.  Using this I decided to have a 21’ X 30’ (I know that is 630 square feet, but go with me) virtual garden.  This garden would contain 4-30 foot rows.  Each row would be 3 feet wide and there would be 3 feet wide walk paths between the rows.  In this space I would plant the Top Ten vegetables grown in US gardens (based on results from the same survey).  Those vegetables are tomatoes, cucumbers, sweet peppers, beans, carrots, summer squash, onions, hot peppers, lettuce and peas.  I also assume that this $70 experiment only covers the spring garden.  Finally, since I garden organically, my $70 garden will use organic principals as well.

Below are the four rows that I have designed.

Row 1 –English peas the 10th most grown veggie in the American garden.  Normally I plant them in January.  For this garden, I am going to recommend putting them on Feb. 1.  A little late here, but this is just an experiment and they will probably still produce when planted this late (especially if you live north of Dallas).  Carrots can go in at the same time.  Beans are a little less cold hardy so I am going to virtually plant them Feb. 15.

All of these veggies will be planted by seeds.  The beans and peas will be spaced at 6” and I will get three rows in each three foot bed.  To plant this many beans and peas, you will need to buy two packs of seed for each.  I selected “Contender” bush beans from Baker Creek Heirloom Seeds.  They were $2 per pack so the beans will cost $4.  I found 100 “Green Arrow Peas” from Seed Savers Exchange for $2.75. The carrots will be planted in a staggered grid plan at 4” spacing.  You will need 2 packs of seed for this many carrots.  Since the seeds are so tiny it is difficult to get just one seed per hole.  I chose “Danver” from Seed Savers Exchange.  The two packs were $5.50.

Row 2 –Around here, we plant our onion sets in November or December.  For this garden, we are going to assume that we planted 300 10-15Y onions in November.  They are stagger planted 6” apart in three rows that are 20’ long.  This would require two bunches of sets and would have set us back about $6.  Now 300 is a lot of onions.  However, I love them and they keep well so I also plant a lot.  I planted the onions in the middle of the row.  This leaves two 5’ beds on either side.

In both of these beds I am planting lettuce from seed.  I love lettuce and there are a ton of varieties.  All do well in the cool season so you can plant whatever variety you choose.  I always plant two different varieties of leaf lettuce.  To plant beds this size, you will need about four packs of seeds.  At $1.50 each, that is another $6.

Row 3 – This whole row is dedicated to cucurbits.  30 feet is a lot of room for our squash and cucumbers,  especially since they are both so productive.  Each of these plants need about 3’ of space.  I will plant six  hills of squash (2-yellow crook neck, 2 zucchini, and two patty pan).  I will then plant four trellises of Poinsett cucumbers.  I grow these every year and they are awesome!  They are very productive and are great as slicers and for pickling.  I build thee-legged trellises for them out of cedar limbs.  Four trellises will allow us to have 12 vines.  This will be more than enough.  For this row we will be using 4 packets of seeds at $2.50 each so the whole row will cost just $5.

Row 4 –Tomatoes are the stars of most summer gardens.  They are the number one grown vegetable in the home garden. For the last row of our gardenwe will buy and plant six tomatoes, two Jalepenos and two Bell pepper plants.   I usually buy plants because it is much easier than planting from seed in January and then nursing to April.  I always plant my tomatoes and peppers the first week in April.  I usually make sure and plant at least two plants of each tomato variety that I select.  My favorite for slicing tomato is an heirloom called “Black From Tulia”.  I also usually plant a cherry variety and a grape variety.  We also love Romas so we grow a yellow variety called appropriately “Yellow Roma”.  I do not have a favorite Bell or Jalepeno variety.  I typically plant whatever they have at the nursery.  I buy well established tomatoes in quart containers.  Each of these usually cost about $4 a piece so you are going to have to part with $24 for this row.  I buy peppers in 4’ pots and they are usually about $1.5 a piece.

My little experiment has proven that you can have an average garden with the ten most common plants for under $70.  Including the 8.25% Texas sales tax, my total came out to $64.13.  That leaves enough for 5 bags of compost (which I highly recommend).  I know this doesn’t account for water or mulch or about a million others things you can spend your gardening dollars on, but it does prove that if you have decent soil you can have a very nice garden for a small amount of money.  According to the NGA survey, this $70 garden will produce $600 dollars worth of food.  So, this garden is good for both your health and your pocket book!  February in Central Texas means it is time again to go outside and get dirty!  Happy gardening y’all!

P.S.  If gardening stats fire you up then you can read my full analysis of the results of the NGA survey in next issue of Texas Gardener.

Succession Planting of Fava (Broad Beans) in the Potager

The only way to get your small garden to continuosly produce is to practice succession planting.  Succession planting is nothing more than putting something in the ground as soon as something else comes out.  Since my potager is so small, and I love a steady supply of fresh veggies, I have to be fairly deligent in the way I manage my plantings. 

This past weekend, I harvested all but one of my cauliflower plants.  This freed up the middle of my four triangular beds for something else.  I decided to replace the cauliflower with fava beans (or Broad Beans for my English readers).  I also took this opportunity to plant a few more radishes, some round Paris Market carrots and Green Arrow English Peas.

I have never eaten or grown fava beans before.  However, the seeds were a gift from my dear friend and gardening mentor, Cythia Mueller.  So, in honor of my friend, and in keeping with my tradition of trying new things, I decided to plant them where my cauliflower had been. 

Fava beans (Vicia Fava) are a cool season crop that have been grown for millenia.    While native to North Africa and Southwest Asia, they are widely cultivated around the world.  It is believed that along with lentils, peas and chickpeas, fava has been in production for over 6000 years.  It is also interesting to note that they are not true beans.  Fava beens are legumes; but they are more closely related to vetch than they are to green or lima beans.

Fava beans are a great choice for the fall Texas garden.  They love a nice loamy soil, but will grow well in less perfect soils.  They will also tolerate soils with high salinity so that makes them a great choice for the Bryan-College Station area.  Fava are a true cold weather crop and they can take just about anything our winter can throw at them.  They will survive freezes into the the twenties.  Even though I planted mine on December 31, most people in our area plant them around Thanksgiving.  They grow best at temperatures between 40 and 70 degrees F and they will not set beans once the night time temps go above 75 degrees.

Here you can see how I use the end of my hand rake to make holes for large sized seeds

Fava beans produce a thick, square stalk and can grow to heights of three feet or more.  The leaves of these tall plants can be harvested and used like spinach.  Their white flowers are streaked with black.  Since black is a very unusual color in the plant world I can’t wiat for these plants to bloom so I can see it for myself.   Also, those lovely white and black flowers are edible.

Here you can see me placing the beans in their holes. And yes, that is a Baylor hat on my head. I did my undergraduate in Waco so I can wear that hat with as much pride as I have when I wear my maroon hats. BTW, did you see the Alamo Bowl? Awesome! Sic 'em Bears!

Fava beans should be planted about an inch deep.  You can plant them every four inches or so but they need to be thinned to about 8″ apart.  I used the end of a hand rake to make holes in my soil about 1″ deep and about 9″ apart.  Next, I placed the beans in the hole, covered them with soil and watered them in.   Now, if eveything goes right, I should be picking my favas by mid-March.  What do you think the odds are that the temps will stay below 75 until then?


The Fall Potager

Even though it is the middle of December, my little potager has never looked better.  This is one of the reasons I love living in Texas.  Because of the mild winters, I can literally garden year round.  Everyone loves to complain about our hot summers.  However, in my opinion, our winters more than make up for it.  I heard last night that Houston averages 16 days per year below freezing.  We are about 90 miles north of Houston but I am willing to bet we only have 20 to 24 days that are that cold.  Due to this, with proper crop selection, some rotational planting and the willingness to occasionally cover things up, your fall garden can last right up to the spring planting.  Below are several pics of the things that are currently growing in my potager:

I have three different varieties of broccoli growing in my garden.

I have 12 cauliflower growing.  I planted the cauliflower in blocks of three two weeks apart.  This way I don’t have to worry about eating 12 cauliflower in one week!

My wife and I love spinach.  Because of this, two of our triangular beds are lined with it.  In classic gardening form, one bed had a bout a 100% germination rate.  In the other bed, the germination was very spotty.  These little set backs are the things that keep me interested.  I will spend hours trying to figure out why one bed performed perfectly and the other, identical bed, was somewhat of a disappointment.

I always grow lettuce in the fall.  We eat a ton of it and it is so easy.  I only grow leaf lettuce.  Nothing against head lettuce, but once you harvest a head you have to replant and wait.  With leaf lettuce you can continuously clip the leaves through out the season.

I love shallots.  Their form is lovely in many applications in the potager.  I grow these things year round.  I never harvest them all.  Many people call them dividing onions and there is a good reason.  I recently left a clump in the ground for a year and there were almost 50 off shots on it.  I have about a dozen heads of cabbage scattered around the potager.  We are going to try our hand at homemade sauerkraut when the harvest comes in.

I don’t just have veggies growing in the potager.  I have tons of flowers.  These are baby larkspur.  I also have lots of Victoria Salvia, poppies, calendula, mums, two different roses and hollyhocks.  There are also a few byzantine glads and dianthus scattered around as well.

Pansey’s, vi0las (Johhny Jump Ups), carrots and shallots in the center bed.

A very dedicated little bee is gathering nectar on a 40 degree day.

Calendula are often called pot marigolds.  Their petals are edible and they will bloom until it gets about 90 degrees.

MOH on Central Texas Gardener

Yesterday was a banner day for MOH.  About 10:00 a.m. yesterday morning, Linda Lehmusvirta and a film crew from Central Texas Gardener showed up to film my little potager.  This was very exciting for me and I enjoyed it thoroughly.  The only downside is it will take a while before my little garden makes its television debut.  Turns out television programs take an awful lot of prep and it will take a bit of work to get the final product edited and ready to view.

Linda and I doing the interview

 Over the past three months I have worked tirelessly growing the plants and improving the potager so that it will look awesome on TV.  Because of this, things have never looked better at my house.  There really is nothing like a big dead line to motivate you to get all of those honey do’s finished that have been put off for too long. 

My wife and I with Linda Lehmusvirta from Central Texas Gardener

The focus of the interview was growing the Texas fall garden.  I was asked to describe what I most commonly grew and how I grew it.  Since I grow organically in raised beds we spent quite a bit of time talking about soil and bed prep.  We also discussed the benefits of the paved walk paths.  I am not sure how long the interview lasted but I think I babbled on for about 30 minutes.  The interview will mostly likely be edited to about 3 or 4 minutes of dialog so it will be interesting to see what I actually said!

A pic of the lettuce, shallots and cauliflower that is growing in the triangular beds of the potager.

 I would like to say a special thanks to Linda Lehmusvirta of CTG for taking time to do this.  She was great and the film crew was awesome!  The whole experience was so much fun and Sally and I greatly enjoyed making new friends.

Growing Broccoli (Brassica oleracea) and Other Cole Crops

Broccoli flower head beginning to form. These heads are actually hundreds of little flowers. Harvest the head as soon as you see any yellow tint begining to form.

Right now, I am eating so much broccoli that my skin has a greenish tint! Back in September I planted 36 plants of three different varieties and now I am being rewarded with tons of big, full heads of broccoli every night. Now there is absolutely no way that my wife and I can eat this much broccoli. However, that is never really a problem. To me, one of the greatest joys that I receive from my garden is the ability to share my harvests. People are always so happy to receive fresh, all organic produce directly from the garden.

The first four heads that I harvested this year. the large head in the back was 8" in diameter.

You might wonder why on earth I planted so many broccoli plants. I normally grow broccoli in the fall, just not this much. However, this year I was offered an opportunity that I just could not pass up. The largest gardening program in Texas, Central Texas Gardener, offered to come and film my little potager. I was thrilled. However, there was a catch; they wanted to film in December! So, I had a challenge. What could I grow that would make the potager look great in the middle of the incredibly unpredictable Texas winter?  So, that’s how I wound up with so much broccoli. I needed something fool proof to make sure my garden looked good for the cameras of CTG and broccoli fit the bill.

Now my garden does not have just broccoli in it. It also has a lot of cauliflower and cabbage (plus flowers and lots of other root crops). They made the cut for the same reason as the broccoli, they are fool proof.

Notice the slight yellow starting to show. this head is ready for harvest.

Broccoli belongs to the plant family Brassicaceae. The genus is brassica and plants that belong to it are often called simply brassicas or cole crops. Cole comes from the Latin word caulis which means stem or cabbage. The genus Brassicas contains some of the most important agricultural crops in the world. This family has been a favorite food of humans for so long that there are species that have been improved to allow us to eat literally every part of the plant. Rutabagas and turnips are brassicas that are grown for their roots. Kholrabi is grown for its stems. Cabbage, kale, brussel sprouts and mustard are grown for their leaves. Broccoli and cabbage are grown for their large, edible flower heads. All brassicas are very good for you. They contain vitamin C, lots of soluble fiber and various cancer fighting compounds as well.

Growing Cole Crops – Almost all cole crops are great choices for the garden. In fact, because of the mild winters that we have in Zones 7 thru 9, we can usually grow them in both the spring and the fall garden. Brassicas like cooler weather and they can easily survive temperatures in the middle twenties. It grows best when the daily temperature is in the mid seventies and nights are 20 degrees cooler. Because of this, it is best to plant your brassicas in early spring (February) or late fall (September). Most varieties in this genus mature in 90 to 120 days so plant according to when temperatures will be best suited for them. Do not plant too late in the season as they strongly dislike high heat.

I love the large foliage of broccoli.

Brassicas need full sun exposure and respond best to soil that drains well and has been deeply worked with compost. All brassicas are fairly pest free but they can get aphids.  They are also often plagued by cabbage worms and cabbage loppers.  Both of these pests are the larva of moths and they can defoliate a plant if the infestation is severe (more likely to happen in the spring).  You can control these with floating row cover or BT.

The brassica’s biggest enemy in the fall is the grasshopper. Young plants are very susceptible to grasshopper feeding. To help the plant beat the grasshoppers, place one gallon tin cans with the top and bottom cut out over the plants until they are about a foot tall. I am not really sure why this works, but it does. My theory is that either the grasshopper can’t see the plant or they cannot fly in way that allows them land inside of the can.

As far as I know, I have grown every type of brassica and I love them all. However, broccoli has a trait that makes it my favorite of all the cole crops. With most cole crops, you harvest the vegetable and then the plant is done. Not broccoli. Cut the green head and in a few days, additional little florets will start to form around the site of the cut. While these florets will not reach the size of the original flower head, they are just as tasty and each plant will produce several of them.

Little broccoli florets forming around the site of an earlier harvest.

In my mind, cole crops are the absolute best plant family to grow in the fall Texas garden. Give them good soil, plenty of sun and regular water and they will reward you with some of the most flavorful and nutritious things you can take from your garden.

Thornless Prickly Pear-The Perfect Plant?

Thornless prickly pears and maximillian sunflowers at Wildseed Farms in Fredericksberg.

My botanical brother Morgan McBride swears that thornless prickly pear (Opuntia ficus-indica) is the perfect plant. You don’t have to water it, it flowers, you can eat the pads and the buds, and it’s evergreen. Plus, if a piece of it falls off onto the ground, it will grow you another plant. I am not sure if I agree with him completely, but you have to admit, he makes a good point.

While I am not as enamored with thornless prickly pear as Morgan is, I do really like the plant. One of my favorite plant combinations of all time was at the weekend place of Dr. Bill Welch. He paired the sculptural, medium green cactus with a dark burgundy castor bean that he got from my plant mentor, Cynthia Mueller. The dark burgundy was a perfect back drop and the combination was stunning. I also felt it was, for lack of a better word, appropriate. Texas is a big place. Some think of it as a southwestern state while others consider it definitely southern. The pairing of the quintessential southwestern plant (the cactus) with the very southern castor bean made me conclude that this was the perfect plant combination to express the dichotomy of Texas.

Thornless prickly pear fruits ready for harvest

Thornless prickly pear does appear in the wild. However, the plant that most of us grow is a hybrid developed by a California breeder named Luther Burbank. Mr. Burbank was busy developing plants around the turn of the century. His two biggest successes were the Russet potato and the thornless prickly pear. Mr. Burbank was a shameless promoter and rather sloppy plant breeder. Because of his poor record keeping, we have no idea what plants he actually used to create the plant we now call thornless prickly pear. Regardless, he was very proud of his creation and he sought to market it as dry land forage for cattle. While the cactus did not catch on as a forage crop (turns out it will grow all of its thorns back if it is subjected to extreme drought), no one can argue with its success as an ornamental.

The cactus blooms in the spring (and sometimes fall). The flowers are typically yellow but can be found in white and red. The fruits of the cactus are very sweet and some say they taste like a very sweet watermelon. Native Americans loved the fruits of this plant so much that they are often called Indian Fig.

Thornless prickly pear and fall asters

Like any cactus, the thornless variety is incredibly easy to grow. Just stick a pad (or nopal) half way in the ground. Water every once and a while and in no time flat you will have a very large mass of cactus. In fact, this stuff is so hardy that it is difficult to control if it is planted in a well drained site with plenty of water.

I don’t know if thornless prickly pear is the perfect plant or not. However, you have to admit, it does have a lot going for it. It is attractive, durable and makes quite a statement in the landscape. Very few plants evoke as strong a sense of place as do cactus. So, if you are looking for something that is guaranteed to grow, thornless prickly pear may be the plant for you.

Lone Star Gourd Festival

One of Judy Richie's stunning art gourds. Photo by the artist

This past weekend, my lovely wife and I headed out for a much need mini-vacation.  For our “romantic get away” we decided to go to the Lone Star Gourd Festival in Fredericksberg, Texas.  We picked the Gourd Festival for several reasons.  First, I love gourds.  The gourd festival is a great place to see some really incredible art being made with gourds.  Second, I just submitted an article to Texas Gardener about gourds and I wanted to meet Judy Richie.  Judy is an incredibly talented gourd artist and her art will be featured in that article. 

A classic example of the finishes and deep front cuts with weavings that Judy has pioneered

Judy has been making gourd art for over ten years.  She is a pioneer in the gourd art world and many of her pieces are featured in several galleries through out the US.  Judy is a talented artist in every skill that can possibly be used to convert an ugly brown dried gourd into something that is truly museum quality art.  She is a master carver, engraver, weaver and finisher.  She was the first to deep cut into the side of a gourd and then adorn those openings with intricate weavings.  She has also developed several of her own finishes that make her art unique and instantly recognizable.

This vibrant piece shows all of things that Judy is famous for: incredible finishes, carving, weaving and inlay. the small piece inlayed in the bear is an ancient Native American pottery shard.

I first discovered Judy’s art at the “The Copper Shade Tree” in Round Top, Texas.  Gerald Tobolo and his wife are the owners of this gallery.  Gerald is a master coppersmith and he started this gallery to highlight his work and the work of other craftsmen working in Texas.  Judy’s art is one of the centerpieces of his collections and one of his better sellers.  According to Gerald, “Judy’s work is so versitile and varied.  Some of her pieces have a distinct Western flair while others resemble art pottery.  In fact, I recently had a customer buy one of her pieces for his craftsman style home.  This customer is a stickler for accuracy in his home.  Even though, no gourd was probably ever featured in a craftsman style home, he loved the fact that the Judy’s piece would “fool” his guests by making them think it was a very fine piece of hand thrown pottery.”

Judy’s business is called “Redcloud Originals”.  Please check it out.  Her website is full of great examples of her work and it also lists the galleries that she exhibits in and her show schedule.

Even though Judy was the main reason I went to the festival, she was not the only artist there.  Once again, I was amazed at the variety and quality of art being created out of gourds.  Scroll down for some pics of things that caught my eye at the 2011 Lone Star Gourd Festival.

The "Traveling Gourd". This is a HUGE gourd that was sent to each chapter in the Texas Gourd Society. There, artists from each chapter added to it to make a gourd that is truly representitive of all of the great things in the Great State of Texas.


I thought this was a cute and original treatment. Great for a child's room.


My favorite creation in the competition room

Square Foot Gardening Second Graders


The organic gardens from Mrs. White's second grade class at St. Paul's Christian Day School in Brenham, Texas

This past Wednesday, I got to participate in two of my favorite activities at the same time; gardening and talking about gardening.  As I mentioned in an earlier post, my wife is a second grade teacher at St. Paul’s Christian Day School in Brenham.  Each year she uses the garden as a way to introduce a plant based biology curiculum to her class.  This year, she asked me to come and talk to her class about plants in general and the seasonality of plants in particular.  It was our goal to help these second graders learn that certain plants grow in different seasons and then plant the proper plants to help bring home the message.

I love talking to young children.  They pay very close attention to what you are telling them and they love to participate in the discussion.  My wife’s second graders did not disappoint.  They were such a good audience.  They answered questions, asked questions, and they always put their hands up first.  They were so good!  I truly love giving presentations to young people.  They always reaffirm my strong belief that, no matter what the news media tells us, America is still producing a whole lot of awful good kids.

Showing the kids the proper way to remove the plants from their cells

So, after our very exciting disscussion of which plants do best in Texas in the fall, we went to the garden to put my lecture into practice.  As I mentioned in my earlier post (Going Green For God), my wife gardens in an 8′ X 3′ garden with a trellis on the back.  Her garden is based on the the best selling book “Square Foot Gardening” by Mel Bartholomew.  Since she doesn’t have a lot of space or time, the square foot gardening method is the perfect tool to allow her kids to grow a variety of crops in a small space with out too much effort.  My wife’s garden allows for 24 seperate squares to be planted.  This is good because her classes usually range in size from 20 to 24 kids.

Excellent weeding!

Before we planted, we cleaned out the weeds and left over plants from the spring garden.  Sometimes when I weed, I fail to take notice of the truly amazing things that happen in the soil.  Not these second graders!  While weeding, the kids found a freshly germinated Texas Montain Laurel seed, young pecans trees beginning to sprout (so evidently squirrels are aware of my wife’s garden), crepe myrtle seeds, grubs, worms and milipedes.  Each new find opened up another round of questions.  However, the thing that generated the most interest was the smallest little snake skin shed that I had ever seen.  The kids were VERY interested in that! 

Before planting, we recharged the beds by adding three bags of composted humate.  The kids really loved this part (and I did too).  We sprinkled the compost over the top of the garden and then used our hands to mix it in.  I cannot really describe the method used by these second graders to mix in the new compost, but it resulted in all of us having dirt and compost all over us.  It really was a lot of fun. 

Mixing in the compost

Once the beds were ready for planting, we laid out the strings that divided the garden into it’s 24 squares.  Each child got to plant either a broccoli, cauliflower, cabbage or mustard green plant.  We had twenty plants, so in the four squares that were left over, we planted 64 carrot seeds (16 per square). 

Planting carrots

Over the next few months, these young gardeners will water, weed and OBSERVE.  I hope that my wife’s efforts will instill a life long love of growing things in some of them.  Even though they don’t yet realize it, my wife is teaching a whole lot more than biology in her little garden.  Her garden shows that you can do a whole lot of good things in life if you work together.  It also let’s them watch the miracle of life unfold right before their eyes.  By watchinging that little seed turn into the carrot, she is showing them that the garden is a special place that can feed alot more than just their stomachs.

Great technique

P.S.  Do you remember the first time you watched a seed germinate?  There is a very good chance that your first exposure to gardening was in a second grade classroom.  Teachers work very hard to find ways to get kids excited about learning.  Take time out of your busy day to thank all of the teachers that are doing everything they can to make sure that the kids of tommorrow are as awesome as the kids of yesterday!

Hyacinth Bean (Lablab purpureus)

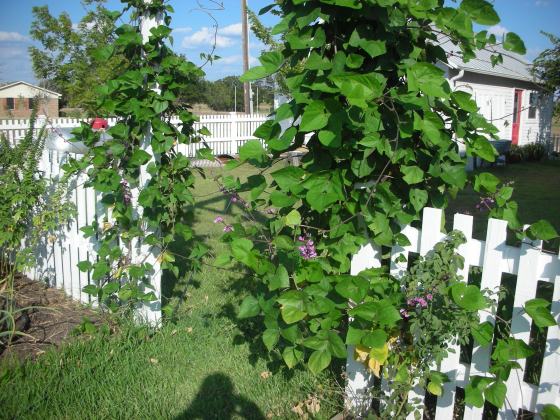
The lovely foliage of the Hyacinth Bean on my trellis

This past spring I was at a garage sale at the home of a truly extraordinary horticulturist named Lorraine.  She and her daughter hold this sale every spring.  In addition to clothes and knick knacks, Lorraine sells plants.  You never know what she is going to have.  Many folks in town know that she can grow anything, so they bring her pots, seeds and cuttings.  She always turns them into beautiful plants that she then sells at ridiculously low prices.  She grows in compost that she makes herself.  She has a green house, the cutest potting shed in town, and a dang fine vegetable garden that she has been tending in the same spot for over 60 years.  She is truly incredible and I hope to someday be just like her.  I really admire her and I never miss her sale.  This year, she had three pots of hyacinth beans that I snatched up and took home.  Those three little four inch pots of hyacinth beans have turned out to be the best $3 I have spent all year!

This year, the first flowers on my hyacinth bean appeared in late July

I planted Lorraine’s starts in May at the base of the trellis that leads to my side yard.  This trellis is over 12’ at the top.  I planted two plants on one side and one on the other.  Since May, those three plants have grown and grown until they almost completely cover this huge trellis.  The foliage is striking and the pinky-purple flower spikes are extraordinary.  The bees, butterflies and wife love them. 

Planting –Plant your seeds outdoors after all danger of frost has passed.  You can also start them inside three or four weeks before the last frost.  Some folks recommend pre-sprouting the seeds in damp paper towels before planting.  However you get them to sprout, be sure and plant them in full sun. Hyacinth bean likes rich, well drained soil.  Water regularly to get them established.  Germination from seed can take about two weeks.  Once the plant starts to grow, provide regular water but do not over water.  They are relatively fast growing and should start producing flowers 45-60 days after germination.

My hyacinth bean bloomed for over a month before it set seeds.  Maybe that was because it was just so hot.  I saw my first flowers in July but I did not see my first seed pods until the first week of September.  The plant is still blooming and it is beginning to get covered in the deep purple, iridescent seeds pods that it is famous for.

The first of the deep purple seed pods appeared last week

Hyacinth beans send out long runners that are perfect for quickly covering a fence, building or trellis. If growing on a fence, they need no support.  To get mine to go up the trellis I tied the tendrils and shoots to the posts of my trellis using a jute-like twine.  Once I had the vines trained over the structure I let them go.  They soon sent out their long inflorescence of magenta flowers that make them so attractive.  The posts of my trellis are 4 ½ feet apart.  The inflorescences of these plants are now so long that you have to push your way through the flowers.

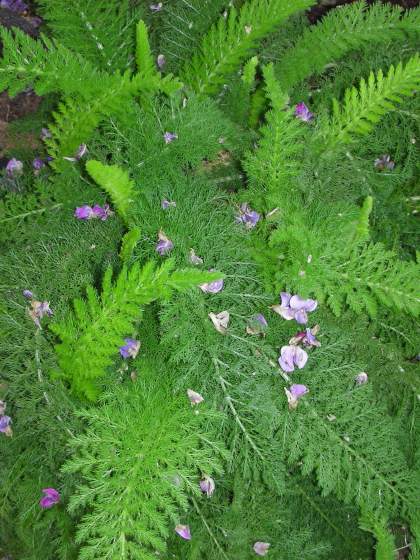
Flower petals from the plant falling onto my yarrow

Harvesting – You can eat hyacinth beans if you harvest them when they are very young.  Many cultures around the world use them extensively in their cooking.  However, if you want to eat them you need to know that are slightly toxic when mature.  So only eat them if you know when to pick them.  In fact, once fully mature, they should not be cooked or ingested at all.

Hyacinth beans are fairly good re-seeders.  Leave them alone and they will come back year after year.  If you want to harvest the seed, wait until the plant has died and then pick the dry, brown seed pods.  Once fully dry, open the seed pod and save the unique black seeds in a cool dry place until next spring.